Summary:
Chapter #0: video tutorial
For this plugin a video tutorial is available, explaining step-by-step the basic setup of a satellite vendor; the author of the video is Salt Peppermint from Salt & Pepper.
Watch the video tutorial here: link.
Chapter #1: overview & setup
! IMPORTANT: The following user manual presents and explains the usage and detailed features of:
- MD Vendor System Plugin – Remote Control version 2.1.0
The user manual for version 2.0.x, compatible with MD Vendor System 4.0.x can be found here.
Remote Control plugin add some very interesting features to MD Vendor System:
- Connect the vendor as client (satellite) to another one (server) which will hold the product in its content;
- Connect the vendor as client (satellite) to a product server which will hold the product in its content;
Installing the plugin is very easy and quick: the owner will only have to drop the plugin script inside the vendor and it will be automatically detected and initialized; a message sent on chat will notify the owner of the successful installation. From that moment, the plugin’s specific features will be available through the “Plugin” sub menu present in the vendor’s owner menu.
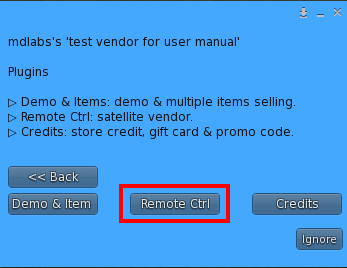
Once the plugin is successfully installed on the vendor the owner can access the plugin’s specific settings using the “Plugins” sub menu that can be found in the owner menu. By clicking on the corresponding ‘Remote Ctrl’ button, the plugin’s specific menu will load, presenting all the available options:
- Client: this buttons is a switch to enable/disable the client mode; by turning it on and performing the connection wizard, the vendor will become a ‘client’ connected to another vendor or product server which will act as ‘server’, hosting the products in its content. More details about this feature in the corresponding chapter.
- Update: this button will search online for plugin’s update and deliver it to the owner, if found.
- Back: this button navigate back to the main menu.
PLEASE NOTE: the plugin is aimed to expand the vendor’s feature, for this reason MD Vendor System ‘core’ script must always be present inside the vendor to use the plugin.
To uninstall the plugin simply remove it from the vendor’s content and the vendor will automatically update, removing the additional features.
Chapter #2: Setup a client vendor
Client mode is a vendor’s particular working mode where the vendor does not holds the products to sell in its content but connects to another vendor or terminal (‘server’) to retrieve the products. The advantages of this setup are obvious: keeping only one copy of your products inside the ‘server’ vendor will reduce the confusion of multiple copies and simplify the maintenance of your products, while also reducing the time required to setup your vendors; moreover, the same ‘server’ vendor can be connected to multiple ‘clients’.
PLEASE NOTE: Whilst the benefits of using client (satellite) vendors are obvious there is also one major downside: client-server communication require more connections and several ‘handshaking’ steps between the client and the server; the success of a purchase and product delivery depends by both client and server status – typically rezzed in different regions.
For reference:
- A client vendor or satellite vendor is an empty vendor, connected to a server; upon purchase, the client requests the server the product’s delivery.
- A server vendor or terminal is a device hosting one or more products and having one or more vendors connected to it as client; the server receives a product delivery request from the client and dispatches the item to the recipient avatar.
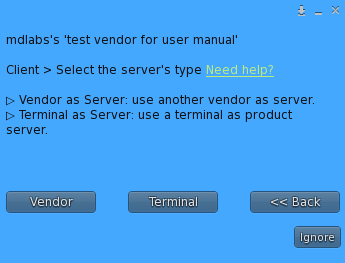
As client, a vendor can be connected to two different type of server:
- Vendor as Server: the client is connected to another vendor running MD Vendor System (‘core’) script and the Remote Control Plugin.
- Terminal as Server: the client is connected to terminal acting as product server and running MD Redelivery Terminal & Product Server Script.
TIP: often using a product server instead of a normal vendor as server is better because a device running the MD Redelivery Terminal & Product Server Script can be used for both redelivery terminal and product server, keeping all the products stored in one place and offering both redelivery and product delivery at the same time.
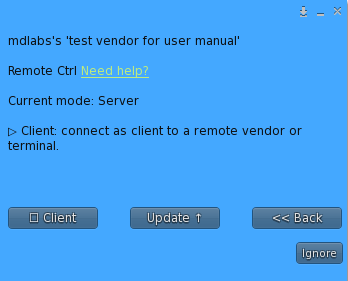
To setup a vendor in client mode, the owner will have to click on the corresponding ‘Client‘ button inside the remote control plugin’s menu, this will start the connection wizard; the procedure to connect a vendor to a server vendor or a server terminal is identical, only targeting a different set of devices. The first step of the setup is picking the type of server to connect to among vendor or terminal.
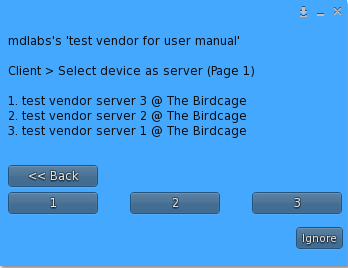
Once the owner has selected the type of device to connect to will be asked to pick a specific vendor or terminal to use as server (step two), depending on the type of device selected in the previous step; in the following example, the owner picked ‘Vendor’ as type of server so a list of all available vendors is shown:
Once the server has been chosen it is necessary to pick one item inside the server which will be sold through the client (step three):
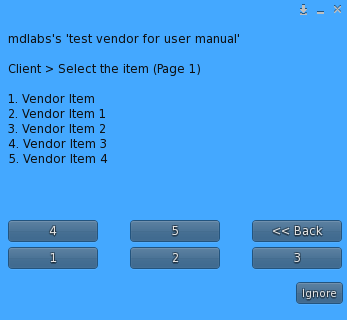
! IMPORTANT: any client – independently by the type of server which is connected to – will be able to manage only one normal item and/or one fatpack item from the server’s content; demo and multiple items will not be considered.
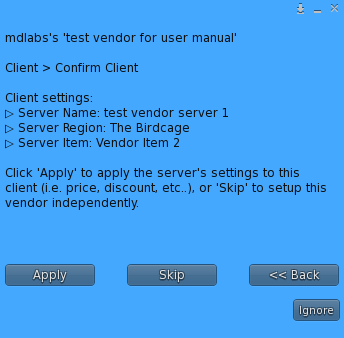
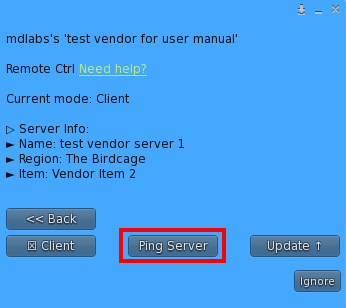
If no errors occur during the connecting between client and server the owner is taken to the last step of the connection process (step four), where is asked to confirm the connection. In this last dialog there is a summary of the client’s connection parameters:
- server name;
- server region;
- server item to deliver;
There is one more feature on this step that can become very useful during the first setup of a client vendor; the owner can in fact decide if replicate the server’s settings on the newly connect client: the settings include price, discount, group mode and any other option. This feature is very useful because it speeds up the setup of clone vendors in specific situations. As example it can be considered the case of a vendor rezzed at a SL event which has to be set up as client and connected to a server vendor which is on the owner’s mainstore; if the client vendor will have to have the same price as the one already working at the mainstore and also the same options it will only be necessary to click on ‘Apply’ on the client’s connection confirmation dialog during the first setup and all the server’s settings will be immediately applied to the client.
PLEASE NOTE: the server’s settings replication on client is available only when connecting a client to a vendor as server, and not when connecting a client to a product server.
Once this last step is done, the connection is complete and a message will be displayed in the local chat; from that moment the vendor will use the item inside the server’s content as products to sell.
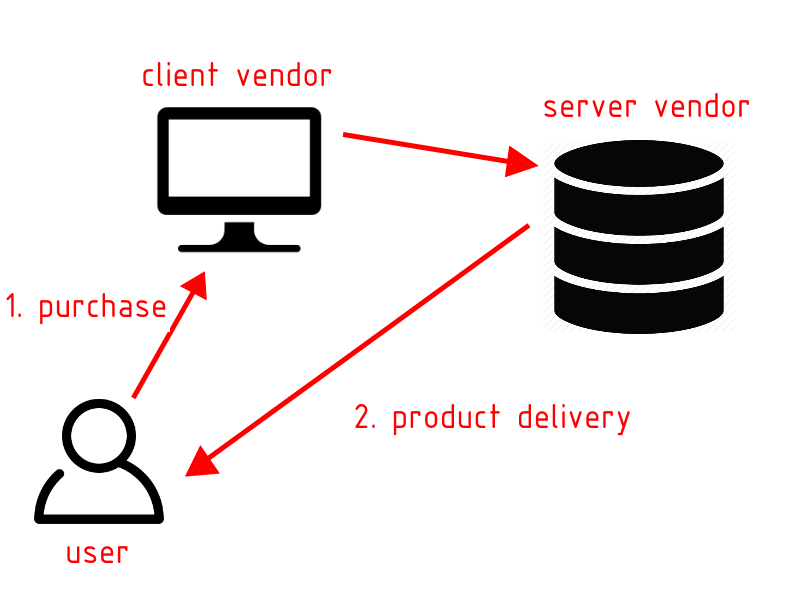
As users will buy or gift a product from the client vendor, the connected server will be contacted and will deliver the product purchased to the desired recipient. The workflow is described in the schema below:
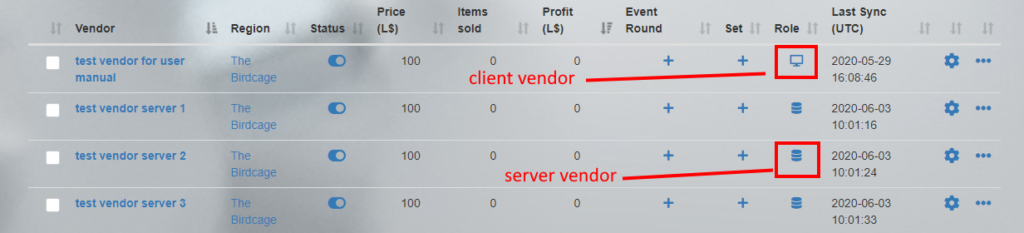
On MD Labs Online Services website, a column called ‘Role’ in the ‘Sales’ tab displays, for every vendor, if it is configured as client or server.
When a vendor is set as client, the remote control plugin’s menu will present one additional button:
- Ping Server: this button will trigger a connection test to check if the vendor server is up and reachable. An message is sent to the owner, with the result of the test.
To disable the client mode from a vendor click the ‘Client’ button: the vendor will be disconnected from the server and will start acting like a ‘normal’ vendor.
To better improve the user experience, an effective delivery method has been implemented: as the user purchases the product the transaction is stored, but the item is flagged as ‘delivered’ only once the server successfully receives the deliver request and the product is sent to the receiver. With this method, if some communication issue arises during the connection to the server or during the product’s delivery, the transaction is stored anyway – giving the user the chance to use the redelivery feature – but will stay flagged as ‘not delivered’; the owner is able to check the delivery status of every transaction on the detail page of the corresponding vendor.
Chapter #2.1: tips to speed up the setup
MD Vendor System Plugin – Remote Control includes a few built-in features aimed to speed up the setup of satellite vendors, whether they are connected to another vendor or a product server; these features are:
- auto-match;
- product suffix;
‘Auto-match‘ is automatically used when the owner is trying to connect a vendor as a client: MD Vendor System Plugin – Remote Control will automatically try to match the client’s vendor name with the server’s info, in order to provide a faster setup. The auto-match is done over:
- the vendor’s name, if the server is a vendor;
- the product’s name, if the server is a product server;
As for example it can be considered a vendor named “Vendor Test” which has to be connected as client:
- When performing a connection to another vendor (server), the plugin will automatically search for a vendor called “Vendor Test”; if found the client is immediately connected, otherwise a list of all eligible server vendors is provided;
- When performing a connection to product server, the plugin will automatically search for an item called “Vendor Test” inside the selected product server; if found the vendor is immediately connected, otherwise a list of all available products is provided;
‘Product Postfix’ (or suffix) is another feature aimed to speed up the client vendor setup; the purpose of this feature is to ‘help’ the auto-match when connecting a client vendor to a product server and the client’s vendor name differs from the server’s product name by a constant string applied as suffix.
As for example it can be considered a vendor named “Vendor Test” which has to be connected as client to a product server in order to deliver the product “Vendor Test (wear to unpack)”. Since the client name – “Vendor Test” – and the product name inside the server – “Vendor Test (wear to unpack)” – are different, the auto-match feature would not be able to automatically understand the relation between the two; here is where the product suffix comes in to help: setting the product suffix to ” (wear to unpack)”, the client will use the vendor’s name, add the suffix and create the final product name to search for. The auto-match feature will do the rest and search for an item called “Vendor Test (wear to unpack)” inside the selected product server; if found the vendor is immediately connected, otherwise a list of all available products is provided;
The owner can set the product suffix from the MD Labs Online Services website under the ‘Advanced Settings’ area which can be found into the ‘Store Management’ tab.
PLEASE NOTE: the product suffix is a store-wide setting and once selected and applied it will be always used the same suffix to speed up the setup of all vendors connecting to a product server.
2020 MD Labs ©