Summary:
- Chapter #1: Overview & Setup
- Chapter #2: Store Credit
- Chapter #3: Gift Card
- Chapter #4: Use a Gift Card
- Chapter #5: Promo Codes
Chapter #1: Overview & Setup
! IMPORTANT: The following user manual presents and explains the usage and detailed features of:
- MD Vendor System Plugin – Store Credit & Gift Card version 2.1.0
The user manual for version 2.0.x, compatible with MD Vendor System 4.0.x can be found here.
Store Credit & Gift Card plugin add the following features to MD Vendor System:
- Toggle store credit as payment method on the vendors;
- Toggle gift cards as payment method on the vendors;
- Create store’s gift card to sell and use with the dedicated MD Gift Card Script;
- Create promo codes, with specific discount % and validity rules, to be used as payment method on the vendors;
- Assign a reward in store credits for each purchase, with different percentages among group members and non-group members;
- Toggle the possibility to use store credits or gift card credits to purchase gifts;
Installing the plugin is very easy and quick: the owner will only have to drop the plugin script inside the vendor and it will be automatically detected and initialized; a message sent on chat will notify the owner of the successful installation. From that moment, the plugin’s specific features will be available through the “Plugin” sub menu present in the vendor’s owner menu.
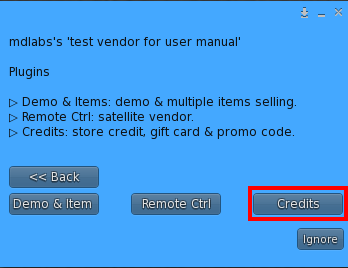
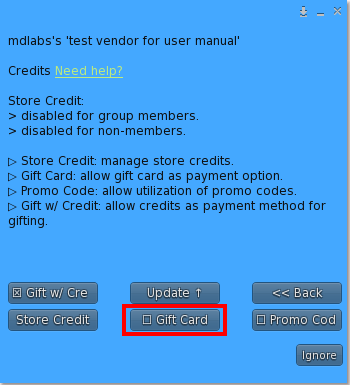
By clicking on the corresponding ‘Credits’ button, the plugin’s specific menu will load, presenting all the available options:
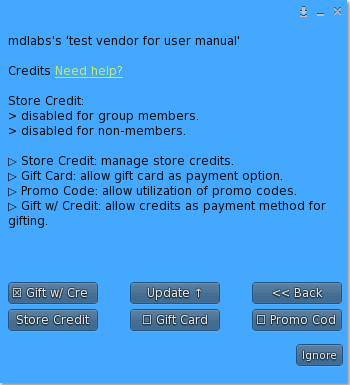
- Store Credit: opens the store credit sub-menu where the owner can toggle the store credits as payment method for the selected vendor and select a percentage of the purchase that will be converted in store credits. More details about this feature in the corresponding chapter.
- Gift Card: activates/deactivates gift card payment method for the selected vendor. More details about this feature in the corresponding chapter.
- Promo Code: activates/deactivates the promo code payment method for the selected vendor. More details about this feature in the corresponding chapter.
- Gift w/ Credit: toggle the ability to use store credits or gift card credits as payment method for gifts;
- Update: this button will search online for plugin’s update and deliver it to the owner, if found.
- Back: this button navigate back to the main menu.
PLEASE NOTE: the plugin is aimed to expand the vendor’s feature, for this reason MD Vendor System ‘core’ script must always be present inside the vendor to use the plugin.
To uninstall the plugin simply remove it from the vendor’s content and the vendor will automatically update, removing the additional features.
Chapter #2: Store Credit
Store credits are virtual coins offered by the store owner to customers that can be used to buy other products from the same store; the users earn store credits by purchasing products at the store using L$ on enabled vendors.
MD Vendor System allows two different levels of store credits:
- store credits as reward for group members;
- store credits as reward for non-group members;
The owner can decide if enable both levels or just one and – for each level – set a specific percentage of the product’s cost that will be converted in store credits.
Clicking on the ‘Store Credit’ button in the plugin menu will open the Store Credits sub-menu:
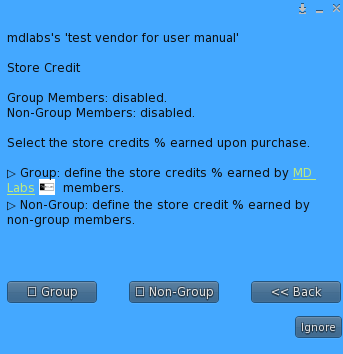
There are two main options:
- Group: with this toggle the owner can enable the store credits for group members, defining the percentage of the product’s cost that will be transformed into store credits;
- Non-Group: with this toggle the owner can enable the store credits for non-group members, defining the percentage of the product’s cost that will be transformed into store credits;
PLEASE NOTE: when enabling the store credits for group members, the group the vendor is set to will be used. If the group is wrong, the owner should right click on the vendor, select ‘Edit’ from the drop down menu and change the group which is into the ‘General’ tab.
! IMPORTANT: by default, 1 store credit = 1 L$.
Once the store credit feature is enable, for every purchase paid (entirely or partially) with L$, an amount of store credits are added to the user’s balance; the number of store credit to add is calculated as the submitted conversion percentage of the item’s price paid using L$. For example, if the cost of the purchased item is 300L$ and the store credit percentage is 10%, 30 store credits will be added to the user’s balance.
The store credits are added immediately after the purchase and the users are able to check their current balance anytime, by clicking on the ‘View Balance‘ button in the vendor’s users menu.
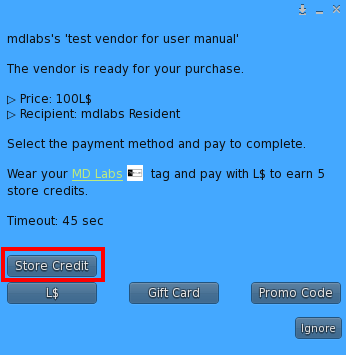
MD Vendor System supports also ‘mixed’ payments: a mixed payment (in this case) is made partially by store credits and partially by L$. This scenario can occur if the user selects store credits as payment option but doesn’t have enough credits to purchase the item. In this specific case, MD Vendor System will prompt the user a window asking if abort the purchase process or complete it using L$ to pay the remaining cost of the item.
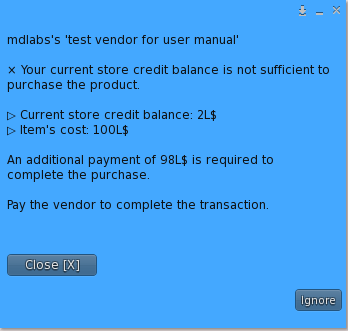
If the user decides to complete the purchase using the L$ for the remaining amount, the vendor will set itself in ‘pay mode’, waiting for the payment; once it’s correctly performed, the product will be delivered and the purchase correctly finalized. In this case, the payment method for this transaction on MD Labs Online Services will be “Store Credit & L$“.
! IMPORTANT: in case of mixed payment with store credits and L$, the amount of store credits to add to the user’s balance is calculated ONLY on the part paid using the L$ balance.
Chapter #3: Gift Card
As for store credit, gift card payment option can be activated by the owner clicking on the corresponding toggle ‘Gift Card‘ in the plugin’s menu. No particular setup is required to activate this feature.
! IMPORTANT: by default, 1 gift card credit = 1 L$.
Once the requested value is submitted, the gift card feature will be immediately activated, adding the payment option in the user’s menu; users are able to check their current balance anytime, by clicking on the ‘View Balance‘ button in the vendor’s users menu.
As for store credit, MD Vendor System supports ‘mixed’ payments also or gift cards: if the user selects gift card as payment option but doesn’t have enough credits to purchase the item, MD Vendor System will prompt the user a window asking if abort the purchase process or complete it using L$ to pay the remaining cost of the item.
If the user decides to complete the purchase using the L$ for the remaining amount, the vendor will set itself in ‘pay mode’, waiting for the payment; once it’s correctly performed, the product will be delivered and the purchase correctly finalized. In this case, the payment method for this transaction on MD Labs Online Services will be “Gift Card & L$“.
! IMPORTANT: in case of mixed payment with gift card and L$ (if the store credit feature is active) the amount of store credits to add to the user’s balance is calculated ONLY on the part paid using the L$ balance.
Inside the Store Credit & Gift Card Plugin pack there is also another pack included: MD Gift Card Creator Kit: it contains the script & tools required to create the gift cards that will be sold and used by customers.
! IMPORTANT: the only gift cards compatible with MD Vendor System are the ones using MD Gift Card Script, other gift cards using different systems will NOT work!
In the next chapter is described how to setup a gift card step by step, using MD Gift Card Creator Kit.
Chapter #3.1: setup a third-party Gift Card
The MD Gift Card Creator Kit contains the script & tools to required to create gift cards to use along with MD Vendor System. This pack is provided with Store Credit & Gift Card Plugin and comes boxed:
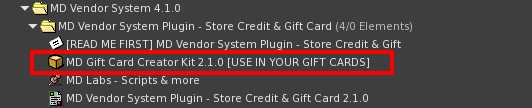
Once unpacked, the content of the creator kit will look like this:

The two important item on this creator kit are:
- MD Gift Card Script: this is the script required by any gift card to work. It comes with copy&transf permissions and can be dropped either on a prim or inside a HUD.
- MD Gift Card Template HUD (Full Perm): this HUD comes with full permissions and represents a template HUD for creating MD Gift Cards.
PLEASE NOTE: this chapter will explain the step-to-step guide for creating generic gift cards using ONLY the MD Gift Card Script. This means the gift cards created can be either object to rez/attach or third-party HUD; if you want to read how to create gift cards using the template HUD included, please refer to the next chapter.
The setup of a generic gift card is simple and quick and can be divided into three main steps:
- Change MD Gift Card Script’s next owner permissions;
- Drop MD Gift Card Script inside an object that will work as gift card;
- Configure MD Gift Card Script’s amount and additional features;
As first step (step 1), a change on the next owner’s permissions is required: as mentioned before, MD Gift Card Script comes with copy&transf permissions, but in order to be used, the next owner’s permissions MUST be set to transfer only. This because a single gift card will be transfer only, so a user can gift and pass it to another, but not take a copy of it.
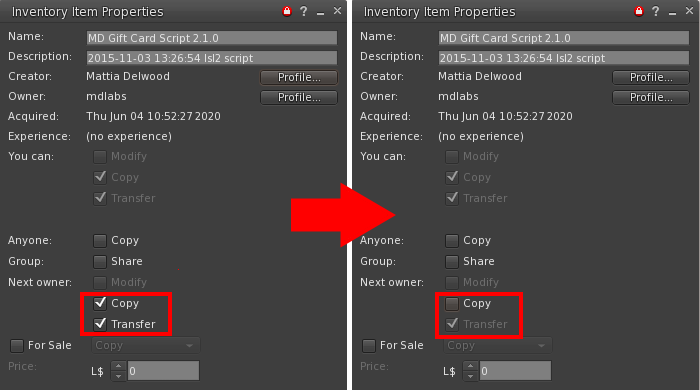
Once done with this first step, the owner must rez the object that will be used as gift card on the ground and drop the MD Gift Card Script inside the object’s content (step 2); if the script is dropped with the wrong permissions will automatically delete itself and another copy (with the right permissions) will have to be dropped. Once the script is inside the object and rezzed on the ground, this step is complete.
! IMPORTANT: the object/gift card’s name cannot end with a number; this is due to security reasons and every gift card which name ends with a number will be automatically invalidated by the system. This means gift cards named “Gift Card 500” are considered invalid.
Clicking on the object/gift card rezzed on the ground a configuration menu will be presented to the owner, containing several options:
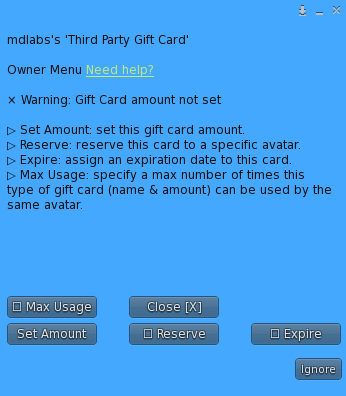
- Set amount: this button will ask the owner to submit the gift card’s amount in L$. This is the only value required during this configuration step.
- Reserve: this feature allows the owner to reserve the gift card to a specific avatar, whom will be the only one able to use it and redeem the gift card. Once clicked the ‘Reserve’ toggle, owner will be asked to provide the avatar key (uuid) or name; once the reserve feature is enabled, clicking on the ‘Reserve’ button again will toggle it off.
- Expire: this feature allows the owner to set an expiration date for the gift card, after which the gift card will not be usable and automatically invalidated by the system. Once clicked on the ‘Expire’ button, the owner is asked to provide the expire date in YYYY-MM-DD format (i.e. 2020-06-24); the gift card will automatically expire at 23:59:59 SLT of the defined day.
- Max Usage: this feature allows the owner to set a maximum number of times a gift card’s type can be used by the same avatar. The gift card type is defined by the combination of the card’s name and amount. This means, for example, that a gift card called ‘Gift Card 500L’ with amount of 500 L$ is considered a ‘type’ of gift card and all the copies of the same card will have the same type.
By clicking ‘set amount’ and providing a valid number greater than 0, the gift card’s value will be set to that corresponding amount in L$ (step 3). At this point the gift card’s setup is complete and the object can be picked up in inventory, ready to be sold. Clicking ‘set amount’ again, the owner can change the gift card’s amount any time before selling it.
! IMPORTANT: after setting or changing the gift card’s amount, the owner MUST NOT change the object/prims’s description, as some relevant information are stored that – if changed – could lead to the gift card break.
Customers purchasing the gift card will be able to either wear or rez the gift card on the ground to get a menu where they will be asked if ‘use’ the gift card, adding the amount to their balance and making the gift card unusable. As additional feature, an animation or pose can be dropped inside the gift card along with the MD Gift Card Script: this animation will be played automatically every time the user will wear the gift card.
The gift card is now ready to be sold.
TIP: MD Vendor System can be easily used also to sell gift cards, handling them as ‘normal’ items (1 per vendor). This way owner will have a complete track of the income made by gift cards, integrated with MD Labs Online Services as well.
Chapter #3.2: Setup a gift card with MD Gift Card Template HUD
This chapter explain how to create a gift card HUD (Heads-up displays) using the template included inside the MD Gift Card Creator Kit.
Once unpacked, the content of the creator kit will look like this:
The object called ‘MD Gift Card Template HUD (Full Perm)’ is the HUD itself that will be used to create the gift cards. This HUD comes empty and with full permissions so to be highly customizable: it will only require the MD Gift Card Script to work.
The setup of the MD Gift Card Template HUD can be divided into few main steps:
- Rez the MD Gift Card Template HUD (Full Perm) on the ground;
- Change the MD Gift Card Template HUD (Full Perm) next owner permissions to transfer-only;
- Change the MD Gift Card Script next owner permissions to transfer-only;
- Drop the MD Gift Card Script inside the MD Gift Card Template HUD (Full Perm);
- Click on the MD Gift Card Template HUD (Full Perm) to setup the gift card;
- Customize the MD Gift Card Template HUD (Full Perm) with personal texture and logo;
- Take the MD Gift Card Template HUD (Full Perm) in inventory and rename it.
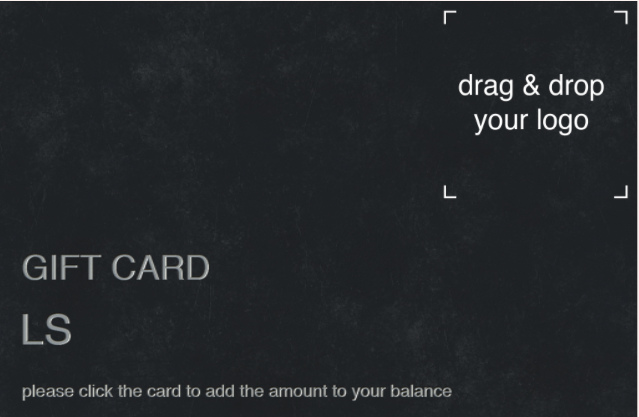
(1) As first step, the MD Gift Card Template HUD (Full Perm) has to be rezzed on the ground; once done it will look like this:
(2) Once rezzed, the first thing to do is change the gift card template next owner permissions to transfer-only:
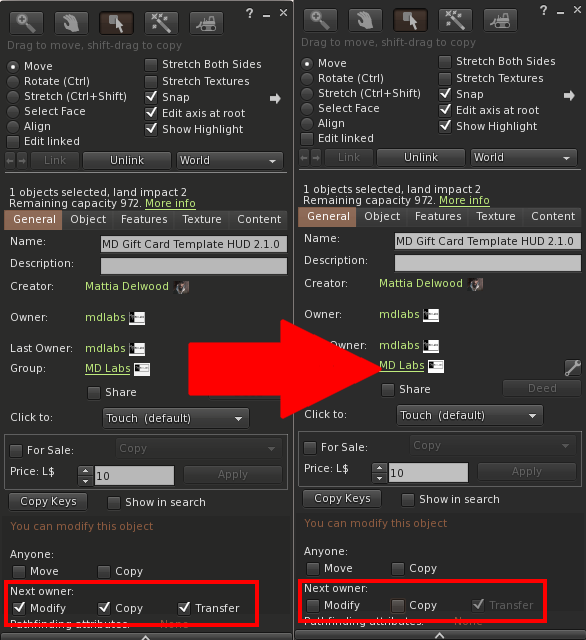
(3) The MD Gift Card Script – included inside the MD Gift Card Creator Kit – needs to have its next owner permissions changed to transfer-only as well:
(4) Once both MD Gift Card Template HUD (Full Perm) and MD Gift Card Script next owner permissions are set to transfer-only, the MD Gift Card Script has to be dropped inside the MD Gift Card Template HUD (Full Perm). At this point, the MD Gift Card Script will perform a permissions check over itself and on the HUD; if wrong permissions are found, the script will print a warning message on the local chat before deleting itself.
(5) As both MD Gift Card Template HUD (Full Perm) and MD Gift Card Script next owner permissions are set up correctly, it will be possible to setup the gift card’s amount and additional options through the configuration menu:
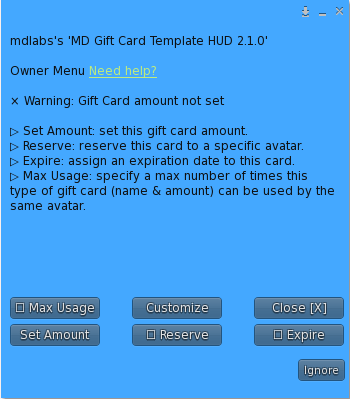
- Set amount: this button will ask the owner to submit the gift card’s amount in L$. This is the only value required during this configuration step.
- Reserve: this feature allows the owner to reserve the gift card to a specific avatar, whom will be the only one able to use it and redeem the gift card. Once clicked the ‘Reserve’ toggle, owner will be asked to provide the avatar key (uuid) or name; once the reserve feature is enabled, clicking on the ‘Reserve’ button again will toggle it off.
- Expire: this feature allows the owner to set an expiration date for the gift card, after which the gift card will not be usable and automatically invalidated by the system. Once clicked on the ‘Expire’ button, the owner is asked to provide the expire date in YYYY-MM-DD format (i.e. 2020-06-24); the gift card will automatically expire at 23:59:59 SLT of the defined day.
- Max Usage: this feature allows the owner to set a maximum number of times a gift card’s type can be used by the same avatar. The gift card type is defined by the combination of the card’s name and amount. This means, for example, that a gift card called ‘Gift Card 500L’ with amount of 500 L$ is considered a ‘type’ of gift card and all the copies of the same card will have the same type.
- Customize: this button will lead to another sub-menu aimed to customize the gift card’s appearance by changing the card’s amount text color and the font;
! IMPORTANT: the gift card setup has to be done with the MD Gift Card Template HUD (Full Perm) rezzed on the ground and not attached. Moreover, after setting or changing the gift card’s amount, the owner MUST NOT change the HUD’s description, as some relevant information are stored that – if changed – could lead to the gift card break.
(6) It’s now possible to customize the MD Gift Card Template HUD (Full Perm)’s appearance by dropping a texture for the background and for the store logo.
Customers purchasing the gift card will be able to wear the HUD and be able to ‘use‘ the gift card, adding the amount to their balance and making the gift card unusable. As additional feature, an animation or pose can be dropped inside the gift card along with the MD Gift Card Script: this animation will be played automatically every time the user will wear the gift card.
TIP: MD Vendor System can be easily used also to sell gift cards, handling them as ‘normal’ items (1 per vendor). This way owner will have a complete track of the income made by gift cards, integrated with MD Labs Online Services as well.
Chapter #4: use a gift card
These few lines will explain you how to use a gift card, received as gift or bought.
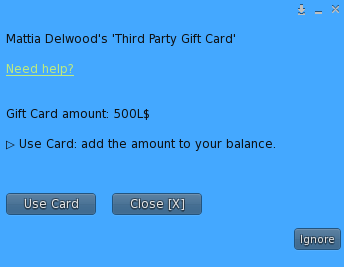
As first thing wear the gift card by double clicking on it from the inventory, or right clicking and select ‘Add‘: a menu will appear, like the one reported below:
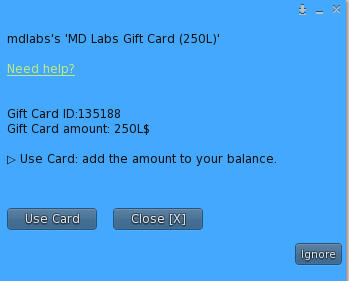
In the dialog it is reported gift card’s amount in L$ and there is only one possible option:
- Use Card: this button will start the gift card’s utilization process, which will add the gift card’s amount to your balance.
By clicking on ‘Use Card‘, a second dialog will open asking for confirmation:

By clicking on ‘Yes‘, the gift card’s amount will be added to your current balance and the gift card will not be valid anymore; you can now detach the gift card and delete it.
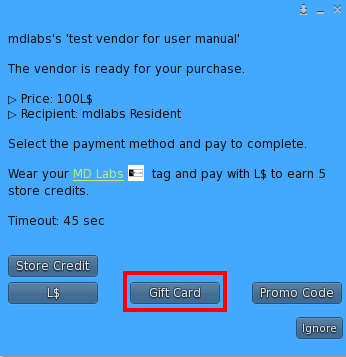
You can now use your credit simply by clicking on a vendor which supports gift card credit as payment, selecting if buy or gift the product and using ‘Gift Card‘ as payment method. The product’s cost will be subtracted from your gift card’s credit balance. You can check your balance anytime by clicking on a vendor which supports gift card credit as payment and selecting ‘View Balance‘.
Chapter #7: promo codes
A promo code is a special code which is associated to a discount, whether in a percentage or a specific amount in L$. MD Vendor System – Store Credit & Gift Card Plugin allow the owner to create as many promo codes as wanted, each one associated to a specific discount, that can be distributed and utilized during the purchase process. When purchasing from a vendor having the promo code feature enabled, in fact, the user will be asked to submit a promo code which – if valid – will apply the specific discount on the current transaction.
When creating a promo code, there are some basic settings to setup:
- The promo code MUST be 3 to 8 characters long;
- The promo code MUST contain only alphanumeric characters (a-z, A-Z, 0-9);
- The promo code MUST be associated to a discount:
- Using a percentage (%), between 1 and 99;
- Using a fixed amount (L$);
- The promo code’s utilization MUST be associated to one of the following:
- Everyone: everyone having the promo code can use it and benefit of the discount;
- Group members: only members of a specific group are able to use the promo code and benefit of the discount;
- Specific avatar: only one defined avatar is able to use the promo code and benefit of the discount;
Along with these basic settings there are also several optional ones, aimed to customize even more the promo code. Those settings aren’t mandatory for the promo code to be created and used, but can enrich the whole experience.
- Promo code utilization limit: define how many times a single avatar can use a specific promo code;
- Promo code validity period: a validity start time and end time (in SLT) defining a period when the promo code is accepted by the vendors;
- Promo code vendor: associate the promo code to a specific vendor, which will be the only one accepting the code;
- Promo code region: similar to the previous one, associate the promo code to a specific region. Only the vendors in the region will accept the code;
Promo Codes are managed through the MD Labs Online Services website, inside the MD Vendor System product page. A tab called ‘Promo Codes‘ is present, containing a list of all the codes with all the features and the button to create a new one.
IMPORTANT: The promo code subject is widely explained in the corresponding chapter on MD Vendor System User Manual, so refer there for any further detail and explanation about how to create and manage promo codes.
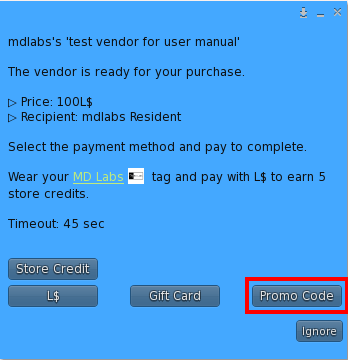
After creating one or more promo codes through MD Labs Online Services website to allow users to use them is necessary to enable the corresponding option on vendors through the Store Credit & Gift Card Plugin, clicking on the corresponding ‘Promo Code‘ toggle inside the plugin’s menu.
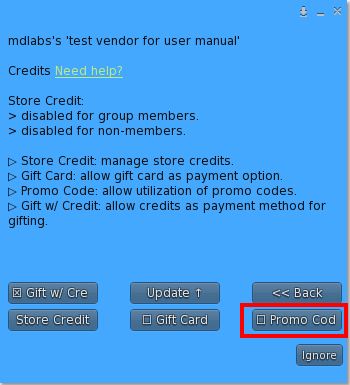
When the customers click a vendor having the promo code feature enable, a ‘Promo Code‘ button will appear among the payment methods; by clicking they will be asked to submit the promo code and – if the code is valid and compliant to all the restrictions – the associated discount will be applied to the product’s cost.
2020 MD Labs ©