Quick summary:
-
-
Chapter #0: Initial notes & basic informations
-
Chapter #1: What’s inside the pack – MD Vendor System components
-
Chapter #2: First setup
-
Chapter #3: Owner menu
-
Chapter #4: Basic usage – setup a simple vendor
-
Chapter #5: Basic usage – interact with a vendor for sale
-
Chapter #6: Vendor’s options
-
Chapter #7: “Apply to All” – setup multiple vendors at once
-
Chapter #8: MD Vendor System plugins – overview
-
Chapter #9: Redelivery Terminal & Product Server
-
Chapter #10: User menu
-
Chapter #11: MD Labs Online Services
-
-
-
Chapter #11.1: Register an account and activate the product
-
Chapter #11.2: MD Vendor System Homepage – a quick overview
-
Chapter #11.3: SL Marketplace integration
-
Chapter #11.4: Vendors tab
-
Chapter #11.5: Vendors tab – Additional operations
-
Chapter #11.6: Vendor’s detail – Transactions
-
Chapter #11.7: Vendor’s detail – Adding a transaction manually
-
Chapter #11.8: Vendor’s detail – Settings
-
Chapter #11.9: Events tab
-
Chapter #11.10: Redelivery Terminal & Product Server tab
-
Chapter #11.11: Store Credit & Gift Card tab
-
Chapter #11.12: Promo Codes tab
-
Chapter #11.13: Presets tab
-
Chapter #11.14: Managers tab
-
Chapter #11.15: Blacklist tab
-
Chapter #11.16: Archived tab
-
Chapter #11.17: Store Management tab
-
Chapter #11.18: Importing data into MD Vendor System
-
-
-
Chapter #0: Initial notes & basic informations
MD Vendor System is a complete vending solution, built with a modular (or plugin) architecture, easy to use and full of features. Its specific modular design lets the owner add or remove additional functions very quickly and easily, while making the whole system able to adapt to every situation and need.
MD Vendor System is composed by one main ‘core’ script and several different plugin scripts, each of them adding different features:
- Demo & Multiple Items: this plugin adds the ability to manage one or more demo items, one fatpack item and multiple products, which customers will be able to buy or gift.
- Remote Control: this plugin adds the ability to set a vendor as ‘client’ (‘satellite vendor’) connected to another vendor (server) or to a product server.
- Store Credit & Gift Card: this plugin adds the store credit, gift card and promo codes option as payment method.
- Poses: this plugin turns any compatible pose displayer into a pose vendor with advanced features.
The main (‘core’) script alone is able to manage and sell one product item, with its specific price.
Also, the main script alone provides all the most common options such as:
- buy and gift features;
- profit split;
- stock quantity limit;
- group mode;
- discounts;
- direct pay;
- and much more
PLEASE NOTE: the main script is always required for the vendor to work.
The basic version of MD Vendor System sold consist of the ‘core’ script and the demo & multiple items plugin, while the other plugins are sold separately or present inside the full pack version sold.
! IMPORTANT: The following user manual presents and explains the usage and detailed features of:
- MD Vendor System (‘core’) version 4.0.2
- Demo & Multiple Items Plugin version 2.0.0
The other plugins have dedicated user manual pages:
- The Remote Control plugin user manual is available here;
- The Store Credit & Gift Card plugin user manual is available here;
- The Poses plugin user manual is available here;
Chapter #1: what’s inside the pack – MD Vendor System components
Depending on which version of MD Vendor System is purchased (standard version vs Full Pack version), the system will be composed by several parts.
MD Vendor System presents the following components:
- MD Vendor System 4.x.x: this is the main ‘core’ vendor system script;
- MD Vendor System Plugin – Demo & Multiple Items 2.x.x: this is the plugin enabling demo, fatpack and multiple items selling;
- [READ ME FIRST] MD Vendor System – Quick Start: a notecard, containing some basic information about the product, as well as F.A.Q. and links to user manuals;
- [ADD ON] MD Vendor System Online Services HUD 0.8: this HUD allows the owner to register an account to MD Labs Online Services, a companion website where it is possible to organize, manage and interact with all the rezzed vendors;
- [Auto Updater] MD Vendor System 4.x.x: this tool is an auto updater for previous installations of MD Vendor System. The auto updater simply runs through all the rezzed vendors containing an older version of MD Vendor System and automatically updates them, replacing the old script with the new ones;
MD Vendor System (Full Pack) presents the following components:
- MD Vendor System 4.x.x: this is the main ‘core’ vendor system script;
- MD Vendor System Plugin – Demo & Multiple Items 2.x.x: this is the plugin enabling demo, fatpack and multiple items selling;
- MD Vendor System Plugin – Remote Control 2.x.x: this plugin allows the vendors to connect as clients (satellites) to another vendor or product server;
- MD Vendor System Plugin – Store Credit & Gift Card 2.x.x: this plugins allows store credits and gift card as payment option. It also includes the gift card script and a full perm template HUD for creating custom gift cards;
- MD Vendor System Plugin – Poses 2.x.x: this plugin turns any compatible pose displayer into a pose vendor, able to preview the poses and let customers buy them directly. It comes also with a full perm pose stand;
- MD Redelivery Terminal & Product Server Script 3.x.x: this content is not a plugin for MD Vendor System, but a separate device working as redelivery terminal and also as product server for client vendors. It includes some advanced features such as mass redelivery.
- [READ ME FIRST] MD Vendor System – Quick Start: a notecard, containing some basic information about the product, as well as F.A.Q. and links to user manuals;
- [ADD ON] MD Vendor System Online Services HUD 0.8: this HUD allows the owner to register an account to MD Labs Online Services, a companion website where it is possible to organize, manage and interact with all the rezzed vendors;
- [Auto Updater] MD Vendor System 4.x.x: this tool is an auto updater for previous installations of MD Vendor System. The auto updater simply runs through all the rezzed vendors containing an older version of MD Vendor System and automatically updates them, replacing the old script with the new ones;
Chapter #2: first setup
Once received the MD Vendor System – boxed or just as folder – inside there will be two main scripts:
- MD Vendor System
- MD Vendor System Plugin – Demo & Multiple Items
The first one is the ‘core’ script, the vendor itself while the second one is a plugin for handling demo and multiple items; while the first is necessary for the vendor to work correctly, the plugin can be added and removed anytime, without compromising the vendor’s functionality.
As first step, the MD Vendor System script must be dropped inside the object/prim used as vendor; if this is the first setup for that specific vendor (and not a simple vendor reset), it’s highly recommended to rename the vendor with it’s final name in order to avoid having multiple vendors with the same name, which could lead to malfunctions. Also, it is important to remember to avoid setup a new vendor starting from a copy of an existing one created via drag©.
The second step is a simple click on the vendor, that will prompt the debit permission request, required by the script in order to handle the split system and the refund one. Clicking on “next” and granting the permission will complete this step.
Once granted the debit permission, the vendor will automatically connect to MD Labs’s server and try to restore the existing settings; this feature – which won’t be useful during a first setup – becomes very handy in case of a vendor reset, when the settings are saved and the whole vendor’s status will be automatically restored.
During a first setup, at this point the vendor is ready to be configured and not yet ready to be used. If a normal user – different from the owner – clicks on the vendor now, a message will be sent saying the vendor is not yet ready for work. When the owner clicks on the vendor, a dialog menu will appear called “owner menu”: this dialog is visible only by the owner and allow to enter script’s configuration menus.
The basic setup for the vendor is now done, but the configuration is not over yet.
Chapter #2.1: Why script needs debit permission
To complete the vendor’s setup the owner has to grant the script the debit permission; this allows the script to take moneys directly from the owner’s account. Even though this may sound somehow dangerous the permission is necessary to enable some advanced script’s features; at the same time there are only a few limited occurrences when this permission will be used.
Here are listed all the reasons why the script could use the debit permission:
- Split L$: when this feature is enable, then a money transfer is required from the owner’s account to the splitter’s one.
- Group only: when this feature is enable and a user pays the vendor without having the right group tag, then a refund of the amount paid is performed.
- Discount (for group members): when the vendor is configured to apply a discount if a customer is wearing a specific group tag while purchasing and the user pays the vendor directly using the left click, then a refund of the discount amount in L$ is calculated and refunded to the payer avatar.
- SL issue/hack: when for some SL issue (i.e. heavy lag) or hack attempt the amount paid do not match with the price set by the owner, then the transaction is canceled and a refund of the amount paid is performed.
- Event: if the vendor is associated to an event having a specific start and/or end time and a customer pays the vendor outside the working period, then a refund of the amount paid is performed.
- Vendor already in use (busy): when the vendor is already in use and a customer (same or different) pays the vendor again, then a refund of the amount paid is performed.
- Double purchase: when the ‘avoid double purchases’ option is enabled on the vendor and a user purchases a product that was previously purchased from the same avatar, then the transaction is canceled and the payer avatar is refunded by the amount paid.
- Blacklist: if the payer avatar or the receiver avatar are blacklisted, then the transaction is canceled and the payer avatar is refunded by the amount paid.
Chapter #3: owner menu
When the owner enters the owner menu a dialog will appear: from this window the most important options are accessible and ready to be customized.
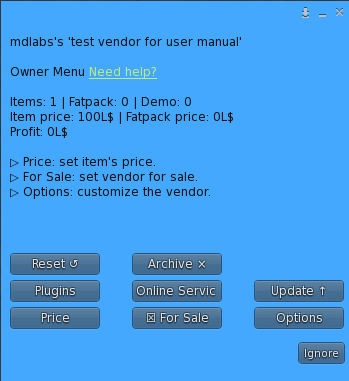
This owner menu – accessible by the vendor system owner only – is divided in many sections, some of them leading into sub menus:
- Price: this first feature is used to set the item price in L$; clicking on the “Price” button will open a textbox where the owner will have to submit the price in L$: only integer values bigger than zero are allowed.
- For Sale: this button acts like a switch, setting the vendor and all its content for sale or not. Setting the vendor for sale is a mandatory step to complete the setup; in order to be set for sale, the vendor should match some criteria:
- Must contain at least one item;
- The item’s price must be set;
If the above conditions are verified, clicking the “For Sale” button will set the vendor for sale, giving users the chance to purchase the products. Clicking another time the button will set the vendor to not for sale state and users won’t be able to interact with the vendor.
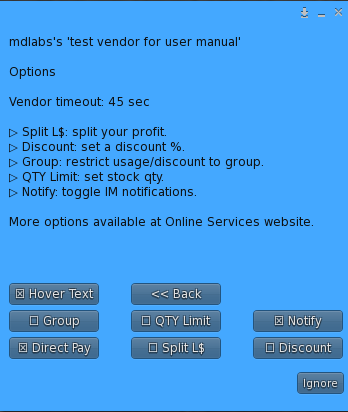
- Options: this sub menu groups together a primary set of options – the most useful ones – that aim to make this product as flexible as possible. The feature present in this menu are:
- direct pay;
- profit split;
- discount;
- group mode;
- limited stock quantity;
- notifications;
- hover text;
The detail of each feature will be explained in the options chapter.
- Plugins: this button leads to the plugins sub menu, where all the installed plugins are listed; for each plugin there is a dedicated menu where the owner can configure the additional features. The details for configuring and using each plugin can be found in the corresponding chapters.
- Online Services: opens the MD Labs Online Services website, where the owner can interact with all the rezzed vendors. Details about this feature can be found in the corresponding chapter.
- Update: this button starts the update module, which will look online for a new update of the product and – if found – deliver it to the owner.
- Reset: this button will reset the vendor.
- Archive: this button triggers a specific feature for vendors which are not used anymore; by archiving, the vendor will be removed from in-world keeping all the it’s statistics and transactions accessible via the MD Labs Online Services web page. This will allow customers to request redeliveries, while helping store owners to keep their data sorted and organized deleting unused vendors.
Chapter #4: basic usage – setup a simple vendor
This chapter is meant to explain the basic steps to setup a simple vendor in its most basic configuration: a single product vendor allowing both buy and gift options for users. The setup procedure consists in just a few and easy steps:
- Rez the object to use as vendor and make sure to have mod permissions for it;
- Drop the MD Vendor System script inside the rezzed vendor object;
- A “touch to setup” hover text will appear over the vendor. At this time is a best practice to rename the vendor with an unique name;
- Touching the vendor will prompt the debit permission request dialog: once granted the vendor will automatically finish the initialization process;
- A “not for sale” hover text will appear over the vendor, stating that the vendor is not yet ready to be set for sale;
- Drop the item product that users will be able to purchase inside the vendor’s content, keeping in mind the following criteria:
- the product must be an object;
- if the owner does not have transfer permission on an item it will be ignored and users won’t be able to purchase it;
- if owner does not have copy permission on an item it will be considered, but a warning message is sent to remind the owner the only available copy of the item will be given to the first user purchasing it.
- Once the item is dropped click on the vendor to access the owner menu, then select “Price” to set the product’s cost;
- Inside the textbox submit the item’s cost in L$, keeping in mind that the minimum item’s cost allowed is 1 L$;
- Click the “For Sale” button in the owner menu to set the vendor for sale, allowing customers to purchase the product;
- The vendor is now setup and working correctly;
In the next chapter is explained how to interact with a vendor once its set for sale.
Chapter #5: basic usage – interact with a vendor for sale
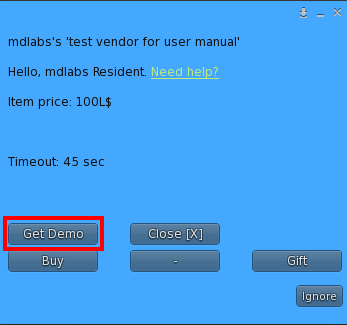
Once a vendor is correctly setup and set for sale will have the “direct pay” option enabled by default, presenting the pay icon  when moving the mouse over the vendor. This feature allows users and owner to interact with the vendor in two different ways:
- Left-clicking on the vendor opens the default Second Life quick pay dialog: in this case paying the vendor will make users purchase the item for themselves;
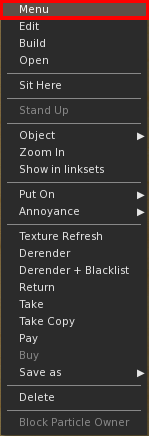
- Right-clicking on the vendor and then selecting “Menu” from the drop down menu takes the users to the user menu:
- if users select “Buy” as action they will be asked to pay the vendor the item’s cost within a certain time defined by the vendor’s timeout. Once the vendor is paid correctly the product is immediately delivered to the user as inventory offer;
- If users select “Gift” as action they will be asked to provide the name or key (UUID) of the recipient avatar. Once a valid avatar name is submitted, the process will run similarly to the one “Buy” one: user will in fact be asked to pay the vendor within the defined time to complete the transaction. The purchased item will be immediately sent to the receiver avatar as inventory offer along with an instant message notifying the gift just received.
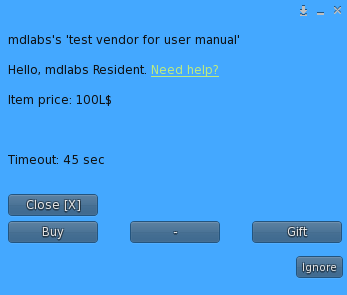
In both ways if the timeout is reached the operation will be canceled and the user will have to start the process again.
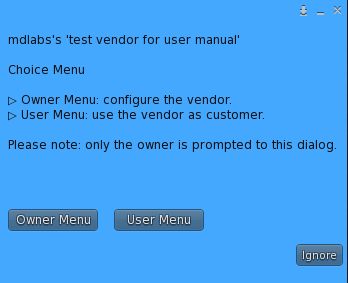
PLEASE NOTE: when the vendor’s owner tries to access the menu via right click>menu, a custom dialog called “Choice Menu” will appear. This window – accessible by the owner only – presents two main choices:
- Owner Menu: allow the owner access the vendor’s owner menu – described in chapter #3 – to manage and configure the vendor;
- User Menu: allow the owner access the vendor’s user menu – described above in this chapter – and use the vendor as a normal user;
Disabling the “direct pay” option from a vendor will slightly change the ways to interact with it; moving the mouse over it in fact will not present the pay option anymore, but a touch option.
- Left-clicking on the vendor will take the user to the “User Menu” (if normal user) or to the “Choice Menu” (if user is the vendor’s owner);
- Right-clicking on the vendor and then selecting “Menu” from the drop down menu takes the users to the “User Menu” (if normal user) or to the “Choice Menu” (if user is the vendor’s owner);
- Right-clicking on the vendor and then selecting “Pay” from the drop down menu will open the default Second Life quick pay dialog: in this case paying the vendor will make users purchase the item for themselves;
Chapter #6: Vendor’s options
In the options sub menu is possible to find a lot of additional features aimed to enrich the experience with MD Vendor System by adding some specific functions. These features may not be useful to everyone all the times, but will allow the owner to setup more flexible and personal vendors.
During years of development while the system kept growing, the number of options has grown significantly too, to the point that felt obvious to create two different classes of them. The first class of options are the most common and used ones and they are accessible either via the MD Vendor System in-world or the MD Online Services website. The second class of options represent the less used ones and they are accessible only via the MD Online Services website. Details about MD Online Services website will be provided in the next chapters.
The options belonging to the first category and available both via the in-world script and MD Labs Online Services website are the following:
- Direct Pay: this options toggles the vendor’s quick pay mode on click. Once enabled, moving the mouse over the vendor will show the pay icon allowing users to quickly purchase the product simply left-clicking on the vendor and paying the amount due. Right-clicking on the vendor and selecting “Menu” from the drop down list will open the user menu where is possible to gift the product and perform different other tasks. When this option is active a “check” sign will appear in the corresponding button of the menu; hitting another time the ‘Direct Pay’ button will disable the feature, restoring the “touch” option once clicking on the vendor.
- Split L$: this option allow the owner to split the profit from the vendor with another avatar. Once clicked on this button, the owner will be asked to submit the name or UUID (avatar key) of the avatar who is going to receive part of the profits and pick a split percentage between 1% and 100%. If both steps are done correctly, each time a user makes a purchase, the profit is split with the avatar declared and the L$ immediately payed out. When this option is active a “check” sign will appear in the corresponding button of the menu and details will be listed in the menu’s header; hitting another time the ‘Split L$’ button will disable the feature.
- Discount: this option let owner apply a custom discount % to the items present inside the vendor. The owner will be asked to submit a custom discount percentage between 1% and 99%. Once this step is complete, the discounted price is calculated based on the percentage chosen and applied to the item’s cost. When this option is active a “check” sign will appear in the corresponding button of the menu and details will be listed in the menu’s header; hitting another time the ‘Discount’ button will disable the feature.
- Group: by enabling this feature only the users wearing a specific group’s tag will be able to interact with the vendor. First, the owner will have to assign the vendor the desired group using the group tool that can be found under right-click > Edit >General tab. Once selected the right group, clicking on the “Group Only” button will enable the feature. When the group only mode is active clicking on the button again will disable it. The basic usage of the group mode will allow only users wearing a specific group tag to be able to use the vendor; however, this feature becomes even more useful when used in combination with the discount. Enabling both the discount and group mode, in fact, will allow users having the right group tag to purchase products at a discounted price, while the others will have the choice to join the group to pay a discounted price, or proceeding without the right group tag and purchasing at the full price.
- QTY Limit: this option – if enabled – lets the owner decide a maximum number of items to be sold, after which the vendor will be set sold out. When clicked on the corresponding button, the owner will be asked to submit the number of items available in stock. Once submitted the value, the feature will be immediately activated and for each sale (buy or gift) the number of available items in stock is decreased by one unit. When no more items are available the vendor is automatically set on sold out and the owner will receive a notification IM.
- Notify: this option – if enabled – sends the owner an IM each time a users pays the vendor to purchase a product. The IM contains reports the name of the user, the product purchased and the amount payed. When this option is active a “check” sign will appear in the corresponding button of the menu and details will be listed in the menu’s header; hitting another time the ‘Notify via IM’ button will disable the feature.
- Hover Text: this option when active displays the hover text over the vendor; this text contains useful suggestion and shows the vendor’s status. When this option is active a “check” sign will appear in the corresponding button of the menu and details will be listed in the menu’s header; hitting another time the ‘Hover Text’ button will disable the feature.
The second group of options, available only through MD Labs Online Services website are:
- Vendor mode: this feature changes the vendor’s operating mode among Buy&Gift, Buy Only and Gift Only. While the Buy&Gift mode allow users to either buy or gift the items in the vendor, the Buy Only mode removes all the gift options from the user menu, allowing users to only purchase the items for themselves. Similarly, the Gift Only mode allow users to only gift the products, removing every buy options.
- Exclude: this option – once enabled – excluded the corresponding vendor from the “Apply to All” feature, basically providing a way to distinguish one or more vendors from all other. This feature, that may sound superfluous is in fact extremely useful as it will be explain in the following chapter.
- Vendor Time: this value represents the amount of time available for the users to interact with the vendor at any step of the purchase process. User clicking on the vendor will in fact reserve it for a limited amount of time; if no actions are taken before the timeout, the vendor is set free and returns available for the other users. By default the vendor time is 45 seconds, but any value between 30 and 300 seconds is allowed. Clicking on this option owner will have to submit the new vendor time in seconds which will be immediately applied.
- MP Link: this feature allows the owner to insert the SL Marketplace’s link (URL) corresponding to the product inside the vendor. Once submitted the link, the users will see an additional “View on MP” button on the users menu; clicking on it, they will be taken to the corresponding page on the SL Marketplace.
Chapter #6.1: Vendor’s defaults
Once a vendor is rezzed for the first time is initialized with the following default values:
| Setting | Default status |
| Direct Pay | active |
| Split L$ | not active |
| Discount | not active |
| Group | not active |
| QTY Limit | not active |
| Notify | active |
| Hover Text | active |
| Vendor Mode | Buy & Gift |
| Vendor Time (seconds) | 45 |
| MP Link | none |
| Exclude | not active |
Chapter #6.2: “Discount” & “Group” – a use case
“Discount” and “Group” are both options available in MD Vendor System: the first one allows the owner to set a specific discount rate on the vendor’s cost, while the second forces the users to wear a specific group tag in order to be able to use the vendor. Both features are utilizable alone, but when used in combination they become even more useful.
When both “discount” and “group” features are enabled, only customers wearing a specific group tag while purchasing will be able to pay the products at a discounted price.
As example, the following scenario is taken: a vendor with item’s price set to 100L$ and a 25% discount set for group members. Once both features are enabled, depending on how users interact with the vendor there will be different behavior:
- Left-clicking on the vendor will prompt the default SL payment dialog where the full price of 100L$ is presented; if the payer avatar has the right group tag active, once the payment is made a refund of 25L$ (25% of 100L$) will be sent to the avatar whom paid the vendor. If the avatar paying does not have the right group tag active no refund will take place and the item is bought at its full price.
- Right-clicking on the vendor and selecting “Menu” from the drop down list will open the user menu; in this case the discounted price (if due) is calculated during the purchase process and the payer avatar will be presented a payment window containing the final price that could be discounted, if the avatar is wearing the right group tag, or full.
- Right-clicking on the vendor and selecting “Pay” from the drop down list will will prompt the default SL payment dialog where the full price of 100L$ is presented; if the payer avatar has the right group tag active, once the payment is made a refund of 25L$ (25% of 100L$) will be sent to the avatar whom paid the vendor. If the avatar paying does not have the right group tag active no refund will take place and the item is bought at its full price.

Chapter #7: “Apply to All” – setup multiple vendors at once
MD Vendor System introduces a very useful feature that aims to save time while setting up the vendors. This feature, called ‘multiple setup’, allows the owner to decide whether to apply a specific setting to the current vendor or to all vendors belonging to the owner which are not excluded and present on the same region.
It’s possible to take advantage of this great feature with almost all the settings available, including all the options described in the options chapter. Once a feature is chosen, the owner will be prompted to a dialog asking if apply the setting to the single vendor or to all vendors; once the selection is made and the specific setting configured, the value will be applied to the single vendor or all vendors at once.
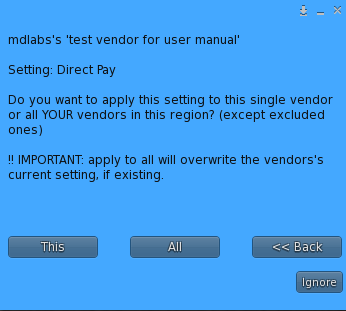
PLEASE NOTE: when applying a setting to all vendors, the new setting’s value will overwrite the vendor’s existing one.
Chapter #7.1: “Apply to All” & “Exclude” – a use case
There are a multitude of scenarios where the combination of “Apply to All” and “Exclude” features becomes extremely useful: one among them all – and taken as use case – is during a store sale when the store owner wants to apply a specific discount % to all products present in the store, possibly for a limited period. This very common scenario tho, hides some critical aspects: while the discount has to be applied to every product vendor in the store, there is often some exception vendor that doesn’t have to be touched by the settings change. One example among all are the gift card vendors – typically running MD Vendor System as well – for which it would be wrong to apply a discount. There may be some other class of products – such as outlet products or exclusive vendors – that has to be ignored while applying the settings to all vendors in the store.
Using both “Apply to All” and “Exclude” features in combination, MD Vendor System is able achieve the desired behavior in just a few steps:
- Using the MD Labs Online Services website the store owner can exclude those vendors – such as the gift card ones – for which the discount doesn’t have to be applied;
- In-world, clicking on one of the vendors that should use the discount, access the owner menu and then the options sub menu. Select “Discount” and submit the amount of discount to apply; the next dialog will ask if to apply the discount only to the current vendor or to all vendors in the region (except excluded ones). Selecting “All” will instantly apply the discount % to all vendors in the same region, ignoring the ones which are excluded;
- Once the sale period is over at the store, is possible to remove the discount in the same exact way as it was applied, always ignoring the excluded vendors;
Chapter #8: MD Vendor System plugin – overview
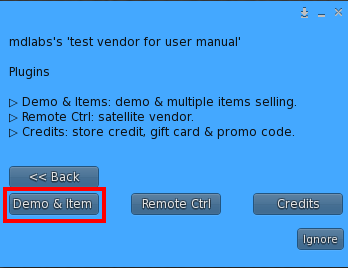
MD Vendor System can be expanded using several dedicated plugins, each of them adding different features. There are a total of 4 different plugins available:
- Demo & Multiple Items Plugin
- Remote Control plugin (available as separate purchase or included in MD Vendor System (Full Pack))
- Store Credit & Gift Card plugin (available as separate purchase or included in MD Vendor System (Full Pack))
- Poses plugin (available as separate purchase or included in MD Vendor System (Full Pack))
Installing a plugin is very easy and quick: the owner will only have to drop the plugin script inside the vendor and the plugin will be automatically detected and initialized; a message sent on chat will notify the owner of the successful installation. From that moment, the plugin’s specific features will be available through the “Plugin” sub menu present in the vendor’s owner menu.
PLEASE NOTE: the plugin is aimed to expand the vendor’s feature, for this reason MD Vendor System ‘core’ script must always be present inside the vendor to use the plugin.
To uninstall the plugin simply remove it from the vendor’s content and the vendor will automatically update, removing the additional features.
Chapter #8.1: Demo & Multiple Items Plugin
Demo & Multiple Item is the first plugin for MD Vendor System and it’s always included in any version sold. This plugin adds the following features to vendors:
- Handle one or more demo items, that will be given for free to users clicking on the “Get Demo” button in the vendor’s user menu;
- Handle multiple “normal” items, that users will be able to select via the user menu and decide to buy or gift;
- Handle one fatpack item, with custom price, that users will be able to buy or gift using the user menu;
PLEASE NOTE: by LL limitation, an object can contain up to 255 items inside; this means MD Vendor System can handle up to (255-the number of scripts) items in a single vendor.
Once the plugin is successfully installed on the vendor the owner can access the plugin’s specific settings using the “Plugins” sub menu that can be found in the owner menu. By clicking on the corresponding ‘Demo & Items’ button, the plugin’s specific menu will load, presenting all the available options:
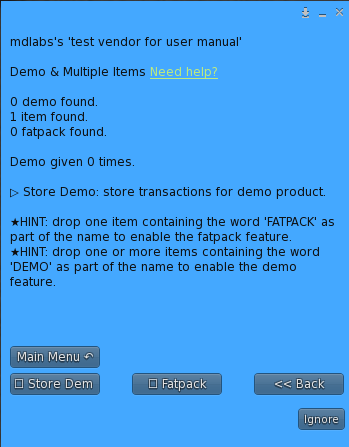
- Store Demo: when this option is enabled, MD Vendor System will store on MD Labs Online Services website also transactions for demo items.
- Fatpack: enabling this option will open a dialog window where the owner will be asked to provide the fatpack’s price in L$. Any integer value greater than 0 will be accepted.
- Back: this button navigate back to the plugin sub menu.
- Main Menu: this button navigate back to the owner menu.
Both demo and fatpack features rely on a naming convention to be respected in order for the script to automatically detect the products present inside the vendor’s content. A demo item in fact will have to contain the keyword ‘DEMO‘ in its name in order to be automatically identified by the MD Vendor System and used properly; similarly, the fatpack item will have to contain the keyword ‘FATPACK’ in its name.
PLEASE NOTE: the keyword can be in any part of the item’s name, but it’s mandatory to write it with capital letters and without quotes.
As reference, here’s a couple of examples for demo items:
- DEMO Mesh rigged hair; (correct)
- Mesh rigged hair DEMO; (correct)
- (DEMO) Mesh rigged hair; (correct)
- Mesh rigged hair [DEMO]; (correct)
- DEMO! MESH RIGGED HAIR; (correct)
- Mesh hair DEMO rigged; (correct)
- demo Mesh rigged hair; (wrong)
- Mesh rigged hair Demo; (wrong)
Once one or more valid demo items are dropped inside the vendor, an additional button named ‘Get Demo’ will appear inside the user menu; by clicking it, the user will receive a folder containing all the demo items.
As reference, here’s a couple of examples for fatpack item:
- FATPACK Mesh rigged hair; (correct)
- Mesh rigged hair FATPACK; (correct)
- (FATPACK) Mesh rigged hair; (correct)
- Mesh rigged hair [FATPACK]; (correct)
- FATPACK! MESH RIGGED HAIR; (correct)
- Mesh hair FATPACK rigged; (correct)
- fatpack Mesh rigged hair; (wrong)
- Mesh rigged hair Fatpack; (wrong)
- FatPack Mesh rigged hair; (wrong)
Once the fatpack item is detected and the corresponding price is set correctly, new options appear in the user menu, like shown below:
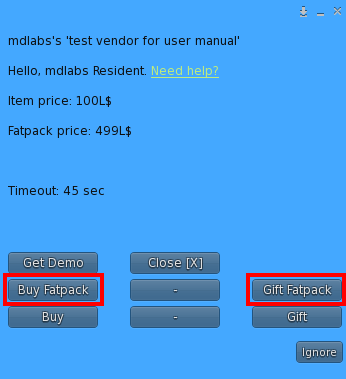
When a user selects “Buy Fatpack” or “Gift Fatpack” options, the normal buy / gift workflow as described in the previous chapters is activated, but applied on the fatpack item.
HINT: To disable the fatpack feature owner will have to either remove the corresponding fatpack item from the vendor’s content or uncheck the “Fatpack” option present inside the Demo & Items plugin configuration menu.
The last feature added by the Demo & Items plugin is the ability to sell multiple “normal” (not fatpack, nor demo) products within the same vendor.
PLEASE NOTE: when selling multiple “normal” items within the same vendor, all of them will have the same price set using the “Price” button present in the owner menu. MD Vendor System does not support different prices for different “normal” items.
Once the user clicks the vendor and selects among buy or gift from the user menu, a list of all the products is displayed and the user is asked to choose in order to complete the process.
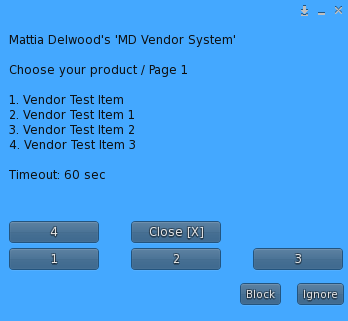
Once the item’s selection is made, the purchase flow continues as described in the previous chapters.
Chapter #8.2: Remote Control Plugin
Remote Control plugin allows to interact remotely with the vendors and enabling the client mode. This plugin has a dedicated user manual, available here.
Chapter #8.3: Store Credit & Gift Card Plugin
Store Credit & Gift Card plugin adds to vendors the store credit and credit card payment options. This plugin has a dedicated user manual, available here.
Chapter #8.4: Poses Plugin
Poses plugin can turn normal pose displayer into pose vendors, able to preview and sell poses. This plugin has a dedicated user manual, available here.
Chapter #9: Redelivery Terminal & Product Server
MD Redelivery Terminal & Product Server Script is a 2-in-1 tool developed to work seamlessly integrated with MD Vendor System, able to offer several additional features such as redelivery point and centralized product server. This product is not a plugin for MD Vendor System, therefore it doesn’t have to be installed inside the vendors; it’s a script for standalone devices that complete the MD Vendor System platform. This tool has a dedicated user manual, available here.
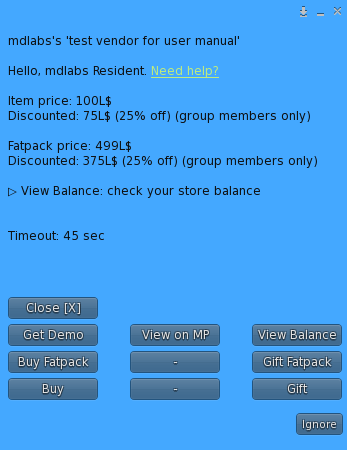
Chapter #10: User menu
The ‘user menu‘, accessible either via touching the vendor or right clicking on it and selecting “menu” from the drop down list, is the main menu that users can access to interact with the vendor and its advanced features. Depending on the setup chosen by the owner, this menu can contain several buttons: the “Buy Fatpack” and “Gift Fatpack” are in fact available only if the owner has installed the Demo & Multiple Items plugin and enabled the fat pack option. Similarly, the “View Balance” button will appear only if the Store Credit & Gift Card plugin is correctly installed into the vendor. This guide will cover all the possible features, but keep in mind that not all of them may be present all the times.
- Buy: this option allow the user to purchase the item from the vendor. The vendor will set itself in pay mode, waiting for the user to pay the amount requested; a timer is started at this point and if no actions are taken before the timeout the operation is canceled and the vendor is set free and available again. A simple click on the vendor will open the default Second Life payment window and once the user pays the vendor the item selected will be automatically given as inventory offer.
- Gift: this option let users gift an item from the vendor to another avatar. As first thing, user will be asked to submit the name or the key (UUID) of the recipient avatar. If the value submitted is correct the process will proceed and the vendor will set itself in pay mode, waiting for the user to pay the amount requested; at this point the work flow is the same as for the buy option: once user pays the vendor the requested amount the item purchased is sent to the receiving avatar as inventory offer, and an instant message is sent as well, notifying the receiver about the gift.
- Buy Fatpack: this option allow user to purchase the fatpack from the vendor. The process is exactly the same as the “Buy” one described above, but applied to the fatpack item.
- Please note: in order to use this feature, Demo & Multiple Items plugin must be installed on the vendor.
- Gift Fatpack: this option allow user to gift the fatpack from the vendor to another avatar. The process is exactly the same as the “Gift” one described above, but applied to the fatpack item.
- Please note: in order to use this feature, Demo & Multiple Items plugin must be installed on the vendor.
- Get demo: clicking on this button the user will receive for free a folder containing all the demo items inside the vendor.
- Please note: in order to use this feature, Demo & Multiple Items plugin must be installed on the vendor.
- View on MP: clicking on this button, the user will be taken to the SL Marketplace’s page of the corresponding product.
- View Balance: with this option the user will receive an IM containing the personal credit’s balance, divided in store credits and gift cards.
- Please note: in order to use this feature, Store Credit & Gift Card plugin must be installed on the vendor.
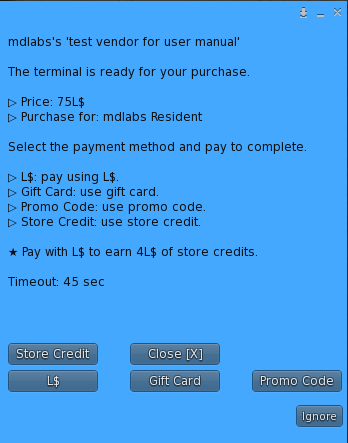
Chapter #10.1: User menu – payment methods
When interacting with a vendor through the user menu, after deciding the product desired (normal item vs. fatpack) and the type of purchase (buy vs. gift), the user is taken to a second dialog where is asked to choose the payment method. Depending on the vendor’s setup several payment methods may be available:
- L$: this is the default payment method and is always available; the user is asked to pay using his L$ balance as a standard Second Life transaction.
- Store Credits: this payment method is available only when the Store Credits & Gift Card Plugin is installed into the vendor; with this method the user will consume credits from his personal store credits balance at the corresponding store. The user is asked to confirm the transaction and if the amount of store credits is not enough to cover the item’s cost completely, an additional payment in L$ of the remaining amount is asked. Store credits for a specific store can be earned by purchasing products from the store’s vendors having the store credit feature enabled.
- Gift Card: this payment method is available only when the Store Credits & Gift Card Plugin is installed into the vendor; with this method the user will consume credits from his personal gift card credits balance at the corresponding store. The user is asked to confirm the transaction and if the amount of gift card credits is not enough to cover the item’s cost completely, an additional payment in L$ of the remaining amount is asked. Gift card credits for a specific store can be earned redeeming the store’s gift cards.
- Promo Code: this payment method is available only when the Store Credits & Gift Card Plugin is installed into the vendor; a promo code can offer a certain amount of discount to the item’s cost, but cannot cover the entire product’s cost. The user is asked to submit the promo code to use and if the code is valid, the discount associated to that promo code will be immediately applied. At this point, the user is asked to pay the remaining amount using his L$ balance.
Chapter #11: MD Labs Online Services
MD Labs Online Services is a responsive website, accessible from any platform from mobile devices to desktop computers, which allow to interact with the products released by MD Labs. MD Vendor System is designed to work seamlessly integrated with MD Labs Online Services, extending the range of features available:
- Get a quick overview of all the vendors, with locations where they are rezzed and total profit;
- Analyze selling statistics grouped by vendor, region, date (day/month/year), customer, product or by event;
- See the transaction list for every vendor, including buyer, item bought, item cost, net profit, purchase type, purchase date-time;
- Delete one or more specific transaction from a vendor;
- Add/remove any vendor assignment to an event;
- View selling statistics for both In-World sales and SL Marketplace sales (SL Marketplace integration is required);
- Configure any vendor remotely;
- Delete completely one or more vendor, including all its transactions;
- Redeliver contents from all your vendors to customers (redelivery terminal required);
- Keep track of your store credits and gift cards, adding credits to specific users (store credit & gift card plugin required);
- Create presets for quick vendor setup;
- Create promo codes, associated with specific discounts for users;
- Add one or more avatars as managers – with several permissions levels – allowing them to access the store’s data and interact with the vendors;
- Blacklist avatars, forbidding them to use vendor, get redeliveries, and so on;
- Tons of other useful features;
Chapter #11.1: Register an account and activate the product
Before accessing the website for the first time, the owner must register an account and activate the service. In order to do so, an Online Services HUD is provided inside the MD Vendor System pack.

Once attached the HUD, there are 2 simple steps to follow:
- Click on the user icon
 of the HUD, and type a password for the Online Services login.
 - Click on the check icon
 to activate MD Vendor System for the Online Services.
At this point it’s possible to open the MD Labs Online Services website and simply log in.
Chapter #11.2: MD Vendor System Homepage – a quick overview
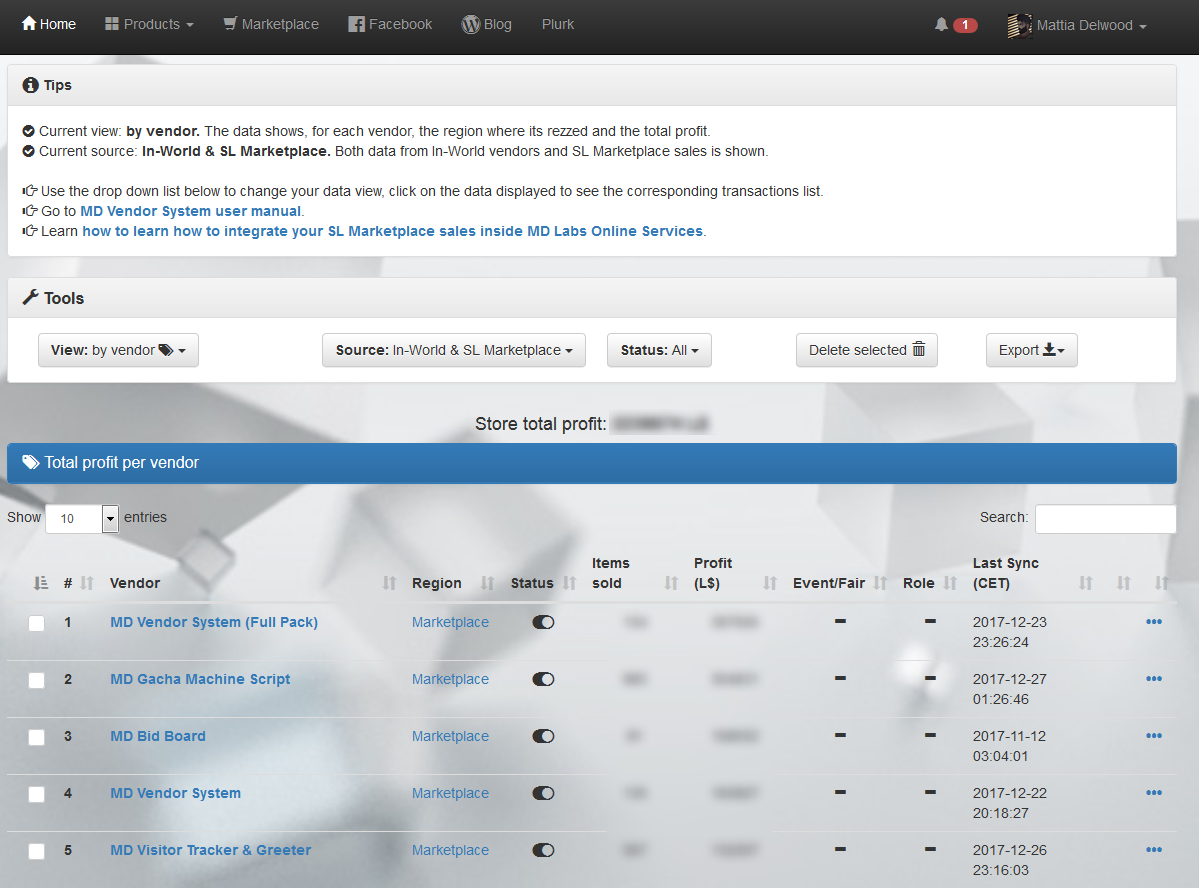
Once logged in the MD Labs Online Services website, it is possible to access the MD Vendor System section from the ‘Products’ drop-down list at the top of the page. The page that will load is the MD Vendor System homepage and will look similar to this one:
As first thing to notice, the webpage is divided into several different tabs (right under the top bar), each one containing specific features:
- Vendors: it’s the main tab, from here is possible to access the store’s data as well as to a list of all rezzed vendors and the detailed transactions list of each of them. For each vendor is possible to see at a glance where is rezzed, the total number of item sold and the total profit in L$ made. If SL Marketplace data is integrated, all the MP Listings will be reported here as well, assigned to a special region called “Marketplace”.
- Events: this second tab is dedicated to listing all the created events, showing the number of items sold, the profit made and also access the event’s transactions list.
- Redelivery Terminal & Product Server: this tab lists all the redelivery terminals and product servers rezzed in-world. For each of them is possible to check the role (server vs. client), the available storage and access the detailed transactions list.
- Store Credit & Gift Cards: this tab contains a list of all the store’s customers having either store credits or gift cards credits, as well as a list of all store’s gift card sold. From here the store owner can add credits to specific customers, add new customers giving them a certain amount of credits and interact with the gift cards.
- Promo Codes: from this tab is possible to manage all the available promo codes; owner and managers can create new promo codes, examine the list of all codes and also disable, enable and delete them.
- Presets: this tab contains all the presets created for vendors; from here is possible to create, edit and remove presets, as well as apply them.
- Managers: this tab lists all the store’s managers, with detailed info about their permissions; from here it’s possible to add and remove managers, as well as change their permissions levels.
- Blacklist: in this tab are listed all the avatars who have been banned from the store. Once blacklisted, an avatar cannot buy or gift any product from in-world vendors, as well as cannot receive any store’s product as gift and cannot access the redelivery feature.
- Archived: this tab lists all the archived vendors, the ones that are not used and/or not rezzed anymore in-world. Archiving the vendors helps keeping data sorted and consistent.
Chapter #11.3: SL Marketplace integration
MD Labs Online Services also offer the opportunity to integrate SL Marketplace data inside the Online Services website. This means all the sales made through the SL Marketplace will be listed inside the Online Services website, giving a complete and detailed view of both in-world and Marketplace.
In order to integrate SL Marketplace with MD Labs Online Services a quick and easy setup is required. The procedure can be summarized in these few steps:
- Open your SL Marketplace webpage and select ‘Merchant home‘ from the ‘My Marketplace‘ drop down list on the top.
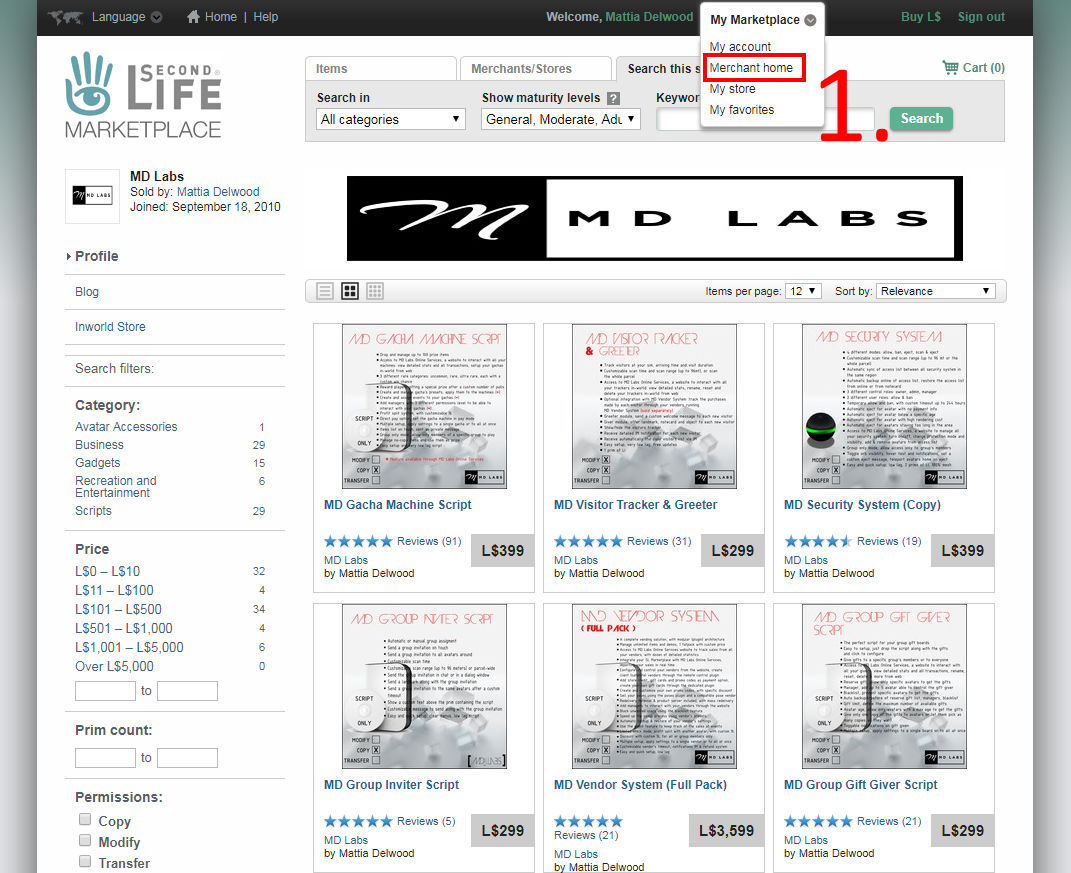
2. Select “Automatic Notifications (ANS)” from the left drawer.

3. Add ‘http://www.services.mdlabsonline.com/interface/generic/ans.php‘ (without quotes) in the ‘Notification URL‘ field.
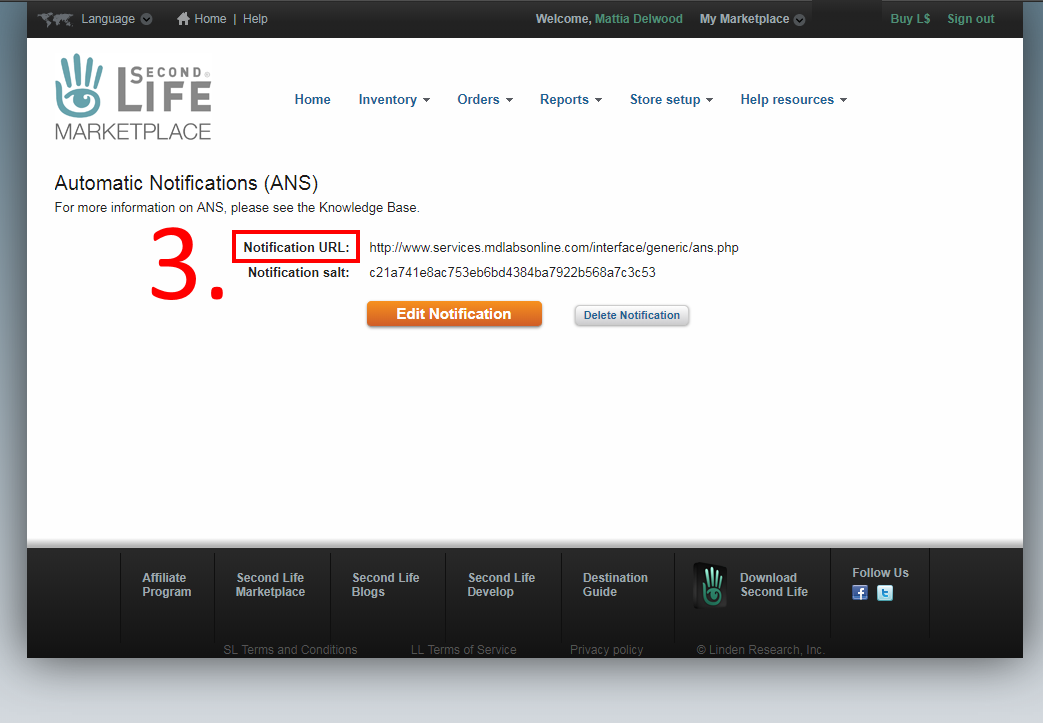
At this point, the integration is complete and all the future sales on SL Marketplace will be automatically listed inside the MD Labs Online Services website.
There are several benefits in integrating the SL Marketplace inside MD Labs Online Services website, the most important are:
- Having both SL Marketplace sales and in-world sales grouped in only one place, with statistics and tools to analyze them;
- Through MD Redelivery Terminal, being able to offer redelivery for both product purchased from in-world and on SL Marketplace;
Chapter #11.4: Vendors tab
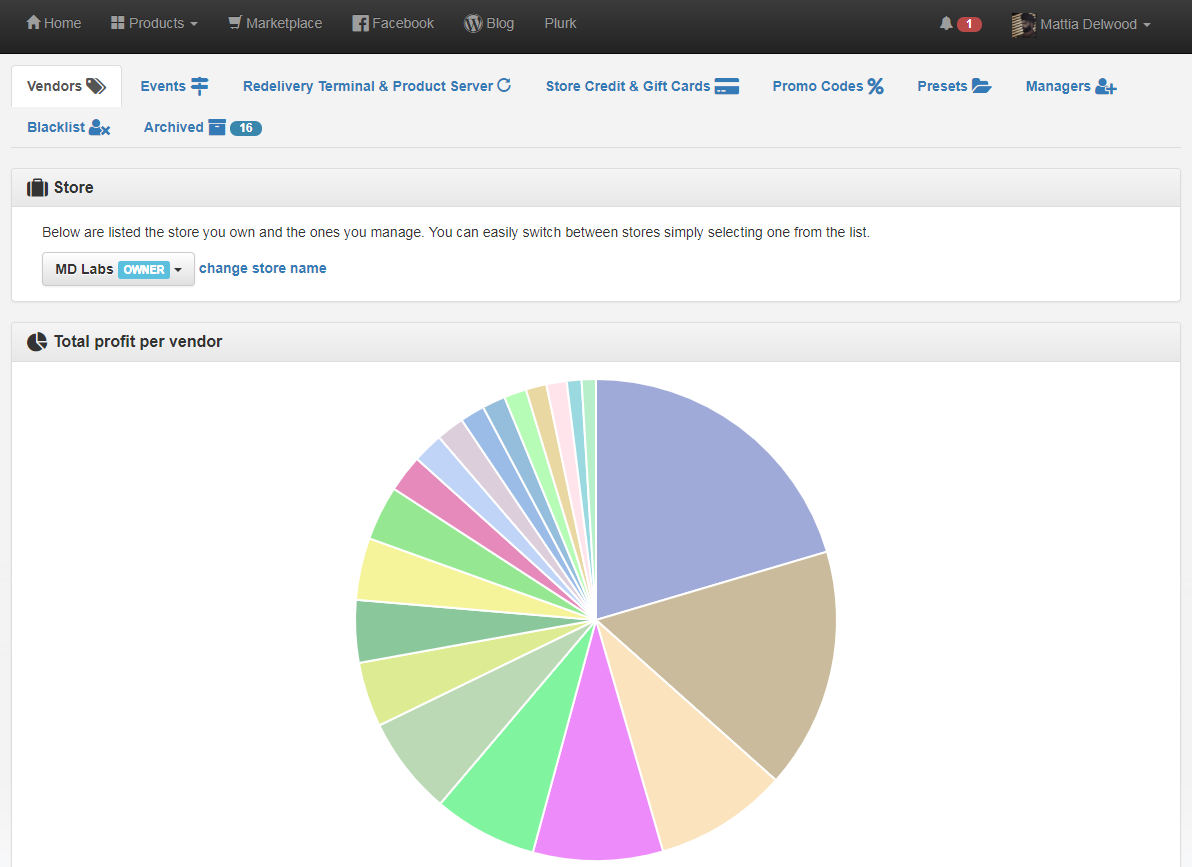
The Vendors tab is the first tab present inside the MD Vendor System homepage and it is probably the most important one. This tab lists all the rezzed vendor and MP Listings (if SL Marketplace is integrated), as well as giving several tools to analyze the store’s data and sales.

At the top of the page there is a Store panel listing the user’s store and eventually all the other stores where the user is manager. To switch from a store to another simply select a new store from the drop down list: the page will refresh and load with the selected store’s data.
Below the store panel there is the graph panel: the data represented here will vary based on the current view selected. The default view is “by vendor” and the graph will show a pie chart with all the vendors/MP listings and their profit. Further below, the tools panel and the vendors list give access to the main features of this tab.
The Tools panel groups together some useful tools to analyze and manipulate the vendor’s data. The most important tool of this section is the ‘view‘ drop down list which allow to group, sort and view the data in several ways:
- by vendor: this is the default view, useful to analyze the number of products sold and profit made by each vendor or MP Listing;
- by region: through this view is possible to analyze the profit generated by each region where at least one vendor is rezzed;
- by day: this view is useful to analyze the daily profit made by vendors;
- by month: this view is useful to analyze the monthly profit made by vendors;
- by year: this view is useful to analyze the yearly profit made by vendors;
- by customer: through this view is possible to analyze the profit made from each customer;
- by product: through this view is possible to analyze the profit made from each product;
When switching from a view to another, the page will reload and update to show all the data (including graphs) accordingly to the selected view mode. Please note that, while the in-world vendors can be listed under different regions, the SL Marketplace Listings are always listed under a generic “Marketplace” region.
Another useful feature present in the tools panel is called Source; this drop down allows to filter the data presented depending on where the vendors are located:
- In-World & SL Marketplace: the data presented (total sales, vendors list) is calculated from both vendors rezzed in-world and SL Marketplace listings;
- In-World: the data presented (total sales, vendors list) is calculated only from vendors rezzed in-world;
- SL Marketplace: the data presented (total sales, vendors list) is calculated only from SL Marketplace listings;
When switching from a source to another, the page will reload and update to show all the data (including graphs) accordingly to the selected source mode.
Similarly to the Source feature, the Status drop down allows to filter the data depending on the vendor’s status:
- All: the data presented includes all vendors;
- For Sale: the data presented includes only vendors which are set for sale;
- Not For Sale: the data presented includes only vendors which are set not for sale;
- Sold Out: the data presented includes only vendors which are sold out;
When switching from a status to another, the page will reload and update to show all the data (including graphs) accordingly to the selected status mode. Please note that, while the in-world vendors have different status, the SL Marketplace Listings are always considered “For Sale”.
Other useful tools are the ‘delete selected‘ button, which allow the deletion of multiple vendors at once, and the ‘export‘ button, which allow to export the data from the current view.
Below the Tools panels there is the last – and most important – section of the vendors tab: the vendors list. Here all rezzed vendors and SL Marketplace Listings are displayed, each one with several useful information and ways to interact with them:
- Vendor Name: the name of the vendor in-world, or SL Marketplace Listing. Clicking on the name will load the details page for the corresponding vendor, containing both the complete vendor’s transactions list and settings.
- Vendor Region: the region where the vendor is rezzed in world (SL Marketplace Listings will always have “Marketplace” as region). Clicking on the region’s name will load the details page for the corresponding region, listing all the transactions occurred in the region by all vendors rezzed there.
- Vendor Status: the status of the vendor rezzed in world (SL Marketplace Listings will always have “For Sale” as status). This button acts as a switch for in-world vendors, allowing the owner to switch the vendor’s status from “for sale” to “not for sale”, enabling or disabling the vendor.
- Items sold: the number of items sold by the vendor.
- Profit (L$): the amount in L$ made by the vendor.
- Event/Fair: this info – available only for in-world vendors – allows the owner to assign a vendor to a specific event previously created. The event feature is a very handy and useful way to keep track of the income made by participating at SL events, allowing to see the most profitable ones at a glance. Clicking on the event’s name will load the details page for the corresponding event, listing all the transactions made by vendors which were assigned to it.
- Role: this info – available only for in-world vendors – shows whether a vendor is set as server (independent) or as client (satellite).
- Last Sync: the last time the vendor contacted the MD Labs server to update its status.
- Vendor’s settings: clicking on the cog icon will load the details page for the corresponding vendor, containing both the complete vendor’s transactions list and settings. From here is possible to change the vendor’s settings and they will be automatically applied in-world.
- Vendor’s operations: clicking on the three-dots icon will open a secondary menu containing several additional operations to perform on the corresponding vendor. These operations include delete, rename, reset, merge and much more. More details about it in the the dedicated chapter.
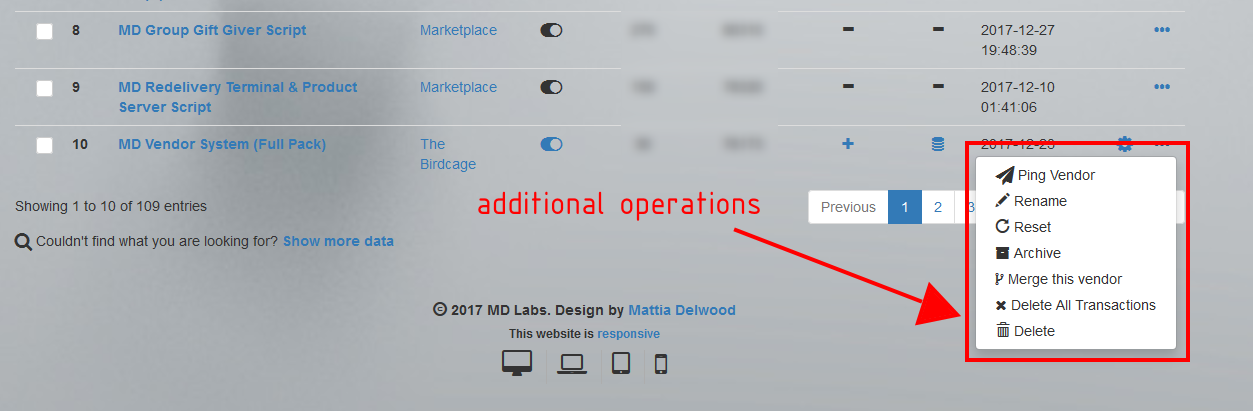
Chapter #11.5: Vendors tab – Additional operations
When having the view set to ‘by vendor‘ is possible to access several additional features simply clicking on the 3-dot icon ![]() :
:
- Ping Vendor: contact the vendor in-world to check its reach-ability from MD Labs Online Services website (in-world vendors only);
- Rename: rename the corresponding vendor or SL Marketplace Listing in-world and on MD Labs Online Services;
- Reset: reset the vendor in-world (in-world vendors only);
- Archive: archive the corresponding vendor or SL Marketplace Listing. This operation will remove the vendor from in-world, but keep all the data such as transactions, total profit;
- Merge: merge the data from two different vendors or SL Marketplace Listings. Through this feature is possible to unify all the data (transactions, profit, etc) regarding a vendor (source) with another vendor (destination);
- Delete All Transactions: delete all the transactions made by the corresponding vendor, resetting also the total profit and number of transactions made (in-world vendors only);
- Delete: delete the corresponding vendor from in-world (in-world vendors only);
Chapter #11.6: Vendor’s detail – Transactions
Depending on the data view chosen (by vendor, by region, by date, etc) is possible to view and analyze different kind of data; the most important is the data view ‘by vendor‘, the default one. When this data view is selected, a list of all vendors rezzed (and SL Marketplace Listings) is presented along with the region, the total item sold and total profit made by each vendor. By clicking on the vendor’s name the details page for that specific vendor will load, and will look like this one:
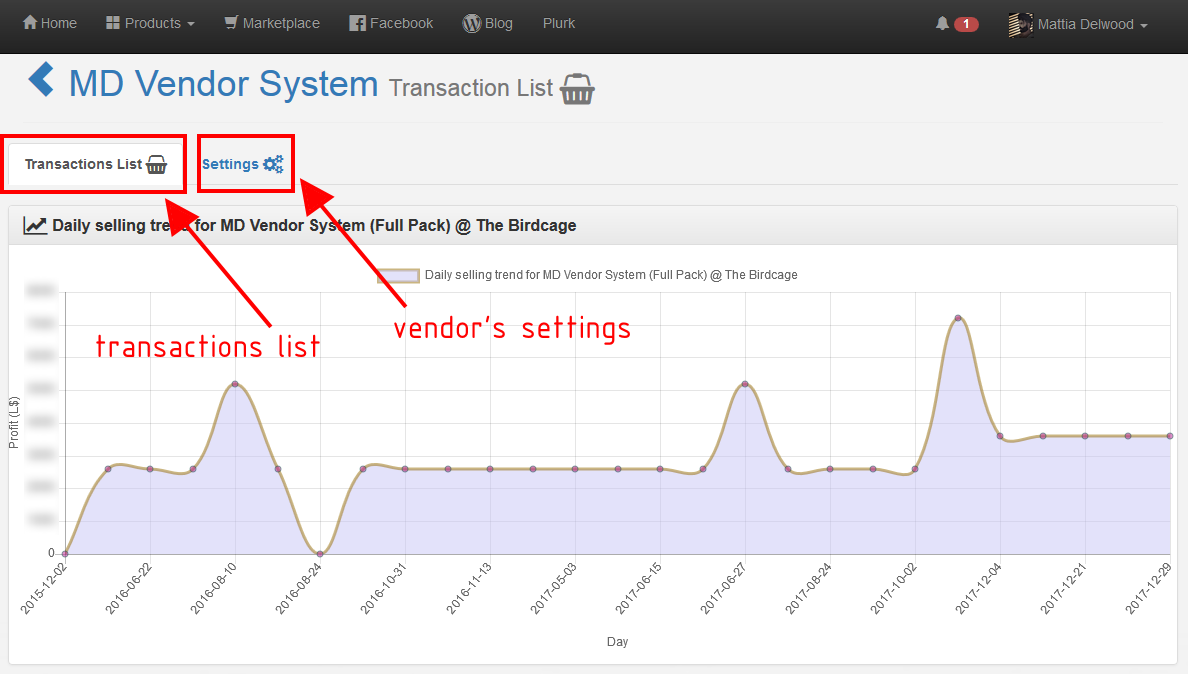
The page is divided into two tabs: transactions list and settings; the first one contains the complete list of the vendor’s transactions, while the second holds the vendor’s settings.
IMPORTANT: keep in mind that the details page is contextual to the data view selected in the MD Vendor System Homepage. This means – for example – that if the data view is set to ‘by vendor’ clicking on the vendor’s name will load the details page for the chosen vendor, containing all the transactions made by the vendor itself. Differently if the data view is set to ‘by region’ clicking on the region’s name will load the details page for the chosen region, containing all the transactions made in the region, independently from the specific vendor which made it. Moreover, if the data view is set to ‘by day’ then clicking on the date will load the details page for the specific day chosen and containing all the transactions made on the day, independently from the specific vendor or region where occurred.
The first part of the ‘transactions list‘ tab contains an useful graph showing the daily profit for the selected vendor; below this graph two other panels are present, containing the tools and the transactions list itself.
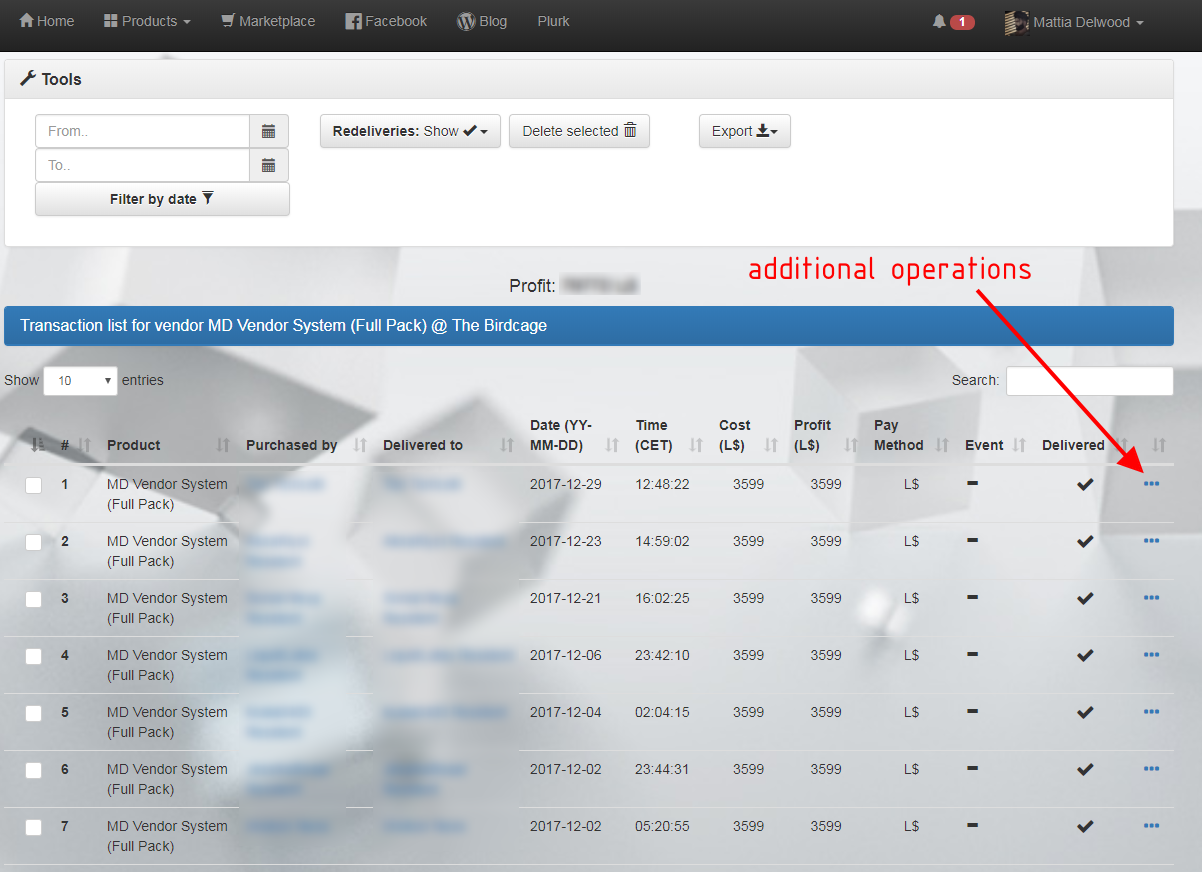
The tools panels provides some useful instruments to filter, manage and analyze the vendors data; is possible in fact to filter and see only the transactions made during a specific period, delete multiple transactions at the same time and export the transactions list.
The transactions panel is the main panel of this page and presents a complete list of all the transactions made by the vendor; for each transaction the following data is displayed:
- Product name;
- Payer avatar;
- Receiver avatar;
- Purchase date;
- Purchase time;
- Product’s cost;
- Transaction’s profit;
- Payment method used;
- Transaction’s event (if associated);
- Transaction’s delivery status;
For each transaction is possible to perform a few additional operations, simply clicking on the 3-dot icon ![]() :
:
- Redeliver: this feature will redeliver the transaction’s item to the corresponding recipient. The delivery is made through a redelivery terminal rezzed in-world or a product server hosting the product in the content;
- Delete: this feature allow the owner to completely remove the corresponding transaction, updating also the vendor’s statistics (total sold and total profit);
Chapter #11.7: Vendor’s detail – Adding a transaction manually
When the data view is set to ‘by vendor‘ is possible to manually add a transaction, that will be associated with the corresponding vendor or SL Marketplace Listing. There are some circumstances – in fact – where is useful to be able to manually add one or more transactions and associate them to a specific vendor:
- When, due to some technical issue, a paid transaction was not stored correctly;
- When the store owner wants customer to access the redelivery feature for a certain product;
- When the store owner wants to include one or more customers into the Mass Redelivery for a certain product;
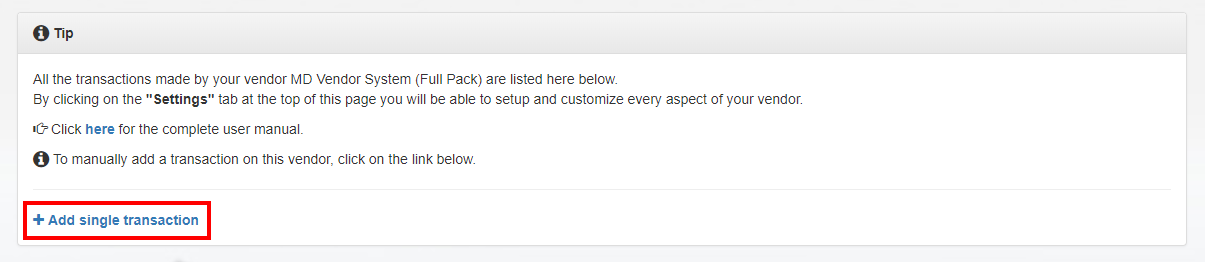
To add a transaction manually, simply click on the corresponding link in the ‘Tips‘ panel; a wizard will appear requiring some data to be filled before confirming the transaction creation.
The wizard requires the following data:
- Payer name or UUID: the name or the key (UUID) of the avatar who paid for the transaction;
- Receiver name or UUID: the name or the key (UUID) of the avatar receiving the product;
- Product: the product sold in the transaction;
- Amount earned: the amount of L$ earned with the transaction. This value can be set to 0 (zero) if the transaction is a gift from the store owner to a selected recipient;
- Payment method: the payment method used for the transaction. The only option for this value is “L$”;
- Deliver product: if checked, this option will deliver the product to the selected recipient through a redelivery server or product server;
- Update vendor’s total: if checked, this option will update the vendor’s sales statistics (total sold and total profit) adding the transaction’s data;
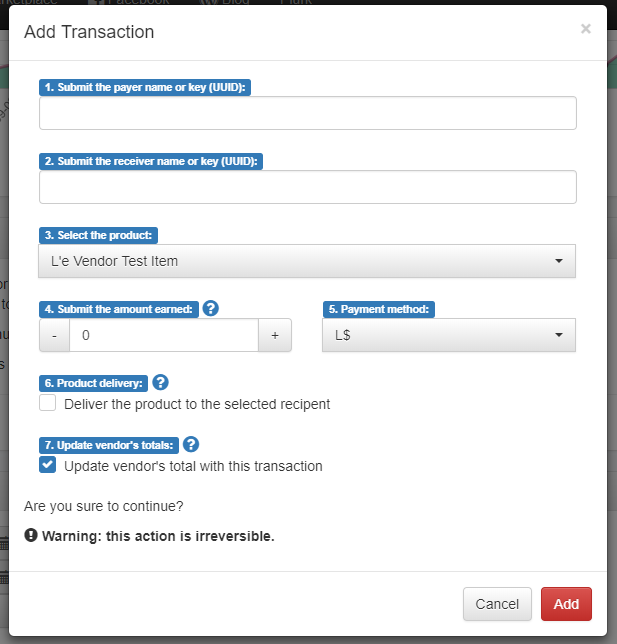
Once all the data is correctly submitted, clicking on the “Add” button will create a transaction and associate it to the corresponding vendor. The recipient avatar will then be able to request redelivery and receive products as part of the Mass Redelivery process, as well as receive the product directly if the owner checked the dedicated option.
Chapter #11.8: Vendor’s detail – Settings
When the data view is set to ‘by vendor‘ a second tab is present inside the detail page, named ‘settings‘. This tab – available only for in-world vendors and not SL Marketplace Listings – lists all the vendor’s settings, from name to price, event associated and all the other options.
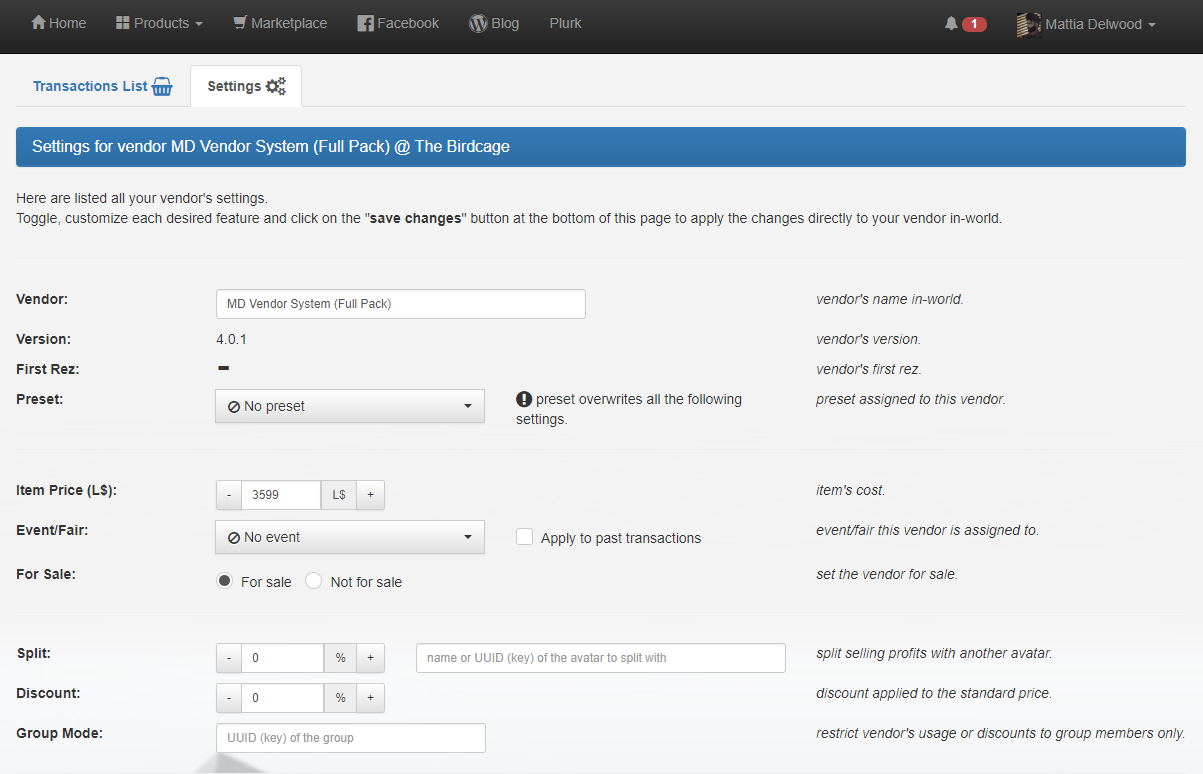

Each setting can be toggled or edited and it will be applied directly to the vendor in-world upon pressing the “Save changes” button at the bottom of the page.
Chapter #11.9: Events tab
Back on the MD Vendor System homepage the second tab is called ‘Events‘ and offers a view of the events created by the owner and for each shows some useful statistics.

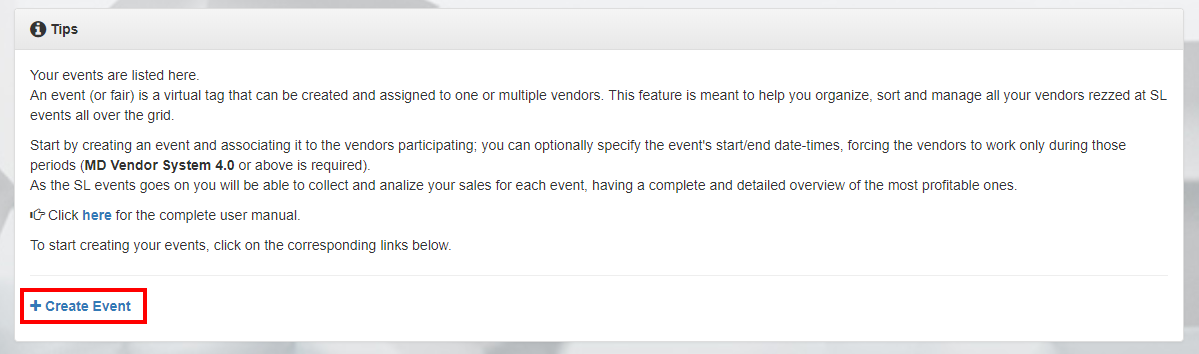
Before going through all the features of this tab is very important to understand what an event is. An event is basically a virtual tag that can be created and assigned to one or more vendors; while an event can have an unlimited number of vendors associated, each vendor can have only one event at time. Why events are useful? The feature was created to meet the needs of organising and managing vendors in an era where SL events are more and more often on everyone’s agenda. Often, a store owner participates to several events monthly and it is very important to understand which ones are the most profitable and which aren’t. MD Vendor System’s event feature does all this and much more.
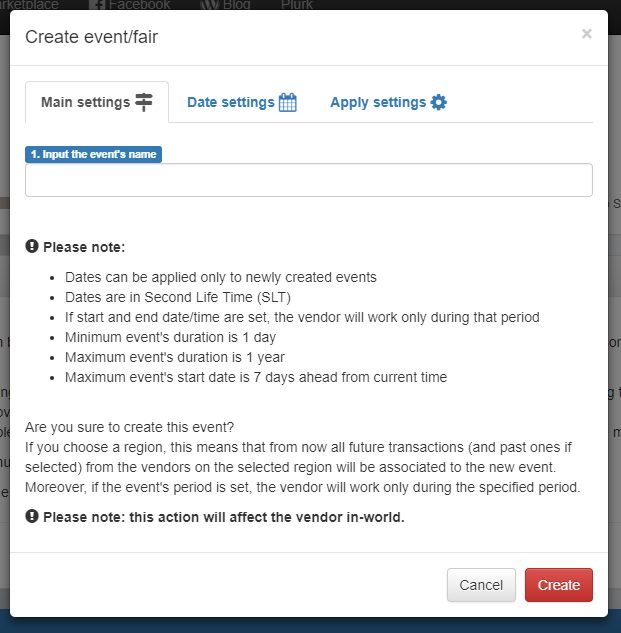
The first step to perform is create an event that will be used to associate vendors to. To create a new event, simply click on the ‘Create Event’ link that can be found in the ‘Tips’ panel; this will load a wizard that will guide the owner in creating a new event.
The event creation wizard is composed by three main tabs, each of them containing specific settings:
-
- Main Settings: here the owner is asked to provide an unique name for the event. If the event corresponds to a SL event it is a good idea to pick a name which includes the SL event’s name and also the round (i.e. “Uber-2018-01”). PLEASE NOTE: the event’s name is the only mandatory data to provide in order to create an event; all further data is optional and will give access to several advanced features.
- Date Settings: this tab contains two optional values called ‘event start time’ and ‘event end time’. Often in fact the SL events have a specific duration composed by a start date-time and a end date-time:
- providing a start date-time for the event will force all the in-world vendors associated to start working only from the moment specified;
- providing a end date-time for the event will force all the in-world vendors associated to stop working when the specified moment is reached;
- This feature is really useful because allows store owners to setup their vendors in advance, without worrying that their products could be bought before the effective SL event’s start;
- Apply Settings: the last tab for the event creation wizard contains two optional settings aimed to speed up the application of the event just defined. The first one allows the owner to automatically assign the event to all vendors in-world rezzed in a specific region. Doing this, the vendors will be associated to the newly created event and – if there is a start date-time or a end date-time – operate as scheduled. The second feature on this tab works together with the first one: when applying the event to all vendors rezzed at a specific region, the owner can decide if associate also the vendor’s previous transactions to the newly created event in case those vendors have already been used and it is important to keep track of every transaction.
Once the event is created it will appear listed in the ‘Events’ tab, as shown here:
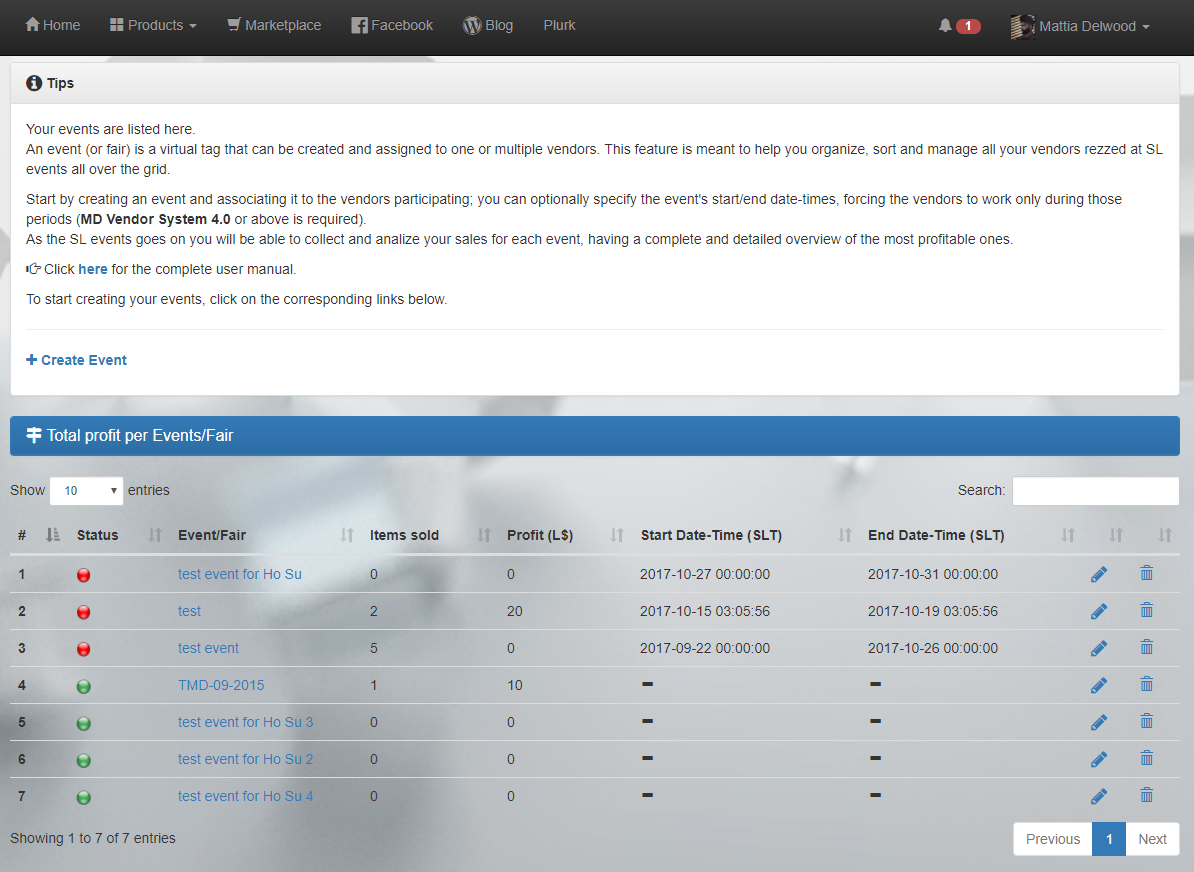
For each event created, the table shows different data:
- Status: this icon is useful only for events which have a start date-time and/or a end date-time associated. The status icon is green for the events which are currently active (having at least one vendor working within the event’s validity period defined) and red for the ones not active (having validity period expired).
- Event/Fair: the event’s unique name, useful to distinguish one event from the other. Clicking on the event’s name will open the corresponding event’s detail page, which will be discussed below in this chapter.
- Item sold: this value represents the amount of product sold by all vendors associated to the event, whether they are in the same region or in different locations.
- Profit (L$): this value is the total profit in L$ made by all vendors associated to the event, whether they are in the same region or in different locations. If the event is associated to vendors participating to a SL event this number is the most important one to consider, as it gives the owner an idea of how much profitable the SL event is.
- Start Date-Time (SLT): this value – optional – shows the start date-time for the event. If the value is present, all vendors associated to the event will start working and selling goods at that specific moment.
- End Date-Time (SLT): this value – optional – shows the end date-time for the event. If the value is present, all vendors associated to the event will stop working at that specific moment.
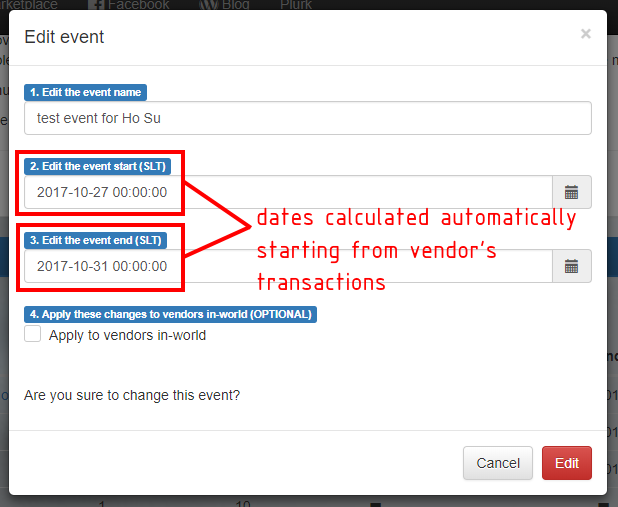
- Pencil icon (
 ): this button lets the owner edit the corresponding event’s parameters, such as event name, event start time and event end time. Clicking on the pencil icon will load a floating window where the owner will be able to adjust the event’s settings; in particular the event start time and end time are automatically calculated/guessed analysing the transactions from the vendors associated to the event and suggested to the owner. While the values suggested may not be completely accurate, it gives the owner an useful hint simplifying the event’s editing.
 - Trash icon (
 ): this last button allows the owner to remove the corresponding event. Since this action will affect also all vendors associated to the event, the owner will have to choose among two different kind of deletion:
- Delete the event’s association from transactions: this deletion method keeps the transactions made while the vendor was assigned to the event, but remove the association.
- Delete transactions associated to this event: this deletion method removes permanently all the transactions made while the vendor was assigned to the event.
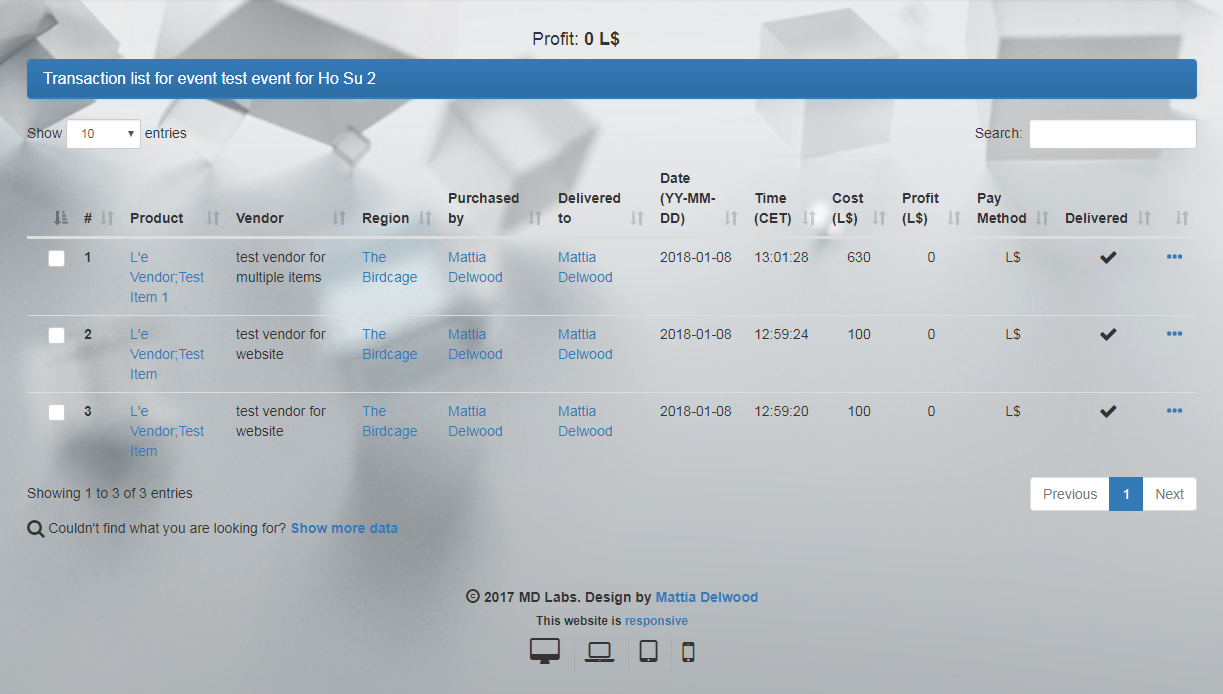
When clicking on a specific event/fair entry, the details page for the corresponding event will load, showing a daily graph with the selling trends and the complete transactions list for the event selected. Since the event can have more than one vendor associated, for each transaction listed is reported which vendor performed it in addition to all other usual data.
Chapter #11.10: Redelivery Terminal & Product Server tab
The third tab in the MD Vendor System homepage is named ‘Redelivery Terminal & Product Server‘ and lists all the redelivery terminals and product servers rezzed in-world. PLEASE NOTE: for a more detailed explanation about what a redelivery terminal / product server is, click here.

The tab is composed by two main panels: the ‘Tips‘ one and the list of all terminals rezzed. The tips panel contains a few hints and links to other user manuals and two special links, each one giving access to a specific feature.
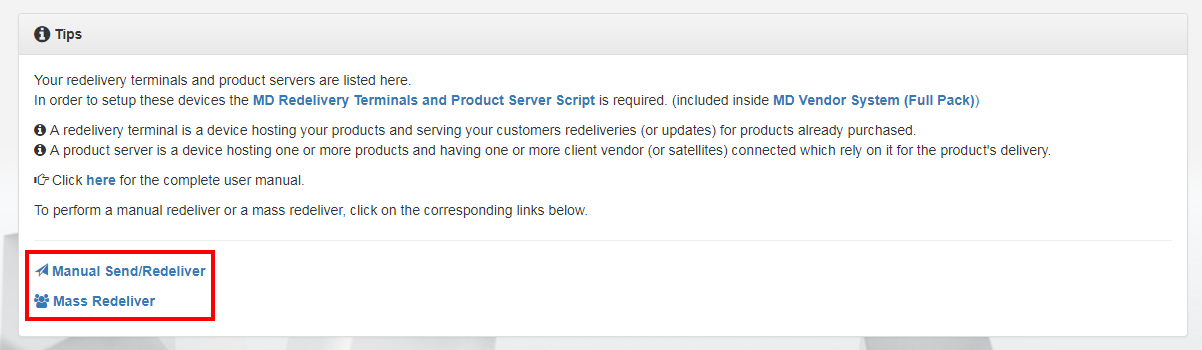
Manual Send/Redelivery allow the owner to either manually send (if the recipient did not purchase yet) or redeliver (if the recipient has already purchase) a product to a specific recipient; this feature is very useful when the owner wants to deliver a specific product to a recipient whom – due to some issue – did not receive it during the purchase process. Clicking on the ‘Manual Send/Redeliver’ link in the ‘Tips’ panel will load a simple wizard that will guide the owner through the process configuration:
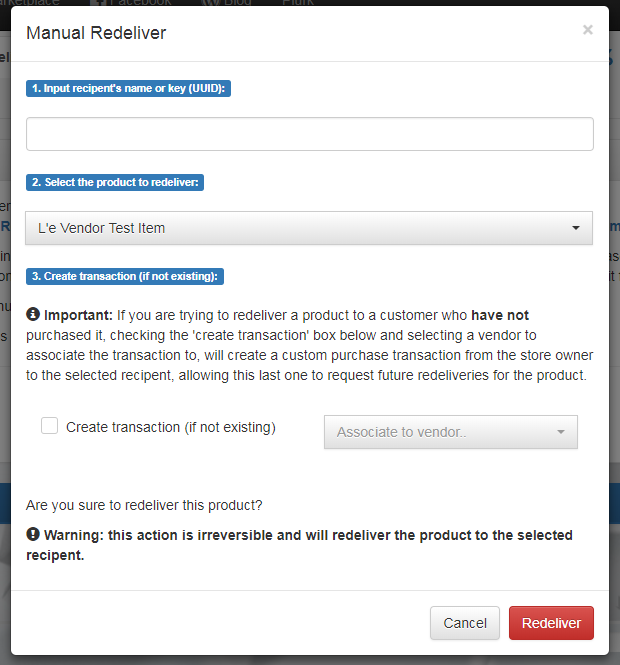
The owner will have to provide the recipient’s name or key (UUID) and select which product to send or redeliver. The last data to input – which is optional – is the ‘create transaction’ checkbox. It can happen in fact that the owner need to send out a product to an user who never purchased it; in this case, checking the ‘create transaction’ box will create a custom transaction from the store owner to the selected recipient having the item chosen as product; in this way – having a transaction for the delivery – the recipient will be allowed to request redeliveries for the product and will also be included during the mass redelivery processes. Once clicked on the ‘Redeliver’ button on the wizard, the process will start and the system will start looking for the selected product inside each redelivery terminal/product server rezzed in-world; once the product is found, it will be delivered to the designed recipient.
Mass Redeliver is similar to the Manual Send feature but, instead of allowing the owner to deliver a product only to one recipient, allows the owner to redeliver a single product to all users whom purchased it. This feature is designed to automate and simplify the delivery of a product’s update, when a certain product has to be redelivered to all recipients who have purchased it in the past. Clicking on the ‘Mass Redeliver’ link in the ‘Tips’ panel will load a simple wizard that will guide the owner through the process configuration; here only two parameters are required: the product to redeliver and the redelivery terminal/product server currently hosting the product in-world. Once clicked on the ‘Mass Redeliver’ button the process will start and the selected terminal will begin deliver the product to every user whom purchased it.
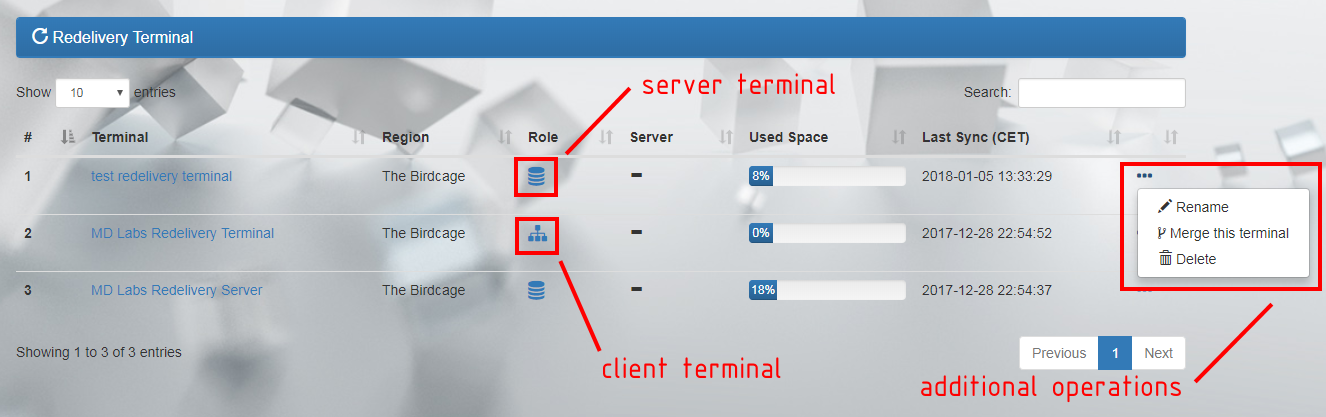
Below the ‘Tips’ panel there is a second panel listing all the redelivery terminals and product servers belonging to the owner and rezzed in-world; for each entry, several data are presented:
- Terminal: the device name, clicking on it will open the corresponding terminal’s detail page, which will be discussed later in this chapter.
- Region: the region where the device is rezzed.
- Role: the device’s role, which can be either server (if the device hosts the product in its content) or client (if the device connects to a server to retrieve the products to deliver). For more info about the device role, please refer to the MD Redelivery Terminal & Product Server user manual.
- Server: the server the device is connected to.
- Used Space: the device’s used space; due to LL limitations a device can host up to 255 items in its content, after which the owner will have to rez an additional terminal to manage more products.
- Last Sync: the last time the device contacted the MD Labs server to update its status.
- Additional operations: accessible through the 3-dot icon (
 ), this submenu allows access to some specific features:
- Rename: rename the corresponding device in-world and on MD Labs Online Services;
- Merge: merge the data from two different terminals. Through this feature is possible to unify all the transactions list regarding a terminal (source) with another one (destination);
- Delete: delete the corresponding terminal from in-world and from MD Labs Online Services;
When clicking on a specific Redelivery Terminal/Product Server entry, the details page for the corresponding device will load, showing the complete transactions list. This page – similar to the vendor’s detail one – contains a complete list of all the redelivery transactions performed by the redelivery terminal, including the product requested and the name of the requesting recipient.

Chapter #11.11: Store Credit & Gift Card tab
The fourth tab in the MD Vendor System homepage is named ‘Store Credit & Gift Card‘ and contains a list of all store’s customers having store credit and/or gift card credit at the store. PLEASE NOTE: in order to take advantage of the features included in this tab, vendors must have the MD Vendor System Plugin – Store Credit & Gift Card installed.

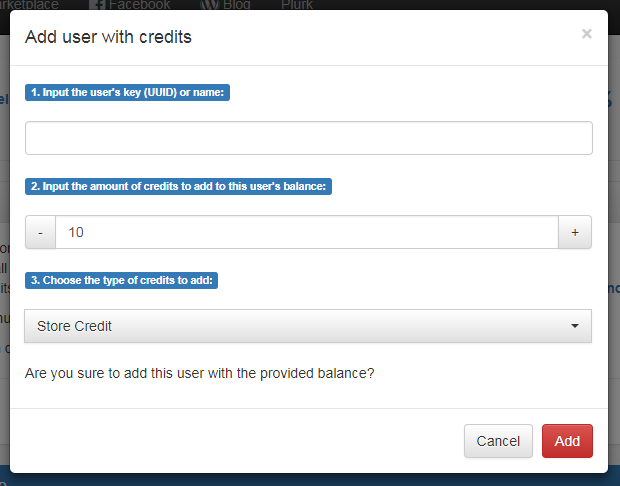
The tab is composed by three main panels: ‘Tips‘ , ‘Store Credit & Gift Card Balance‘ and ‘Gift Card List‘. The main feature that can be found in the tips panel is a link called ‘Add User‘ which allows the owner to manually add a user associating a custom amount of store credits or gift card credits; once added, the customer will be able to pay on the store’s vendor using the type of balance added as payment method.
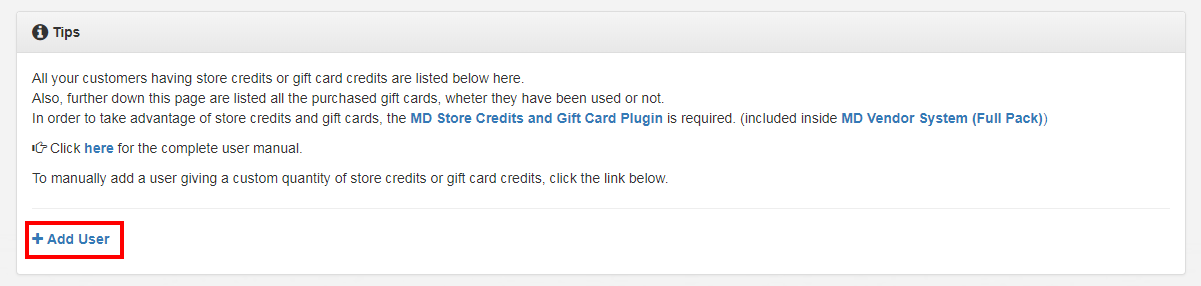
The insertion of a new user is made through a wizard that is triggered clicking on the ‘Add User’ link; in the wizard, the owner will have to provide the user’s name or key (UUID), the amount of credits to add to the user’s balance and the type of credits picking among store credits or gift card credits. Once confirmed by the owner, the user will be added to the store’s list of customers having a credit balance.
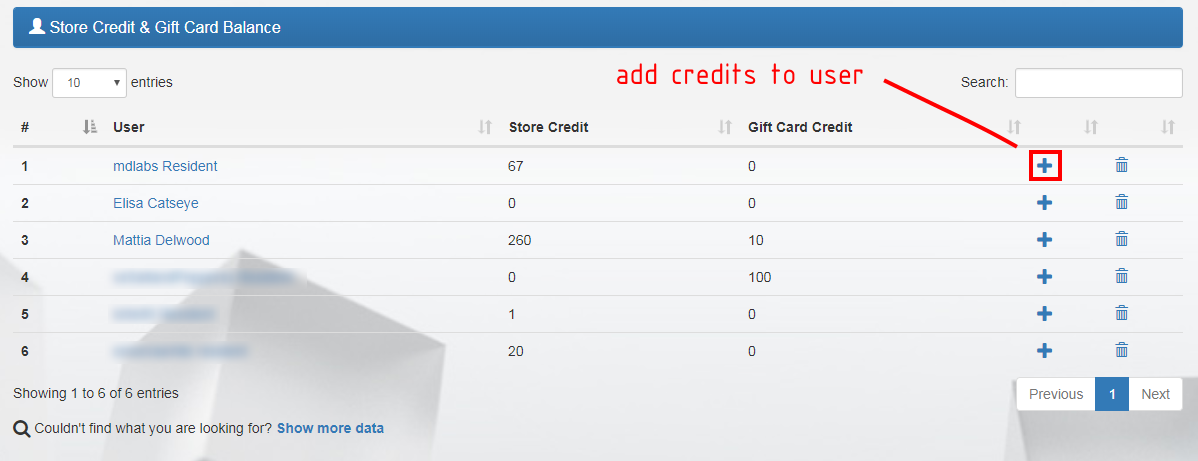
Below the ‘Tips’ panel there is a second one called ‘Store Credit & Gift Card Balance’ which can be considered the main panel of this tab: here in fact are listed all the store’s customers having at least one store credit and/or one gift card credit in their store’s balance. For each entry in the list several data are available:
- User: the customer’s name; clicking on it the owner will be taken to the user’s details page where all the user’s purchases are listed.
- Store Credit: the amount of store credits in the user’s balance.
- Gift Card Credit: the amount of gift card credits in the user’s balance.
- Plus Icon (
 ): this button lets the owner add a custom number of credits (store credits and/or gift card credits) to the corresponding user’s balance.
 - Trash bin icon (): this button removes the corresponding user from the Store Credit & Gift Card Balance list at the store, resetting also the user’s balance.
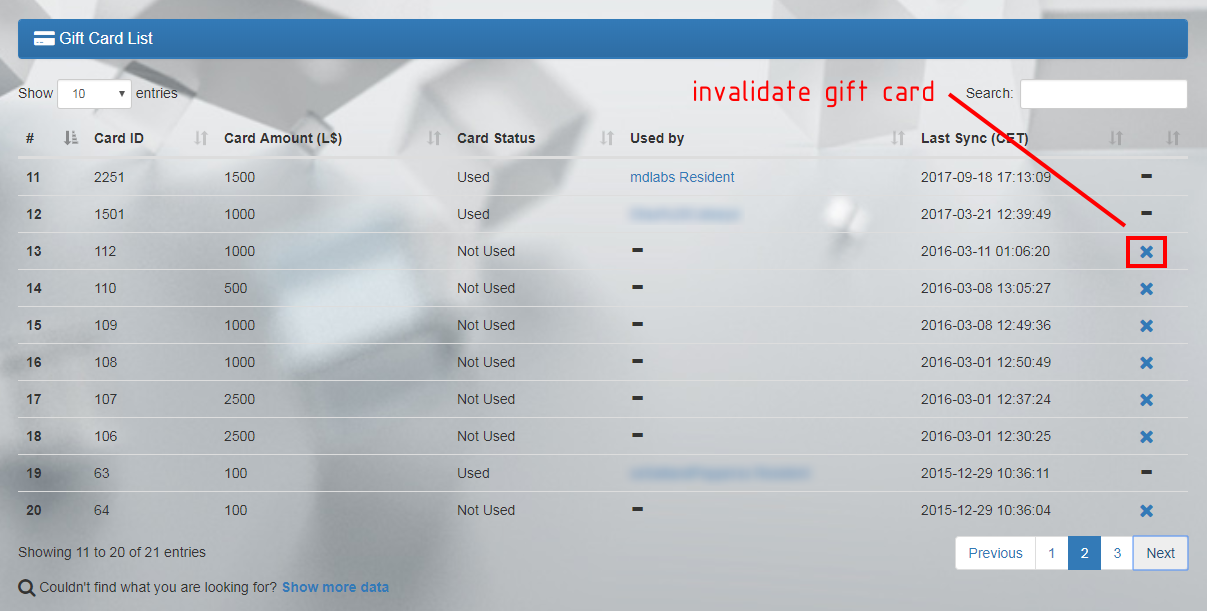
The last (but not least!) panel of this page is called ‘Gift Card List’ and presents a list of all store’s gift card sold; for each of them several information are available:
- Card ID: an unique identifier used to catalog every gift card.
- Card Amount (L$): the gift card’s amount in L$.
- Card Status: the gift card status. A gift card can have three different statuses:
- Not Used: the gift card is still not used and its amount isn’t being added yet to anyone’s balance.
- Used: the gift card is used and its amount has been added to the customer’s balance.
- Invalidated: the gift card has been revoked by the store’s owner and it is not possible to use it anymore.
- Used By: the name of the avatar whom have used the gift card, adding its amount to the balance. When the gift card has ‘Not Used’ as status this value is empty. Moreover, clicking on the user’s name the owner will be taken to the details page where all the user’s purchases are listed.
- Last Sync: the last time the gift card contacted the MD Labs server to update its status.
- Cross icon (
 ): this button invalidates the corresponding gift card, making it unusable. Once invalidated, it will not be possible to redeem the gift card’s amount and add it to the user’s balance. A gift card can be invalidated only if not yet used.
Chapter #11.12: Promo Codes tab
The fifth tab in the MD Vendor System homepage is named ‘Promo Codes‘ and contains a list of all store’s promo codes created. PLEASE NOTE: in order to take advantage of the features included in this tab, vendors must have the MD Vendor System Plugin – Store Credit & Gift Card installed.
A promo code – or promotional code, voucher – is a bond of the redeemable transaction type which is worth a certain amount of money in L$ and which may be spent only on store’s vendors; a code must be 3 to 8 characters long and comes with several options aimed to customise the user’s experience and utilisation.

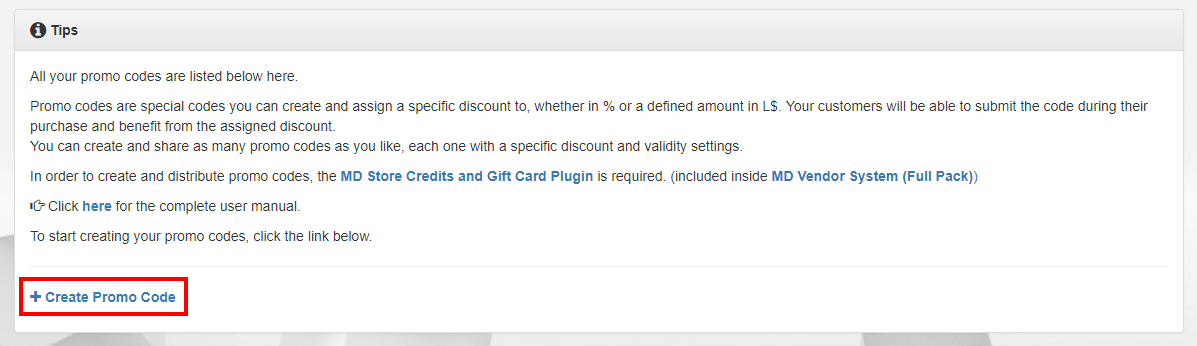
The tab is composed by two main panels: ‘Tips‘ and ‘Promo Codes‘; the first one contains a link that will load the wizard to create new promo codes.
Clicking on the ‘Create Promo Code‘ link will open the code creation wizard and guide the owner to create new codes; the wizard itself is divided into two main tab each one containing a set of option useful to customise the promo code generated. The first tab – called ‘Main Settings’ – contains the most useful and common options for the promo codes:
- Promo code name: the owner is asked to submit the promo code name which will be used by the customers to get their discounts. The code name must be between 3 and 8 characters long and can contain both numeric and alphabetic symbols.
- Discount type & amount: this second parameter to submit represent the type and amount of discount that will be associated to the promo code. Here there are two possible choices:
- Discount in %: the discount associated to the promo code will be a certain percentage between 1 and 99%; customers submitting the promo code during the payment process will obtain a discount of the product’s cost equal to the percentage specified here.
- Discount in L$: the discount associated to the promo code will be a certain amount in L$; customers submitting the promo code during the payment process will obtain a discount of the product’s cost equal to the amount in L$ specified here.
- Promo code recipients: here the owner will have to choose the recipients of the promo code, in other words the users that will able to use the code to get the associated discount. For this setting there are three possible choices:
- Everyone: this is the less restrictive option, allowing everyone who have the promo code to be able to use it to get the associated discount.
- Group member: this option allows only group members to be able to use the promo code. PLEASE NOTE: once this option is enabled the group used is the in-world vendor’s group; moreover, the customers will have to wear the specific group tag in order to be able to use the promo code.
- Specific avatar: this options is the more restrictive one, allowing only a single specific avatar to be able to use the promo code generated. The owner is asked to provide the avatar’s name or key (UUID).

The second tab of the promo code creation wizard – called ‘Advanced Settings’ – contain several other options aimed to customise even more the utilisation of the codes, creating an even more personal experience:
- Code utilisation limit: this setting defines how much times each avatar can use the same code to obtain the associated discount. By default the utilisation limit is set to 0 (zero), which means that the code can be used an unlimited amount of times. Setting this value to ‘3’ for example will let each customer use the code a maximum of three times to get the discount before invalidating it and making it unusable for the user.
- Code validity period: these two values – validity start time and validity end time – represent the period when is possible to use the code to get the associated discount; this setting is very useful and is designed to setup time-limited codes that are accepted only during a certain period, like during discount sales (i.e. Black Friday).
- Vendor associated: this setting – if setup – binds the code to be used only on a specific vendor in-world; any other vendor different from the designed one will not accept the code and not allow the associated discount.
- Region associated: this setting – if setup – binds the code to be used only on a specific region in-world; any other vendor rezzed in any other region in fact will not accept the code and not allow the associated discount.
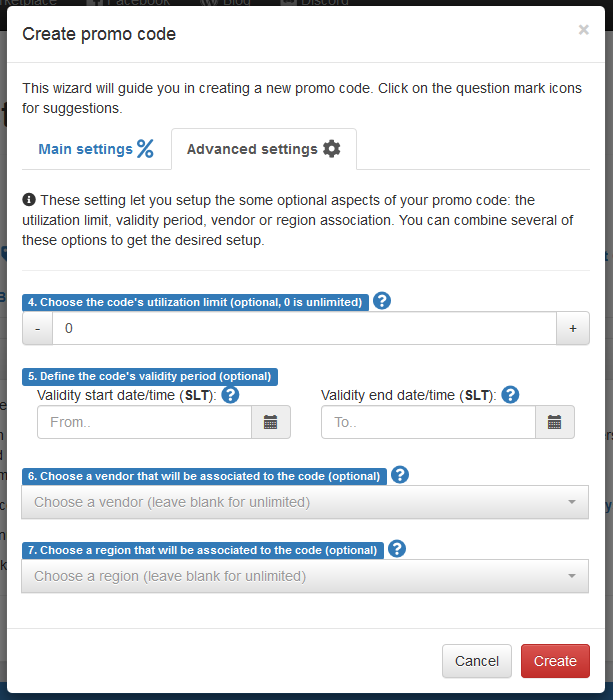
IMPORTANT: all the code’s settings explained can be used both alone and in combination with the other, giving the owner a wide degree of freedom when it comes to personalise the purchase experience. The following examples show two different code setup both valid although very different:
- Code #1: a code allowing a 25% discount to everyone:
- Discount type & amount: percentage, 25;
- Promo code recipients: everyone;
- Code utilisation limit: 0;
- Code validity period: none;
- Vendor associated: none;
- Region associated: none;
- Code #2: a code allowing a 25% discount only to group members, utilisable only one time on a specific vendor during a 3-day special sales event and only in the main store’s region:
- Discount type & amount: percentage, 25;
- Promo code recipients: group ‘XYZ’;
- Code utilisation limit: 1;
- Code validity period: validity start 2018-01-08 00:00:00, validity end 2018-01-11 23:59:59;
- Vendor associated: vendor ‘AAA’;
- Region associated: region ‘BBB’;
The second panel present in this tab is called ‘Promo Codes‘ and contains a list of all created codes, reporting for each of them the code’s configuration and status:
- Status: this field shows the status of the corresponding promo code; there are three possible values for this parameter:
- Not Active: the promo code is not utilizable because it was configured to work durin a specific period (validity) which is now expired. Customers trying to use the code during their purchases will get a warning and the code will not be accepted.
- Paused: the promo code is not utilizable because is temporary paused. Customers trying to use the code during their purchases will get a warning and the code will not be accepted.
- Active: the promo code is active and customers can use during their purchases. PLEASE NOTE: even if the code is active, other restrictions (if present) are applied.
- Code: the promo code itself that is used on the in-world vendors.
- Discount: the discount type and amount which is associated to the corresponding promo code.
- Reserved to: the promo code’s recipients.
- Utilization limit: if present, this value shows the maximum number of times the corresponding code can be used from the same avatar.
- Vendor: if present, this value show the only vendor that will accept the corresponding promo code.
- Region: if present, this value show the only region where the promo code can be used.
- Validity Start (SLT): if present, this value show the moment since when the promo code can be used on in-world vendors.
- Validity End (SLT): if present, this value show the latter moment until when the promo code can be used on in-world vendors.
- Play / Pause icon (
 /
/  ): this button is a toggle that allow to switch the corresponding promo code’s status from play to pause.
 - Trash bin icon (): this button deletes completely and permanently the corresponding promo code, making it unusable.
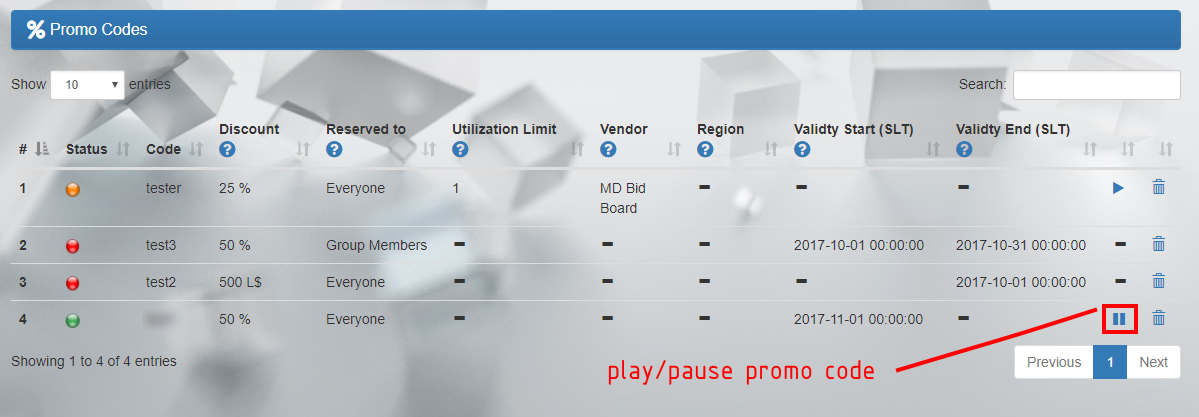
Chapter #11.13: Presets tab
The sixth tab present in the MD Vendor System homepage is called ‘Presets‘ and contains the list of all presets created; from here is also possible to create, manage and apply presets to vendors in-world.
A preset is basically a setup or a configuration that can be applied to one or many vendors; this configuration contains all the settings necessary for the device to work correctly.
So, why presets can be useful? If multiple vendors are configured in the same way (i.e. same price, discounts, group option, ..), then creating a preset with that configuration and apply it to to the corresponding vendor will result in a considerable saving of time, as well reduce the chance to setup vendors with wrong settings. This because – generally speaking – there is a tendency to setup the vendors always with the same parameters (price, discount, etc..), and in this case presets become very handy.

The tab is composed by two main panels: ‘Tips‘ and ‘Vendor Presets‘; the first one contains a link that will load the wizard to create new presets, while the second one listing all the presets created.
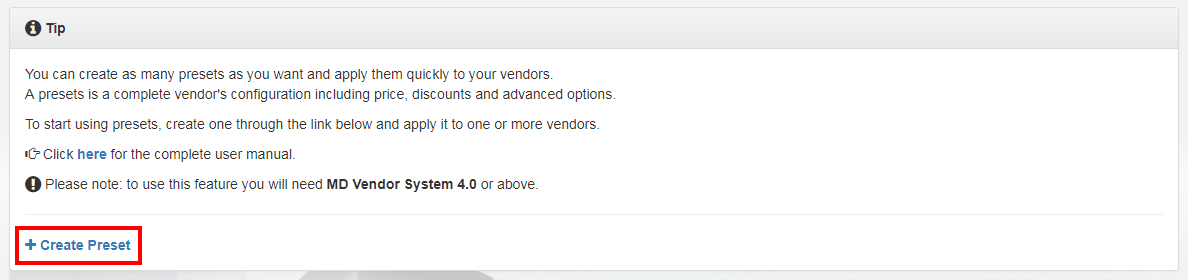
Clicking on the ‘Create Preset’ link will open the preset creation wizard and guide the owner to create new presets; the wizard itself is divided into three main tabs each one containing a different set of options useful to customize the preset generated. Below here is reported – for each tab of the wizard – which options are available, however no detailed explanation of those options will be given as they were already vastly discussed in the previous chapters.
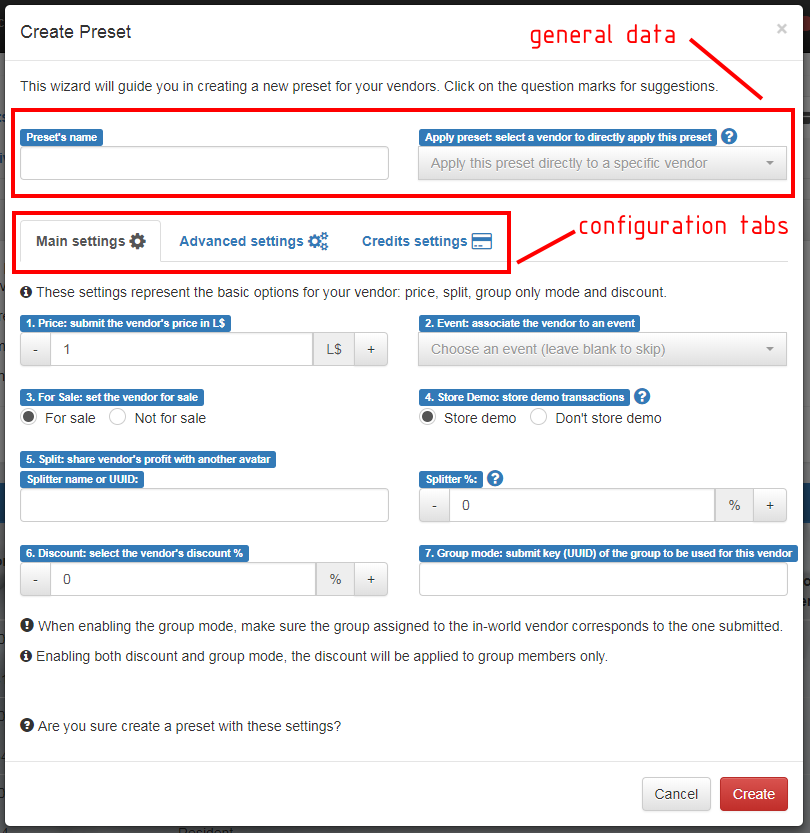
The first tab present into the preset creation wizard is called ‘Main settings‘ and contains the following options:
- Vendor’s price;
- Vendor’s event;
- Vendor’s for sale status;
- Store demo;
- Split %;
- Discount %;
- Group mode;
The second tab is called ‘Advanced settings‘ and here the owner will be able to find the following options:
- Quantity limit (stock quantity);
- Vendor time;
- Notify;
- Hover text;
- Direct pay;
- Exclude;
- Vendor mode;
The third and last tab is called ‘Credits settings‘ and holds all the options available through the Store Credit & Gift Card plugin:
- Store credit %;
- Store credit’s group restrictions;
- Gift card support;
- Promo code support;
Once all the required settings are provided, clicking the “Create” button will create the preset defined as specified in the wizard. All the presets are listed under the ‘Vendor Presets‘ panel.

From the list each presets can be easily applied to a specific vendor simply clicking on the paper plane icon (![]() ); the owner will be asked to pick the vendor to apply the preset to and upon confirm every setting connected to the preset will be applied to the chosen vendor in-world. Using the trash bin icon (
); the owner will be asked to pick the vendor to apply the preset to and upon confirm every setting connected to the preset will be applied to the chosen vendor in-world. Using the trash bin icon (![]() ) on the presets list is then possible to delete completely a preset.
) on the presets list is then possible to delete completely a preset.
Chapter #11.14: Managers tab
The next tab on MD Vendor System homepage is called ‘Managers‘ and allows the owner to add, manage and remove one or more store’s managers; a manager will be able to access the MD Vendor System homepage just like the store’s owner and – depending on the permissions granted – interact in several ways with all the aspect of the system.
PLEASE NOTE: managers will ONLY be able to interact with the vendors and other devices through the Online Services website, and not directly from in-world.

Each manager will have a specific level of permissions that can vary from level 1 to level 3. Lower level (1) means less permissions, while higher level (3) means more permissions; also, some actions can be performed only by the owner. Below here there is a list of all the actions and who can perform them:
- Owner only actions:
- rename the store;
- rename SL Marketplace listings;
- export data;
- perform mass redelivery;
- create promo codes;
- create presets;
- add managers;
- remove managers;
- change managers permission level;
- toggle share profit with managers;
- Managers with permissions at level 1:
- view all the data but not perform any action; (view-only permissions)
- Managers with permissions at level 2:
- rename vendors;
- delete vendors;
- create events;
- associate events to vendors;
- edit events;
- remove events association from vendors;
- archive & restore in-world vendors;
- archive & restore SL Marketplace listings;
- rename redelivery terminals & product servers;
- apply presets to vendors;
- send new managers the registration HUD;
- mark transactions as delivered;
- ping vendors in-world;
- Managers with permissions at level 3:
- all the actions from managers at level 2;
- delete single vendors;
- delete multiple vendors at once;
- delete single transactions from in-world vendors;
- delete single transactions from SL Marketplace listings;
- delete all transactions from vendors;
- delete events;
- apply settings to vendors in-world;
- toggle vendors’s ‘for sale’ status;
- add transactions manually;
- redeliver specific transactions;
- perform manual redeliveries;
- merge two vendors;
- merge two redelivery terminals or product servers;
- add users and give them store credits/gift card credits;
- add store credits/gift card credits to existing users;
- remove store credits/gift card credits from existing users;
- invalidate gift cards;
- toggle promo codes’s status;
- delete promo codes;
- delete presets;
- add users to blacklist;
- remove users from blacklist;
As listed above, some actions can be performed only by the owner, level 1 is the lowest level (view only) and doesn’t allow any actions to be performed, level 2 and 3 allow the managers to perform more and more actions.
Independently by the permissions level, there is another important setting that characterizes each manager: the ‘share profit data’. As said, this option does not depend by the permissions level but the store owner has to declare it when adding a new manager and can optionally change it anytime. The share profit data is a flag that can either be set to true or false:
- if true, the manager will be allowed to see the store’s total profit, and all the vendors’s profit.
- if false, the manager will not be able to see the store’s total profit and all the vendors’s profit.
This is made to protect the owner’s privacy, since not always a store owner is willing to share the store’s profit data with the managers. The share profit data setting is personal to each manager and can be changed anytime by the owner only; the changes will be applied immediately to the corresponding manager.
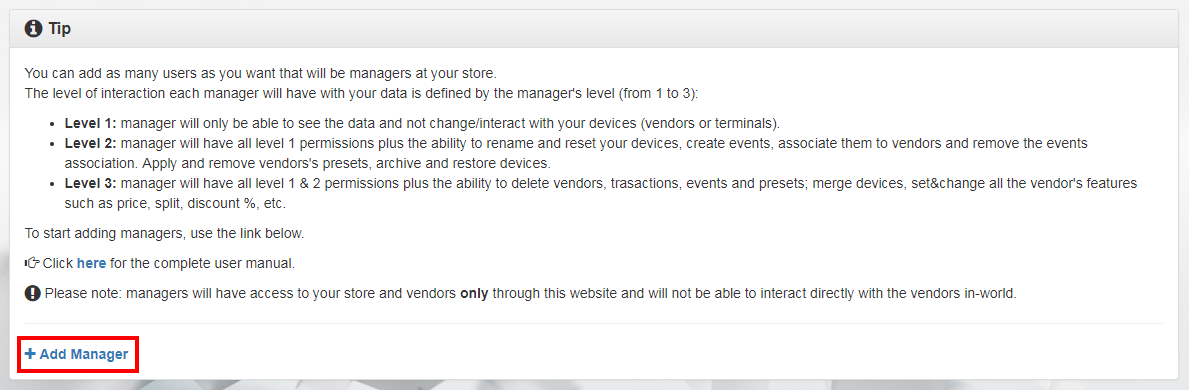
To add a new manager, the owner will have to click on the ‘Add Manager‘ link in the ‘Tips’ panel; a wizard will appear and require a few simple steps:
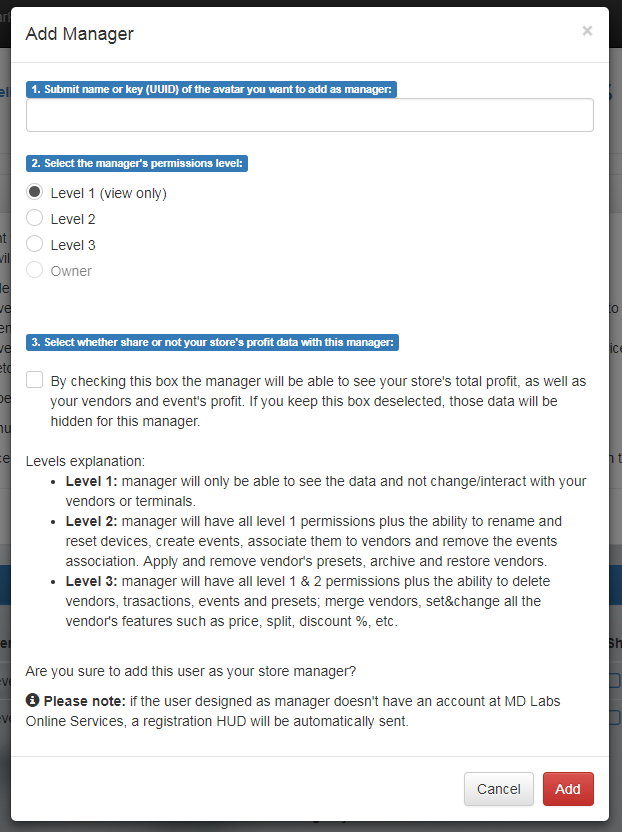
The first thing is provide the manager’s name or key (UUID); then select a permission level and whether share or not the store’s profit data. Once these info are provided, clicking on the ‘Add’ button will add the selected user as store’s manager. The manager will be immediately listed in the ‘Managers ‘ panel which can be found into the ‘Managers’ tab; from here it will be possible to change the manager’s level, toggle the share store’s profit and also remove the manager.
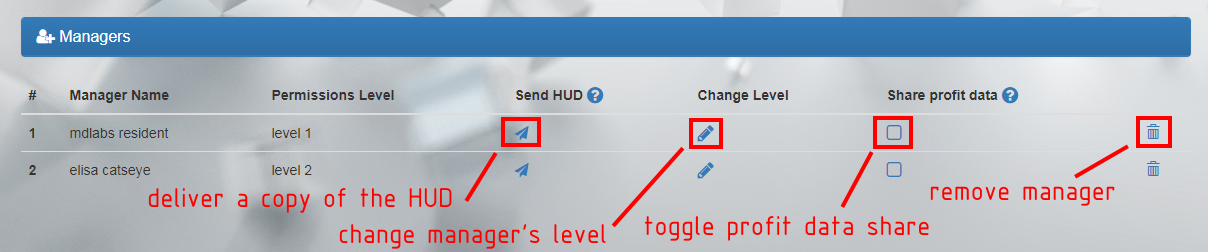
The ‘Managers’ panel – located into the Managers tab – contains the following data:
- Manager Name: the name of the manager.
- Permission Level: the permission’s level of the corresponding manager.
- Send HUD (
 ): this button delivers a new copy of MD Vendor System registration HUD to the corresponding manager. More info further down on this page.
 - Change Level (): this button opens a wizard that allows the owner to change the manager’s permission from one level to another.
- Share profit data (
 /
/  ): this button acts as a toggle, enabling and disabling the share of the store profit with the corresponding manager.
 - Trash bin icon (): this button removes completely the manager from the store’s managers list, prohibiting the deleted manager to access the store’s page.
Is important to spend a few more words on the registration HUD for MD Labs Online Services. In order to login and access the store, the managers must be registered to MD Labs Online Services; if the user selected as manager already uses MD Vendor System then an account is already registered and the users will be able to use the same credentials to login to the store to manage. Conversely, if the user selected as manager doesn’t use MD Vendor System then the creation of an account is required and a registration HUD will be automatically sent to the user once added as manager. It is also possible to repeat the HUD dispatch in another moment through the corresponding option in the managers list.
Once added as manager, the user will be able to switch between stores through the “Store” panel present into the ‘Vendors‘ tab; from here, the drop down will present a list of all stores owned and managed by the user, and a click on them will start the switch process to the selected store.
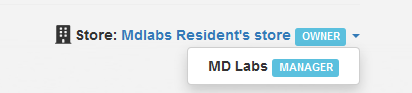
Chapter #11.15: Blacklist tab
The ‘Blacklist‘ tab allows the owner to block one or more users, preventing them to interact with the store’s vendors and services; this feature is designed to help store owners against impolite or rude users having an unfair attitude, like copybotters or cheaters. The tab is composed by two different panels called ‘Tips’ and ‘Blacklisted avatars’.

The ‘Tips‘ panel contains a link called ‘Add Blacklisted Avatar’ that will open a simple wizard to add a new blacklisted avatar; the only required data in this process is the name or key (UUID) of the avatar to blacklist.
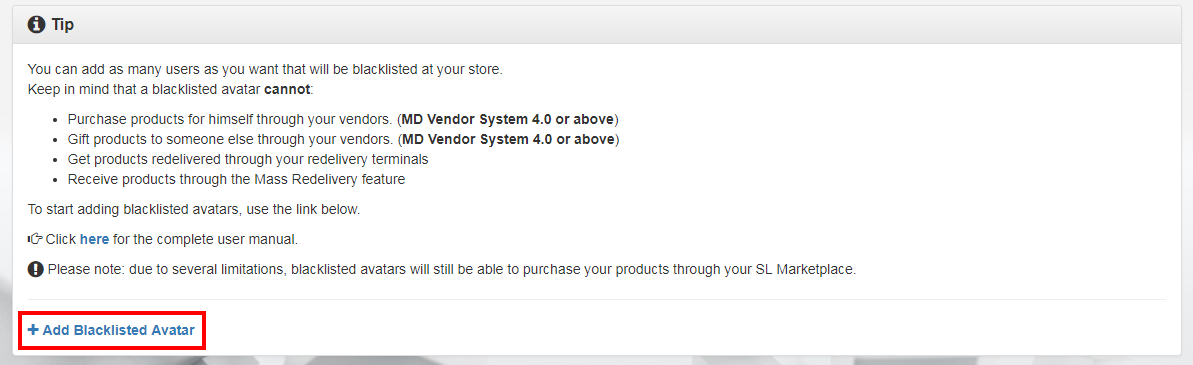
Once an avatar is blacklisted, it will be blocked from all kind of interactions with MD Vendor System:
- It will not be possible for a blacklisted avatar to purchase any product from in-world vendors;
- it will not be possible for a blacklisted avatar to gift any product from in-world vendors;
- it will not be possible for a blacklisted avatar to receive a product as gift from in-world vendors;
- it will not be possible for a blacklisted avatar to request any product redelivery for past purchases;
- a blacklisted avatar will be automatically excluded from the mass redelivery process;
PLEASE NOTE: due to a lack of specific features, is not possible to block an avatar from purchasing from SL Marketplace.
IMPORTANT: as described in the initial chapters of this manual if a blacklisted avatars tries to purchase a product from an in-world vendor the transaction will be canceled, no product will be delivered and the avatar will be refunded of the amount paid.
Once the avatar is added as blacklisted it will be listed into the ‘Blacklisted avatar’ panel:
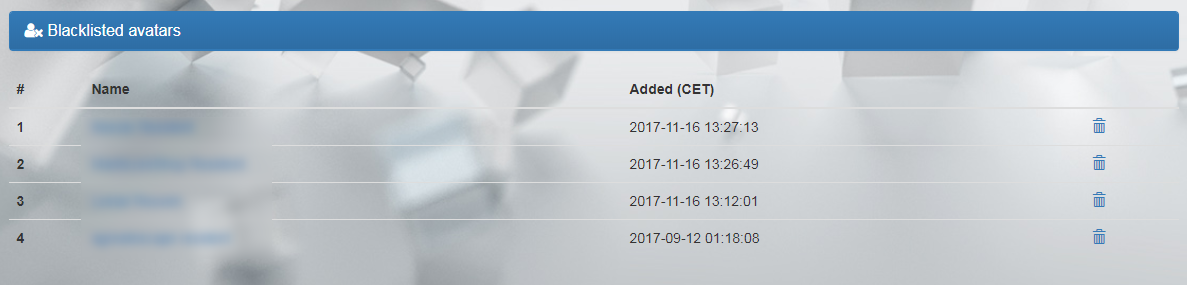
This panel shows a few data about the blacklisted avatars:
- Avatar name: the name of the blacklisted avatar.
- Added: the date-time when the avatar was added into the blacklist.
- Trash bin icon (): a button that will remove the corresponding avatar from the blacklist, allowing it to interact with again with MD Vendor System.
Chapter #11.16: Archived tab
The last tab which composes the MD Vendor System homepage is called ‘Archived‘ and groups together all the vendors which are not rezzed anymore and which have been archived by the owner. The archive feature has been designed to help store owners to keep their data consistent while reducing the amount of information displayed; by archiving a vendor – in fact – it will be removed from in-world and from the ‘Vendors’ tab on MD Labs Online Services, but all the vendor’s data such as total profit, total item sold and the complete transaction list is kept.

This action brings several benefits to the store owner:
- There will be less vendors displayed into the ‘Vendors’ tab, making it easier to find the vendor desired;
- Since all the vendor’s data is kept there will still be statistics about the archived vendors;
- Since all the vendor’s data is kept it will always be possible for customers to request a redelivery of product purchased from archived vendors;
The main panel present in this tab is called ‘Archived Vendors’ and lists all the vendors which have been archived by the owner.
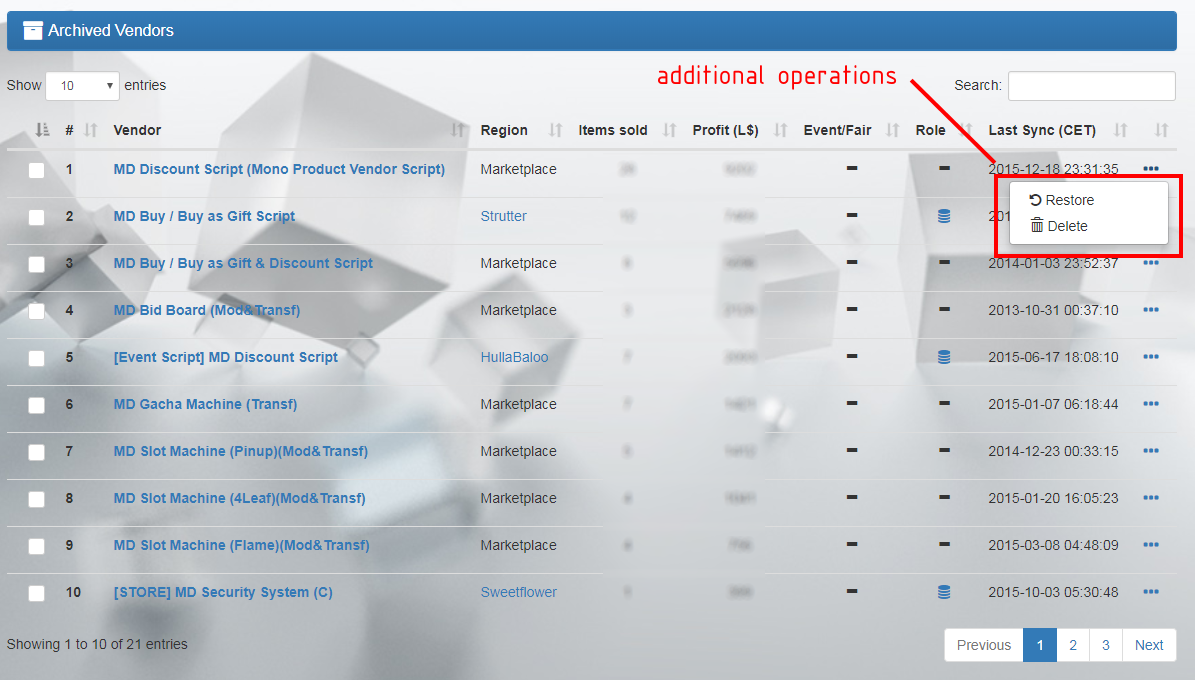
The data showed for each vendor is very similar to the one present in the ‘Vendors’ tab, except the additional operations which are accessible clicking on the 3-dot icon (![]() ). The first operation is called ‘Restore’ (
). The first operation is called ‘Restore’ (![]() ) and it allows the owner to restore an archived vendor, moving it from the ‘Archived’ tab to the ‘Vendors’ one; while this action moves the vendor’s data from one tab to another on MD Labs Online Services website, it will not restore the vendor in-world if it has been already deleted. The second option, ‘Delete’ (
) and it allows the owner to restore an archived vendor, moving it from the ‘Archived’ tab to the ‘Vendors’ one; while this action moves the vendor’s data from one tab to another on MD Labs Online Services website, it will not restore the vendor in-world if it has been already deleted. The second option, ‘Delete’ (![]() ), removes completely the vendor’s data; once done all the vendor’s statistics will be lost including the transactions lists, preventing the users to request redelivery for the product sold by the vendor itself.
), removes completely the vendor’s data; once done all the vendor’s statistics will be lost including the transactions lists, preventing the users to request redelivery for the product sold by the vendor itself.
Chapter #11.17: Store Management tab
The ‘Store Management‘ tab group together several store-wide features and settings designed to customize and enhance the overall experience with MD Vendor System.

The features present in this tab are:
- Store name: the owner will be able to submit the store’s name which will be displayed in several areas, such as the redelivery page;
- Refund double purchase: this option – when enabled – refund avatars whom are purchasing again a product which was already bought by/to the selected recipient. This will avoid avatars purchasing several times the same product, or gifting it to someone who already have it;
- Import sales: through this feature is possible to import sales data from other vendor solutions. More details about the import feature in the corresponding chapter;
- Import credits: through this feature is possible to import credits balance data from other vendor solutions. More details about the import feature in the corresponding chapter;
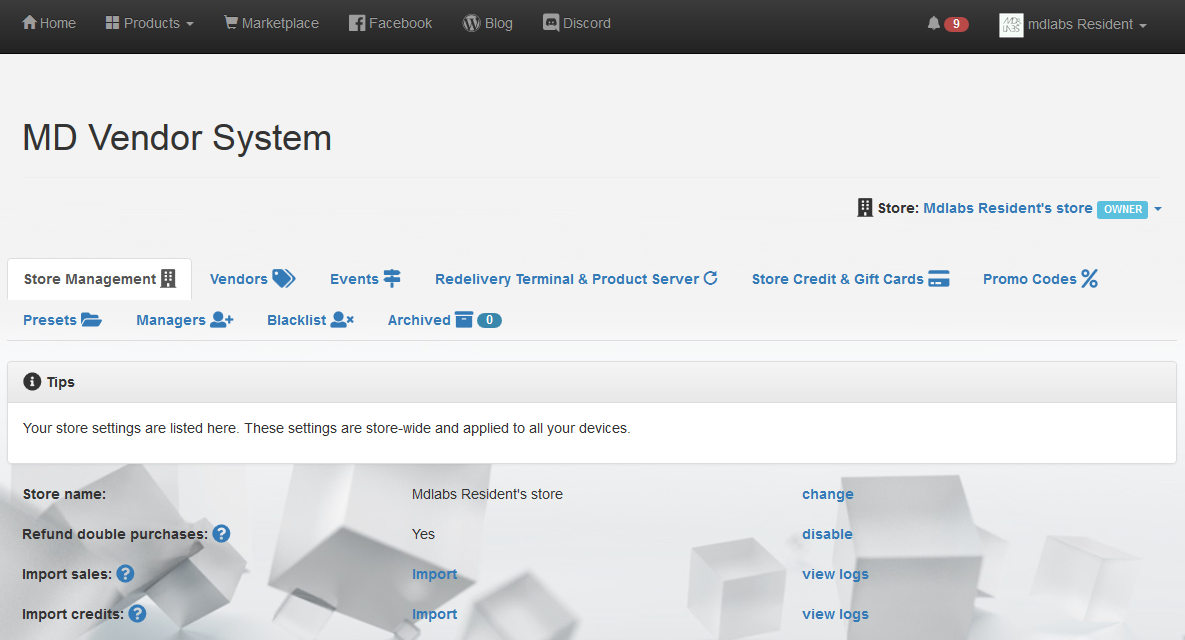
Chapter #11.18: Importing data into MD Vendor System
MD Vendor System can import different kind of data from other vending solutions, such as sales and store credits data. There are several benefits from importing data from old systems:
- customers will be able to redeliver products purchased with the old vendor system;
- store’s general statistics such as total profit will be taken in account also of the past years/months, giving a better and more detailed overview of the sales trend;
- customers will keep their store credit balance in one system, avoiding confusion, mistakes and additional work;
The import process for both sales and credits is very similar and can be launched from the ‘Store Management’ tab, clicking on the corresponding link; a simple wizard will appear:
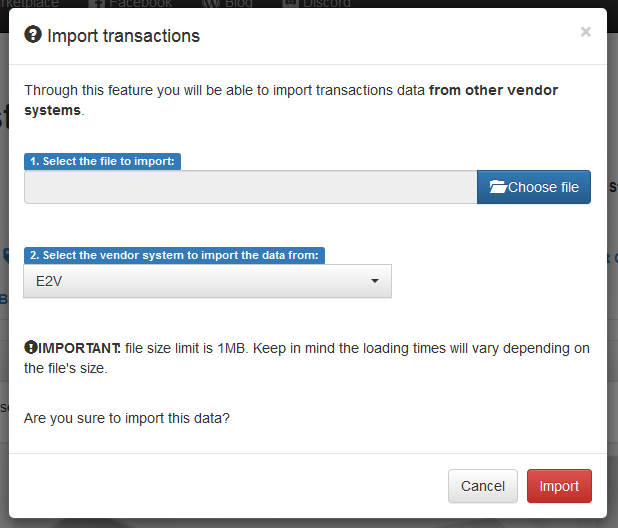
The owner will have to provide the file containing the data to import and also specify the vendor solution which generated the data; clicking will start the import process that will generally take up just a few seconds.
PLEASE NOTE: depending by the vendor system from which the data comes from, a different file type (.zip, .csv) may be required to execute the import.
MD Vendor System keeps track of every import task performed and presents a detailed summary in a dedicated section called Import Logs; this page is accessible simply clicking on the ‘view logs’ link under the ‘Store Management’ tab.
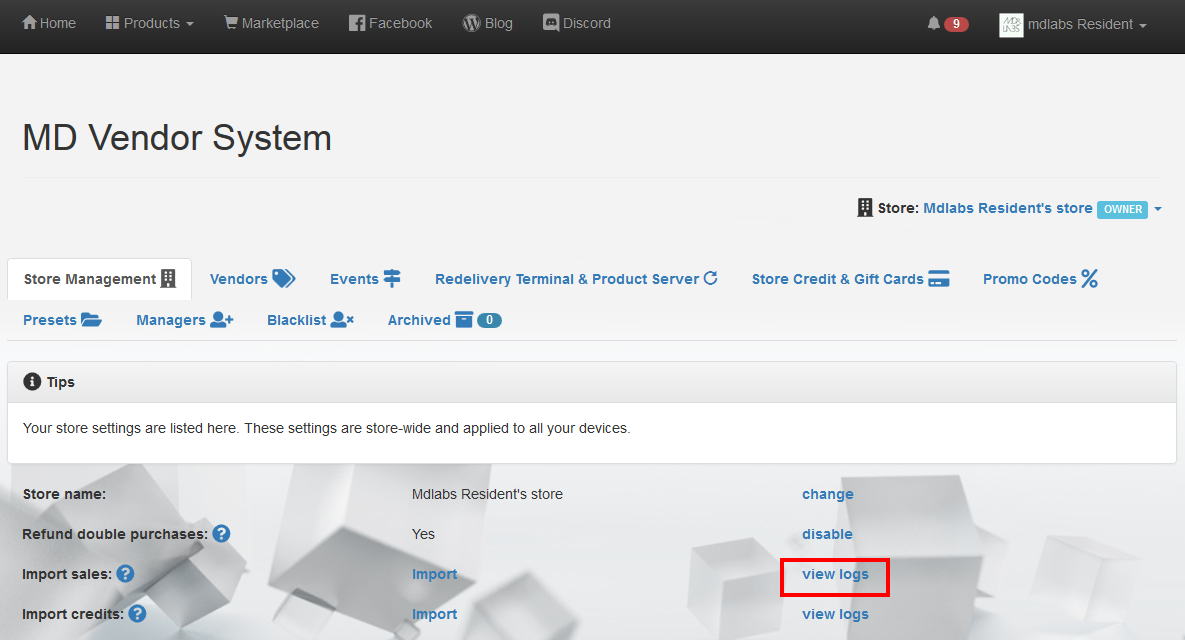
Clicking the ‘view logs‘ link will lead the owner to the import logs page, containing a full archive of all the import tasks performed.
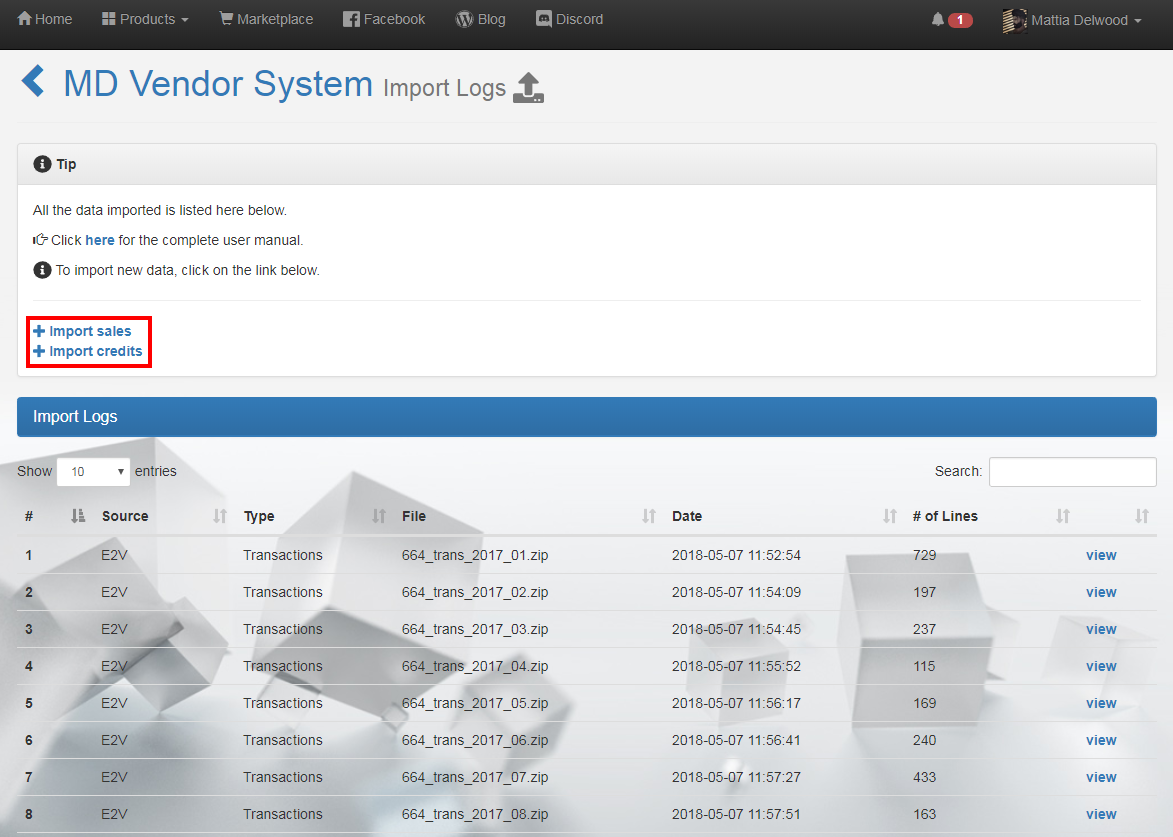
The first panel contains two quick links to import both sales and credits data; these links will trigger the same procedure present into the ‘Store Management’ tab. The second panel, called ‘Import Logs‘ contains a summary of all the import tasks performed and list – for each of them – several useful info:
- Source: the vendor system from which the data was generated;
- Type: the type of data imported, typically transactions or credits;
- File: the name of the file imported;
- Date: the date and time the import task was processed;
- # of lines: the number of lines contained into the file imported and added to MD Vendor System data;
- view: a link to MD Vendor System detail page, where all the imported data from the selected task will be displayed;
Chapter #12: MD Vendor System Auto Updater
Among all the components that can be found inside the MD Vendor System (Full Pack) or MD Vendor System pack, there is one called ‘[Auto Updater] MD Vendor System (Full Pack)‘: this tool is designed to help the owner in the task of updating a store which is running with a previous version of MD Vendor System. The auto updater does most of the work for the owner, updating each selected vendor by replacing the needed scripts inside; the update process can also be customized through the several options available.
Once rezzed, the MD Vendor System Auto Updater shows up like a simple box, similar to this one here:

Once the owner click the auto updater box a menu will appear, offering a few choices:
- All: this button starts the update process for all vendors located in the same region as the auto updater.
- Single: this button starts the update for a single specific vendor located in the same region as the auto updater.
- Options: this button give access to a series of options allowing to customize even more the vendor’s update.
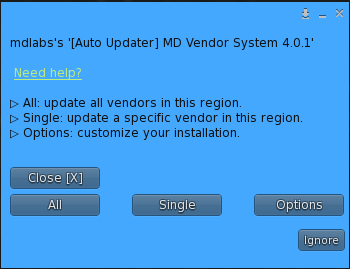
In order to update a complete store, the owner will have to rez the auto updater at any point of the store, as long as the updater is on the same region as the vendors to update. Once done, simply clicking on the auto updater will prompt the owner menu, where ‘All’ will be the chosen option; a second window will show up reporting a summary of the update process, total number of vendors found to update and an estimated update time.
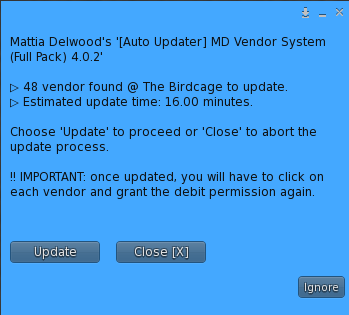
Selecting ‘Update‘ will start the update process: the auto updater will move close to each vendor and replace the scripts inside with the new ones; during this process the updater will send the owner constant reports on the current progress, other than a personal message once the whole update is complete. Unfortunately the auto updater cannot take care of the 100% of required steps to update a vendor: due to LL security measure, once the update process is complete, the owner will have to grant each updated vendor the debit permission again simply clicking on it. Once this has been done, the vendor will restore its configuration including price and all the options.
IMPORTANT: there are a few things to keep in mind in order to avoid issues during the update process:
- Do not click and grant permission on any vendor until the whole store update is complete;
- Do not click the auto updater, stop it or delete it while the update is in progress;
The update of a single vendor is very similar to the one already described for a whole store (‘All’), but the owner – after clicking on ‘Single’ in the owner menu – will be asked to choose the vendor to update; once this selection is done the auto updater will start and the process will continue as already described.
The ‘Options‘ submenu group together several options and features aimed to customize the update process to make it better fit with the owner’s needs.
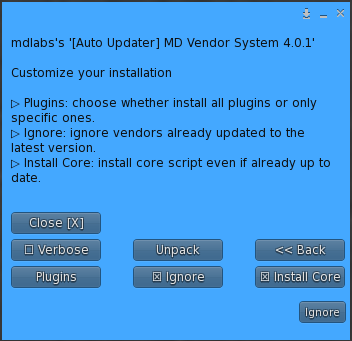
- Plugins: through this button the owner will be able to access a second menu where is possible to force the updater to install only some selected plugins, whether or not they are already installed in a previous version. By default the updater uses the ‘smart-install‘ feature to update vendors: only plugins already present inside the vendor will be updated to the newest version, while the other are skipped. This avoids to install plugins which are not used, reducing also the number of scripts per vendor. The owner can override the ‘smart-install’ feature selecting one or more plugin to install from the ‘Plugins’ submenu; at this point the updater will only install the selected plugin, whether they were already present or not inside the vendor.
- Ignore: this toggle – once enable – let the updater skip from the update vendors which are already running the latest version of MD Vendor System.
- Install Core: this toggle – once enable – forces the update to always install the ‘Core’ script of MD Vendor System even if already present in the last version.
- Verbose: when this toggle is enabled, the updater will give in chat more information regarding the update process.
- Unpack: clicking this button will unpack the content of the updater, creating a folder in the owner’s inventory.
Chapter #12.1: Updating from E2V
MD Labs provide a special updater for the store owners using E2V as vendor system. This special update is called ‘[Auto Updater] MD Vendor System (Full Pack) for E2V‘ and provides an automatic way to migrate existing E2V vendors rezzed in-world into vendors running MD Vendor System.
This tool will do the most of the update work for the owner:
- moving next to each rezzed vendor running E2V and replacing the scripts with the MD Vendor System ones;
- reading automatically the vendor’s price from its description and assigning the value to the vendor;
PLEASE NOTE: due to a different credits implementation, the E2V updater will NOT automatically set the store credit %, but the owner will have to do it manually once the update is complete.
In order to update a complete store, the owner will have to rez the auto updater at any point of the store, as long as the updater is on the same region as the vendors to update. The updater comes in the shape of a simple box, identical to the standard MD Vendor System updater introduced in the previous chapter; once rezzed the owner has click the box and a menu will appear, offering a few choices:
- Start: this button will start the update wizard, allowing the owner to customize the installation before proceeding;
- Verbose: this button toggles the verbose mode on, providing more information in the local chat during the update;
- Close: this button closes the menu;

Clicking on the ‘Start‘ button will prompt the owner to a second dialog where is possible to select which plugins install during the upgrade, along with the MD Vendor System core script.
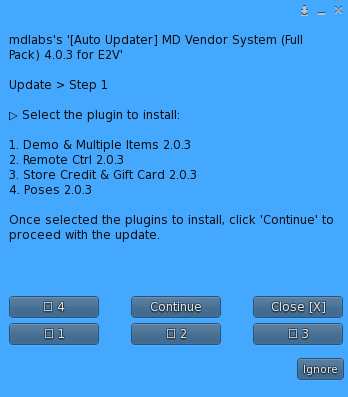
This step allows the owner to customize the upgrade by installing one or more of the following plugins:
- Demo & Multiple Items (more info here)
- Remote Control (more info here)
- Store Credits & Gift Card (more info here)
- Poses (more info here)
Once the update setup is complete, clicking on the ‘Continue‘ button will prompt a last dialog where a summary of the update settings is reported. Clicking on the ‘Update‘ button will then start the upgrade process: at this point the update box will start searching for E2V vendors to update in the region, move next to each of them, delete the E2V script and install the MD Vendor System script, along with the selected plugin.

PLEASE NOTE: the update process may take from a few minutes to hours depending on the number or vendors to update.
Unfortunately the auto updater cannot take care of the 100% of required steps to update a vendor: due to LL security measure, once the update process is complete, the owner will have to grant each updated vendor the debit permission again simply clicking on it. Once this has been done, the vendor will try to gather the price from the vendor’s description field and apply it automatically to the newly updated vendors.
IMPORTANT: the update process is split in several clusters, the updater will send the owner an IM when the whole update is done.