Summary:
- Chapter #1: Initial setup & deeding
- Chapter #2: Owner menu
- Chapter #3: Basic usage
- Chapter #4: Mode
- Chapter #5: Rules
- Chapter #6: Access List
- Chapter #7: Options
- Chapter #8: MD Labs Online Services
Initial notes
! IMPORTANT: The following user manual presents and explains the usage and detailed features of:
- MD Security System version 3.1.0
Chapter #1: initial setup & deeding
The setup process for MD Security System is divided into two main steps: the owner registration and the security system’s deeding; while the first step is mandatory and must be done, the second is not always required depeding on the owner’s permission over the land where the MD Security System is rezzed.
To start the setup process, the owner will have to rez the MD Security System and wait a few seconds for the system to initialise; during this time the security orb is registering itself and checking and starting all its modules.
After the first step, the MD Security System will analyse the land where its rezzed on, the owner’s permissions on the land and eventually require for an additional step: the deeding. This is because for the eject feature to work correctly, the MD Security System owner must be the land owner as well, as required by Linden Lab.
However, as it happens for many private estates, the land may be owned by a group; in this case, to have complete protection, it’s necessary to deed the MD Security System to the same group that own the land.
After the land scan – and if the deed is required – a hover text will be shown to remind the owner to deed the orb, as well as a chat message suggesting which group the owner should deed the orb to.
In order to deed the orb a few simple steps are required:
- Right click the MD Security System and go to “Edit”and go to the tab called “General”;
- Under creator, owner and last owner there is an entry called “Group”, be sure the current group is set to the one owning the land, and if not use the wrench icon to change it;
- Click on the checkbox called “Share” to select it;
- Click on the “Deed” button;
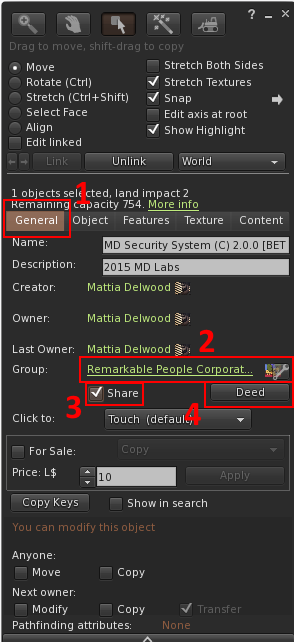
At this point the security system is deeded and the owner will receive a message confirming the operation: the initial setup is now complete.
IMPORTANT: deeding the MD Security System to the land group will force the ‘Group Mode’ feature – once enabled – to work only with the land group the orb is deeded to.
Chapter #2: owner menu
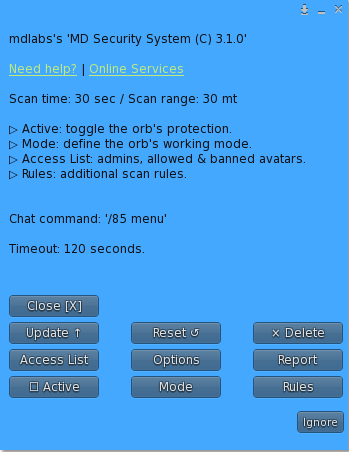
Once the MD Security System’s setup is complete, a click of the owner on it will open a menu called ‘owner menu’; this dialog is accessible by the owner, administrators and managers, but – depending by the user’s role – some features ,may be available or not.
Through this menu is possible to configure and manage every aspect of the security system:
- Active: this button activates or deactivates the MD Security System, turning the scan engine on and off;
- Mode: this button leads to a sub-menu where it is possible to choose the orb’s behaviour toward new avatars found. More details in the dedicated chapter;
- Rules: this button leads to a sub-menu where it is possible to specify additional custom rules which the avatars found will have to satisfy in order to not be ejected. More details in the dedicated chapter;
- Access List: this button leads to a sub-menu where it is possible to define and manage who can interact with the MD Security System, who is allowed in the land and who is banned. More details in the dedicated chapter;
- Options: this button leads to a sub-menu where it is possible to find all the additional settings allowing the owner to customise several different aspects of MD Security System, from how the orb protects the area and ejects unwanted avatars, notifications, to appearance settings such as orb’s visibility, hover text and more. More details in the dedicated chapter;
- Report: this button will send the owner a report of the last 20 orb’s activities, such as the unwanted avatar found, avatars ejected or allowed;
- Update: pressing this button will start the update module and search for a new product update;
- Reset: pressing this button will reset the MD Security System;
- Delete: pressing this button will delete the security orb;
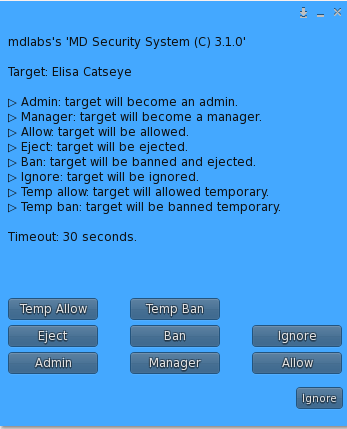
Chapter #3: basic usage
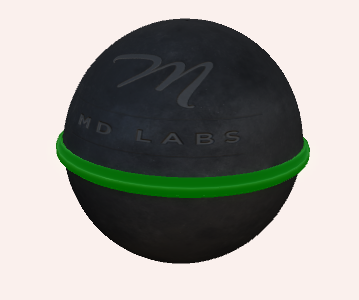
To start using MD Security System simply rez it on the ground and proceed with the deed, if required. Once done a click will bring up the owner menu; before clicking on the ‘Active’ button it’s necessary to pick a working ‘mode’ from the ‘Mode’ sub-menu. Once done, clicking on ‘Active’ will turn the security system on; the MD Security System’s notification bar will switch from red to green and the orb will scanning the area around.
For more details on the orb’s working mode, please refer to the next chapter of this manual.
IMPORTANT: By default, the orb will scan a 30 meters spherical area every 30 seconds.
Chapter #4: mode
IMPORTANT: Modes define how the security system should behave when one or more avatars are found in the area.
The mode submenu can be reached from the owner menu and is used to set the “default” mode . The owner is asked to choose among several different options:
- Allow: all the unknown avatars found will be automatically allowed in the area and added to the allow list.
- Eject: all the unknown avatars found – who are not on the access list – will be automatically ejected.
- Ban & Eject: all the unknown avatars found – who are not on the access list – will be automatically added to the ban list and ejected.
- Scan & Eject: all the unknown avatars found not matching the scan options will be automatically ejected while the other ones will be allowed. This mode is particularly useful for clubs and events, where the owner just wants to scan and eventually eject avatars not respecting the scan rules.
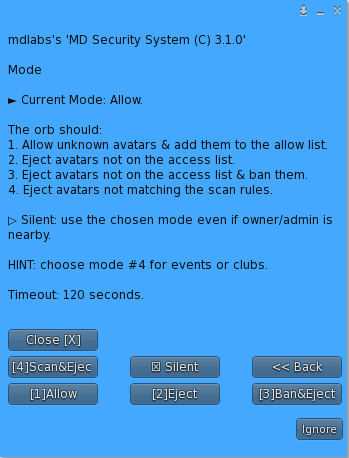
There is one last option in this submenu called ‘silent’:
- if ‘silent’ is enabled: once unknown avatars are found, the security system will use the chosen mode automatically, without asking the intervention from the owner or administrators.
- if ‘silent’ is disabled: once unknown avatars are found, the security system will look for the owner or administrators in the area and if found, prompt a dialog to them asking to manually pick a specific action toward the avatars found. If no action is taken before the timeout, the orb will use the “default” mode.
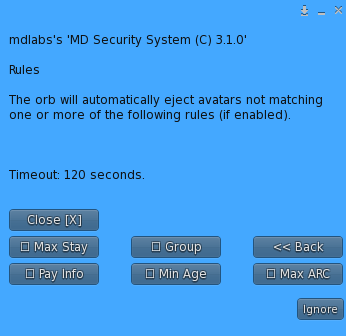
Chapter #5: rules
The rules submenu contains several additional rules aimed to customise even more the behaviour of MD Security System; these rules work “on top” of the chosen mode and they can be combined together to create a very specific pattern.
The rules submenu contains the following entries:
- Pay info: when this feature is enabled, every scanned avatar will be required to have the payment info on file; if not the avatar will be ejected from the area;
- Min age: when this feature is enabled unknown avatars found in the area having an age below the minimum allowed are automatically ejected, without intervention from the owner or administrators. Once clicking to enable the feature, the owner is asked to provide a specific age – in days – that will be the limit below which avatars will be ejected.
- Max ARC: Avatar Rendering Cost is a point score that defines how each avatar affects the rendering performance of the viewer. Using this specific rule the owner can define a maximum rendering cost for the avatars to have and if this value is exceeded the avatar will be ejected from the area. To enable this feature the owner will have to pick a maximum ARC level among the available ones or submit a custom value.
- Max stay: to enable this feature the owner will have to define a minimum value – in minute – for the avatars to stay in the area scanned by the orb. Once enabled every scanned avatar will be allowed to stay a maximum amount of minutes as specified; if not the avatar will be ejected from the area.
- Group: enabling this feature only the avatars member of a specific group and wearing the corresponding tag will be allowed in the area. Owner will be asked to assign the security system to the desired group using the group tool that can be found under right-click > Edit >General tab. Once selected the right group, clicking on the “Group Mode” button will enable the feature. When the group mode is active clicking on the button again will disable it. Please note: once the MD Security System is deeded, this feature will work ONLY with the group the orb is deeded to.
IMPORTANT: Most of the rules presented are made to work at their best with the ‘Scan&Eject’ mode.
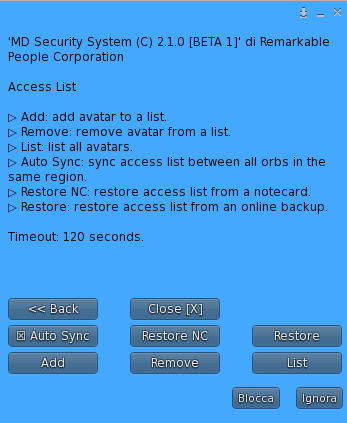
Chapter #6: access list
The access list submenu is the core of MD Security System and allows the owner to define lists of avatars with specific roles and permissions upon the area under control.
The security system’s access list can be divided in two major categories:
- Control list: define who can control the security system;
- Access list: define who is allowed or banned from the security system’s area;
The control list is made on a 3-level structure, where each level is a different role:
- Owner: the highest role, assigned only to one avatar, the security system’s owner; this role has full permissions on the security system;
- Admin: the second-level role after the owner; admin has a complete control on the security system, with some few exceptions.
- In general, one admin can:
- Activate/deactive the security system
- Set security system’s auto action
- Add admin, allowed and banned avatars
- Remove allowed and banned avatars
- List all avatars in access list
- Set security system’s scan time and scan range
- Toggle security system’s visbility, hover text, notifications
- At the same time, one admin can’t:
- Remove other admin from security system’s access list
- Activate/deactive security system’s lock mode
- Restore security system’s access list
- Delete the security system
- In general, one admin can:
- Manager: the third-level role after owner and admin; manager has a limited control on the security system.
- In general, one manager can:
- Add allowed and banned avatars
- Remove allowed and banned avatars
- List all avatars in access list
- At the same time, one manager can’t:
- Activate/deactive the security system
- Set security system’s auto action
- Remove admin from security system’s access list
- Remove other manager from security system’s access list
- Activate/deactive security system’s lock mode
- Restore security system’s access list
- Set security system’s scan time and scan range
- Toggle security system’s visbility, hover text, notifications
- Delete the security system
- In general, one manager can:
Similarly to the control list, the access list is made on a 2-role structure:
- Allow: avatars with allow role can freely enter the area under the security system’s protection.
- Ban: avatars with ban role cannot enter the area under the security system’s protection and they will be immediately ejected out if found.
For each role (admin, manager, allow, ban) a list is kept by the MD Security System: users of each list can be added, removed or listed anytime.
The access list submenu presents 3 main buttons corresponding to the main actions that can be performed:
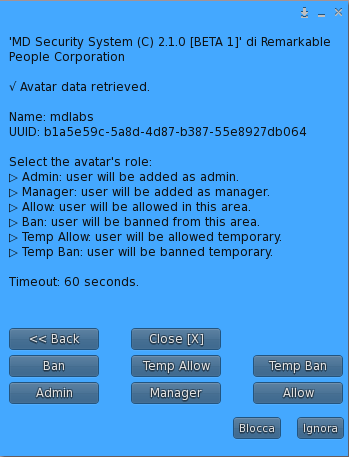
- Add: the user (owner/admin/manager) will be asked to submit the name or key (UUID) of the avatar to add. If the data submitted is correct, the user will be asked to choose a role for the avatar, among the following: admin (this role is present only if the user adding is the owner or an admin), manager, allow, ban, temp allow, temp ban. In case temp allow or temp ban is chosen, the user will be also asked to submit the timeout period (in hours), among 1 and 244. If the process concludes correctly, the selected avatar will be added to the security system’s list corresponding to the chosen role.
- Remove: the user (owner/admin/manager) will be asked to choose a list based on the corresponding role where to remove the avatar from; once the role is chosen, the user will be prompted to a list of all the avatars assigned to the selected role. At this point the user will have to choose the desired avatar to remove from the security system’s list.
- List: list all users present in security system, grouped by role.
Other than role’s lists, the access list menu contains also some additional useful features aimed to enrich and simplify the access lists managing:
- Auto Sync: when this option is enabled all avatars added or removed from any list (admin, allow, ban) will be automatically added or removed from the access lists of all the security systems belonging to the same owner and present in the same region.
- Restore: this feature is made to speed up the orb’s setup by restoring or importing a full access list (including admins, managers, etc) from an existing security system’s backup. The owner will be prompted to a list of all the MD Security System owned and will be asked to choose one to use as source for the restore; the access list of the selected security system (source) will be copied (restored) to the requesting one.
Chapter #7: options
The options submenu contains several specific options and features to customise even more MD Security System and increase the overall experience.
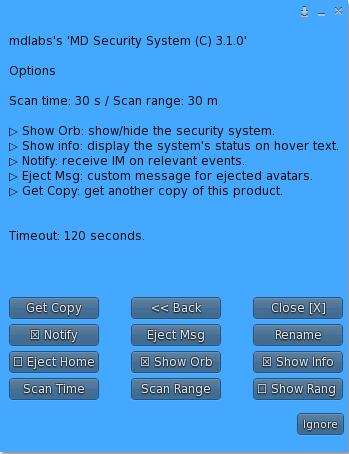
- Scan time: the scan time defines how often the MD Security System will scan the area under protection; by default, the scan time is set to 60 seconds. Using this button the owner can change the scan time to any value between 20 and 300 seconds. ! IMPORTANT: minimum scan time is 20 seconds and it cannot be set to a lower value.
- Scan range: the scan range defines the dimension of the area under protection; by default the scan range is 30 meters. Using this button the owner can change the scan range to any value between 0 and 4096 meters. ! IMPORTANT: Submitting values such as ‘0’ and ‘4096’ will make the security system scan the whole parcel. Please note: since the security system’s scan sensor uses a spherical shape, the effective forward protection distance consist of the radius, which is at max scan range/2.
- Show range: clicking this button will display the security system’s protection area, using a corresponding spherical shape. This feature is useful to check if the chosen scan range covers the desired area.
- Eject home: when this option is enabled banned or unknown avatars will be automatically teleported home when ejected, instead of out the area’s boundaries.
- Show Orb: toggles the security system visibility, switching it from visible to invisible.
- Show Info: toggles the hover text shown above the security system.
- Notify: enables or disables the notification messages sent by the security system to the owner and administrators on relevant events.
- Eject Msg: with this feature, the owner can change the message sent to the avatars on eject with a custom text.
- Rename: this feature allows the owner to rename the security System.
- Get Copy: clicking this button will request for another copy of MD Security System, which will be sent to the owner. Please note: this feature is available only in the copy version of MD Security System, since due to deed reasons the orb itself must have transfer permissions.
Chapter #8: MD Labs online services
MD Labs Online Services is a responsive website, accessible from any platform from mobile devices to desktop computers, which allow to interact with the products released by MD Labs.
Click here for the detailed instructions about how to register and activate your product for MD Labs Online Services.
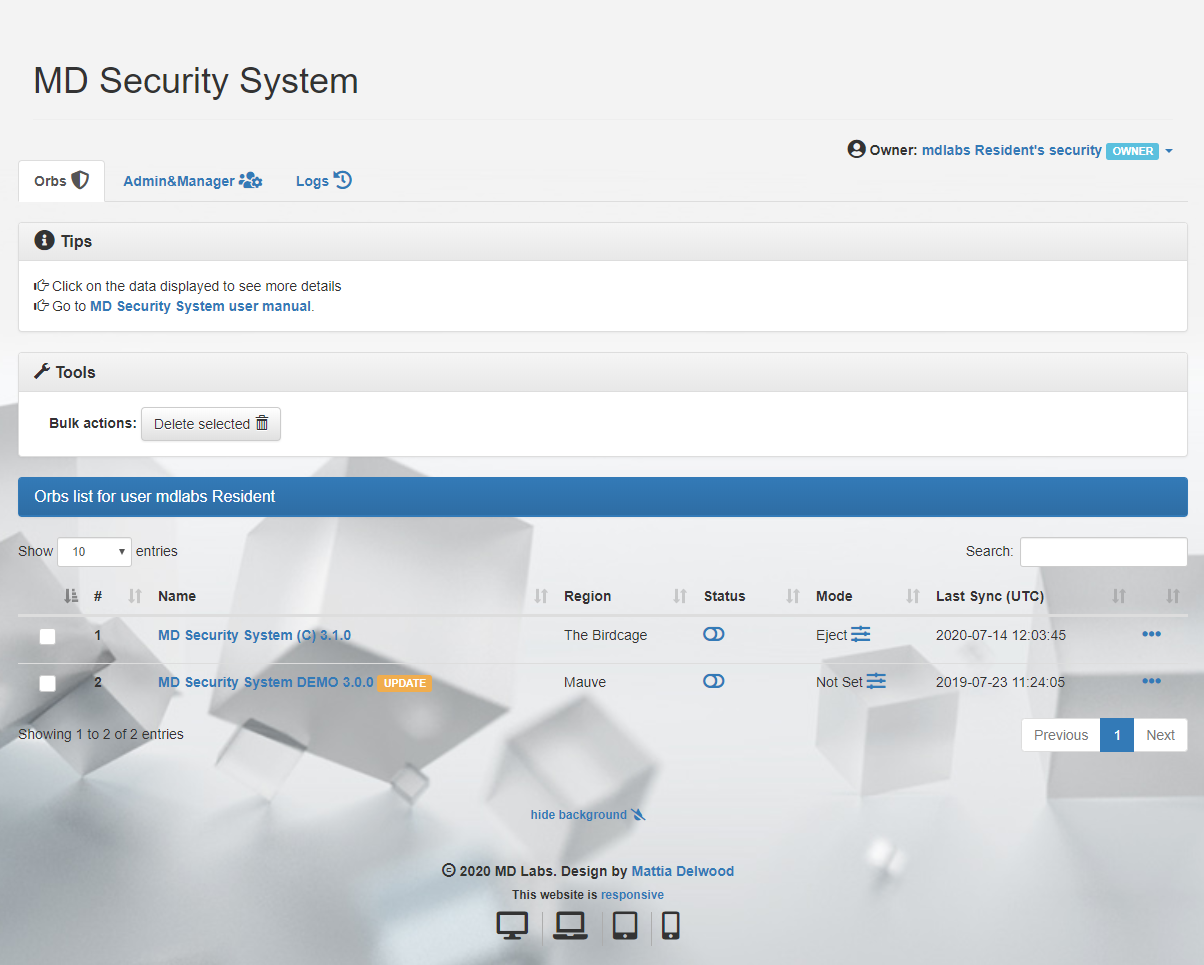
Here’s a quick overview of what the the MD Security System owner will be able to do from the website:
- Have a complete list of all MD Security System rezzed in-world.
- Change the MD Security System protection mode (eject/ban/allow/scan)
- Toggle MD Security System status (on/off) and visibility, rename and delete the security system from in-world.
- View the access list of a specific security system, sorted by role (admin/allow/ban).
- View all the warnings and events logged by each security system.
- Add a specific avatar to the MD Security System’s access list, as admin, allow or banned user, providing the name or uuid.
- Remove a specific avatar from the MD Security System’s access list.
2020 MD Labs